Modern industry offers a membrane to cover the PVC roof, which has ...
|
|
The balcony, although it is not a mandatory element for suburban real estate, but ... |
Most homeowners who plan to repair or arrange flooring, ... |
How to make a glass floor
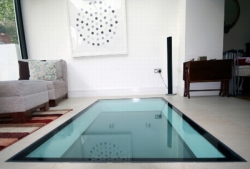
The glass floor today is an exquisite element of design, recently more and more people are decided to make their floor just like that. Glass floors recreate games from unusual colors and shadows, and the overall impression intensifies if you arrange a backlight in such coating. Let's talk with you today how to make a glass floor at home.
Content:
Features of the glass floor
If you want to give your interior originality, then you should pay attention to glass floors. Even replacing a small part of the usual floor on glass is able to radically change its appearance and alleviate the atmosphere in the room, especially if it has a lot of overall furniture. Along with this, the volume of the room increases. In addition, the glass floor also differs in hygienic properties, because bacteria practically do not live on it.

There are several types of glass floors. The main ones are as follows:
- Large glass floorthroughout the room. This is a very bold and expensive solution in floor design. A similar option can be equipped in almost any bathroom, hallway, hall or kitchen. Inside, the floor is filled with any decor that harmonizes with the overall design of the interior of the room.
- Glass tapes. Such tapes are located around the perimeter of the walls on the floor. One of the advantages of such a gender is the ability to distinguish space into functional zones, for example, in the living room or around the pool. They are created, for example, for illuminating mannequins and racks with clothes in expensive boutiques, and in residential premises are part of the decorative lighting system. Paul design with glass ribbons with illumination visually expands the room, especially if it has small sizes.
- Glass niches. A similar design is a recess of a certain shape, which is made on the surface of the floor, filled with decorative elements and then covered with glass slabs. Glass floor windows will give originality to any room, as they allow you to create a floristic composition of dried plants, rose petals and sparkles, a real exhibition of souvenirs, coins or minerals inside the structure, to recreate a dry aquarium or a piece of the beach from sea pebbles or sand.
- Aquarium in the floor. However, the cost of a glass floor with a living aquarium and floating fish rolls over! A popular solution is a combination of glass floor and wooden flooring.
- Glass floors Decorative bridges and stairs. This direction is quite popular in the design of multi -storey buildings for today.
- Glass floor podium. In entertainment centers and residential buildings, it has long been customary to equip a floor of glass in the form of an elevation. This design is located above the usual floor by about 150 millimeters.

DIY glass floor
It is safe to say that the most popular type of glass floor is the window in the floor. In addition, the price of a glass floor allows you to equip it at home with your own hands.
1. Choose the material
First you should worry about glass panels. The flooring is equipped from super -strength glass, which can withstand the load, which is close to 400 kilograms per square meter. For such purposes, the so -called three -layer pie is best suited, the thickness of each layer in it is at least 8 millimeters. The layers are connected using a polymer film or by means of pressing with heating.
In addition, you can use hardened laminated glass, which is covered with a layer of polymer, which contains hollow glass microspheres. Thanks to the spherical form of such particles, the consumption of polymer consumption is reduced. Since the laminated glass is not subjected to cutting, and adjusting the material on the spot is excluded, it is very important when creating the glass floor as accurately as possible remove the measurements of the site.

In addition to the glass panel, for the manufacture of the glass floor, it is necessary to prepare other consumables - a metal profile for installing the frame and a decorative profile for designing joints between neighboring flooring. At the same time, try to choose such a profile that is able to close the weapons fastening places and areas of connection of the LED tape.
To design the niche space, you also need to choose a finishing material. You can give preference to laminate, wood or ceramic tiles. It is immediately necessary to worry about the methodology for attaching the interior decoration. For example, if you have chosen tiles, you should buy a grout for the seams and the finished glue. You will also be useful to silicone sealant and sealing elements, screwdrivers and a grinder, screws and bolts, spatulas (rubber and toothed) and a grinding machine.
2. Determine the type of base
The main element of the entire design of the glass floor is the base that is responsible for the reliability of the coating. The base for the floor can be reinforced concrete, steel or wooden. But in any case, do not forget that the base surface should be even and durable. It is advisable to carry out work on preparing the base until the final installation of the flooring.

First of all, you should decide which you will make a glass podium or a glass niche, as in the photo of the glass floors. In the first case, the base will have to be raised 20 centimeters from the floor level, in the second, make a recess in the floor at a distance of 15 centimeters. You can equip the base of any geometric shape. However, if you first take up such a job, it is recommended to make a square or rectangular hole in order to make less errors.
3. equip a metal frame
After the recess is made, a metal frame must be placed around the perimeter of the glass window, which is customary to make from high -strength structural or stainless steel. Anchor bolts, which are used in the design, are made of steel and covered with special anti -corrosion spraying on top, with the presence of reinforcement for tearing.
The fasteners should be very reliable, since the glass thickness can reach 25 millimeters, and one glass panel can weigh 150 kilograms close. The dimensions and shape of the frame should coincide completely with the dimensions of the base for the glass floor. It should be located below the floor level by the size, which is equal to the thickness of the seal and glass.
Pieces of a metal profile are connected using screws, and bolts are attached to the base. An important condition is that the metal frame should be installed reliably on the base in order to avoid possible deformations of the glass floor.
If you plan to equip the floor with illumination, then do not forget to do at the base of the floor to the strob to withdraw wires, which go from backlight to the nearest distributor or switch. Then fix the backlight. If you use the LED tape, you can simply glue it from below on a bilateral tape on the protruding part of the metal frame.
4. Generate the base with tiles
After installing the frame, you can proceed to the cladding of the base with ceramic tiles. The color of the tiles is recommended to be selected in accordance with the general color scheme of the interior. If you are not an adherent of traditional style solutions, then you can experiment with an unusual color. For tile facing, an adhesive mixture is used, which is applied using a spatula on the base and back of the product with a thin layer. To give the tile the necessary dimensions, it is necessary to walk along it with a grinding machine.

After laying ceramic tiles, it is necessary to process all the seams with a composition for their grout, and bend the excess of the mixture with a spatula. After the end of the finished base, leave until completely dry for about 2-3 days. The final stage of work with facing tiles is its cleaning. To do this, take a small piece of fabric and remove with its help the remnants of the glue and grout mixtures, as well as dust and construction waste.
5. Decorate a glass window
After that, you can proceed to decorating the base. You can use small pebbles, sand, shells, dry flowers, coins, beads, sparkles, flower petals, depending on the final result of your creativity. Lay out the beautifully selected decor inside the glass window.

You can also apply any image or ceramic paint on glass using a stencil. It is possible to tone glass under the mirror or arrange a glass floor in an apartment with a hoarfrost effect. And a special film, which is customary to lay between the sheets of glass, will help to give the floor any color.
6. Mount the glass floor backlight
The glass floor cannot be represented without filling it with light. Remember that not all lamps are suitable for backlighting, halogen bulbs should not be used, because they can greatly heat the glass. As a lighting source, you can use fluorescent lamps and neon tubes, spotlights and a luminous cord. If you arranged the glass floor on the entire room, then under it you can light spotlights.
To add light sources, decide in which order you will place them. The choice of colors without restrictions, at your discretion. The lamps can be arbitrarily placed in order to select individual decorative elements, and around the perimeter.

Among all types of lighting, the most preferable is the backlight of neon lamps. Neon light is always soft, even, without visible shadows. In addition, the use of this type of backlight will allow you to give a variety of geometric shapes to the glass floor, since neon tubes can be mounted even in hard -to -reach places.
Modern technologies allow you to turn on the backlight automatically with the onset of darkness using a special electronic unit, change its color and intensity. The solution of light music is also available - you can recreate in the interior using the speed of blinking and a certain coloring of the backlighting the corresponding atmosphere from romance to disco.
7. We fasten glass panels
Upon completion of the decorative part of the work, you can begin directly to the installation of the glass floor. Glass panels are installed on the sealing element, which is attached to the metal frame. Remember that glass should in no case contact with metal elements and fasteners. In order for the panels on the metal frame to be held as reliably as possible, a thin layer of sealant should be applied to their back.
Do not forget to fix the structure with steel bolts, and process the seams between the panels with a sealant. After that, a decorative profile is attached, it is also laid on the seal, which eliminates the contact of the finishing frame with a glass surface.

When arranging a glass floor with your own hands, you should remember that such a sex also has its drawbacks. On the coating, even with neat circulation, can appear with time of all kinds of scratches and scuffs. To prevent this from happening, it is recommended to use high -quality glass panels, the upper layer of which is made of hardened glass. In addition, the glass floor is quite slippery. The smoothness of the floor in this case will help reduce sandblasting strips and linear ornaments.
![]()
StrPort construction portal 2011-2018. Articles about repair, construction, building materials.
Copying information from the site is possible only with permission of the editorial office Or indicating a direct link to the source. Legal justification