Sooner or later, the question arises of the need to dismantle the old double -glazed window. By...
|
|
Modern architecture and design capabilities allow you to equip at home and ... |
For a decorative and protective coating of a wooden door, there is a large ... |
How to make a concrete screed with your own hands
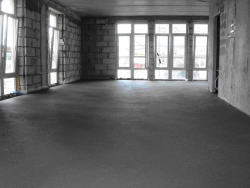
The concrete floor screed is the most common base in apartments and private houses for various flooring. Such popularity is due to simplicity of arrangement, reliability and durability. In addition, the concrete screed, due to its physical qualities, allows you to eliminate the irregularities and defects of the floor, making it almost perfectly even. It is on how even and reliable foundation that the strength and durability of the finish flooring was created will depend.
Content:
- What is a screed
- Types of concrete screed
- Types of concrete screed
- How to make a concrete screed with your own hands
The creation of a concrete screed is quite simple, which can be done without having many years of experience in construction. But without a certain understanding of the process, knowledge about the installation of a concrete screed, its types, stages of work, the tool used and the materials used, it will not work.
What is a screed
At its core, the screed is the basis for the finish flooring, which can be performed in various ways. It is usually made of concrete and is the upper part of the floor base, in the role of which a concrete inter -story floor or multilayer floor pie on the ground can act. The installation of a concrete screed pursues several main goals. Firstly, create a flat surface under the finish flooring. Secondly, create a reliable base for uniform distribution of loads. Thirdly, provide additional strength for the entire floor design.

The concrete screed belongs to the wet type of screed, since when it is created, a liquid solution is used. As materials for a concrete screed, a cement-sand mixture, cellular concrete, and special leveling dry mixtures are used. The choice of one or another material depends on the future flooring, but it should be noted that when creating a floor or a major overhaul, it is necessary to perform a full-fledged screed using cement-sand mortar or cellular concrete. The first is somewhat preferable when creating a screed with your own hands, as it does not require special knowledge and specialized equipment for its production. If a cosmetic flooring is carried out with the replacement of the flooring, then a simple alignment of the surface is required, and a self -leveling mixture can be used for screed.
Types of concrete screed
A concrete screed is a continuous surface and can be associated, as well as with a separating or insulating layer. Each of these styling options has its own positive and negative sides.
Related concrete screed
The laying of a concrete screed of a associated type is carried out by filling the mixture directly on the base, treated with a special primer of deep penetration. Such a screed will have the best clutch with the base and can withstand increased loads.
Dividing layer

The concrete screed on the separation layer implies that at first waterproofing materials were laid on the base and only then the screed. The waterproofing of the concrete screed is created using coating, roller or paint materials. The thickness of the concrete screed in this case should be at least 30 mm to ensure strength. The screed with a separation layer has good waterproofing properties, but slightly reduced strength indicators.
Screed with an insulating layer

Laying a concrete screed with an insulating layer is used in the case when it is necessary to create a floor with high insulating indicators. For example, when a concrete screed of a warm floor is performed, the insulating layer serves to preserve and reflect the heat into the room. Insulation of concrete screed under the warm floor is mandatory. Such a screed is also called floating, its advantages are high heat, hydro- and soundproofing properties. But, unfortunately, the floating screed has a low strength threshold and can collapse under the influence of high mechanical loads.
Types of concrete screed
As noted above, laying a concrete screed is performed in order to create a strong and reliable base and strengthen the entire floor structure. Therefore, to give the strength of the concrete screed, reinforcement is used using a metal mesh or fiber -fiber.
Concrete screed with a reinforcing net

The concrete reinforced screed, which is based on the reinforcing mesh, is the most common. To create such a screed, a metal mesh with cells of 40 50 mm is used, which is laid on low supports over the entire area of \u200b\u200bthe floor. The presence of a grid in concrete gives the screed additional strength and reliability. But there are a number of disadvantages. Firstly, the grid cannot prevent the formation of cracks in the screed during shrinkage. Secondly, the metal tends to oxidize and eventually collapse under the influence of corrosion, which entails the stratification of the screed and a decrease in its operational characteristics. Of course, the use of a metal mesh has a number of undeniable advantages, and besides, the metal corrosion is quite long, so the mesh continues to be used successfully when creating a concrete screed.
Concrete screed with fiber
The desire to improve the operational characteristics of the concrete screed and reduce the costs of its styling led to the emergence of new materials, in particular fiber fiber. This construction component is added to the concrete screed instead of the usual metal mesh. Fibrous is the finest synthetic fiber of the microfiber, which is obtained by extrusion and structural modification from the polymer granules. In addition to the reinforcing effect, the fiber -fiber makes the concrete mixture more plastic, thereby increasing its resistance to the formation of cracks. Another positive moment in the use of fiber fiber for a concrete screed of the floor price. So in comparison with a metal grid, the cost of which is from 1.65 cu For M2, the cost of fiber is much lower and is 0.26 cu 1 m2 of a stored screed. Of the shortcomings, one can note the need to use a strictly defined amount of fiber -fiber and the implementation of the corresponding calculations for this. If you make an error in the calculations, the concrete will crumble.
How to make a concrete screed with your own hands
Before pouring a concrete screed, it is necessary to perform a number of preparatory work, get a tool and materials. From the tool you will need:
- two 2 meter rules, one with a level and one ordinary metal for tightening the solution;
- two levels (first laser or water, second ordinary stamped alcohol level);
- powerful drill or punch;
- roulette;
- sutual shovel.
Of the materials, the following will be required:
- a primer of penetrating action;
- primer to increase adhesion;
- waterproofing materials (mastic, polyethylene film or membrane);
- thermal insulation materials, if it is planned to lay a warm floor;
- sand -concrete dry mixture;
- directs and fasteners for them (you can use a perforated corner and screws with dowels).
So, after acquiring everything necessary, you can start creating a concrete screed, and the first thing to do is prepare the base and clean it of construction waste and dust. To do this, you can use an industrial vacuum cleaner. But if there is no way to rent such a vacuum cleaner, you will have to do with an ordinary broom. In this case, the surface should be slightly moistened to raise less dust.
Zero -level marking
We take a water or laser level and apply marking to the zero point for screed around the entire perimeter of the room.

If the laser level is used, then there will be no particular difficulties. Just set the laser level in the middle of the room and, focusing on the beam, apply marks.
But in order to make marking the grandfather’s way using a water level, you will have to work a little. To do this, apply a mark to an arbitrary wall at a height of 150 cm. We apply a transparent tube of water level near this mark, and apply the second end on the opposite wall, while moving the second end up or down, make sure that the water level in the first coincides with base mark. We do this operation with all the walls, leaving two marks on each. To connect them in one line, you can use the usual beaten painting cord. We pull it between the two marks, and then, pulling a little from the wall, release and get a clear straight line. After that, we take the roulette and find the highest and lowest points from the resulting line to the base.
Now it is necessary to apply a zero level for screed. The simplest option would be to measure the height from the base to the threshold of the neighboring room and take away the thickness of the future flooring. For example, the height from the base to the threshold of 7 cm, it is planned to lay floor tiles on glue, the total thickness of the tile and glue 2 cm. As a result, we get the thickness of the screed of 5 cm, which we take away from the previously planned 150 cm. After that, we mark from the previously applied to the walls Lines 145 cm and repeat the procedure with a painting cord.
Installation of guides beacons

Having created a zero level, we proceed to the installation of guides. To do this, lay out from one wall to another corner, they must lie strictly parallel to each other at a distance of 150 cm. If necessary, they can be cut along the length. After that, we plan the laying place with a pencil and put on this line several holes under the screws with dowels. We shallowly screw the screws and put the guide corners on them. We check the horizontal and coincidence of the upper point of the guides with a zero mark; for these purposes, a two -meter rule and an alcohol level are perfect. If necessary, twist the screw until we get the perfect coincidence with the zero level of the screed. To fix the guides, we use a thick cement-sand mortar and let it gain a little footage.
Applying insulating materials and primers

Having prepared the markings and guides, you can proceed to priming, waterproofing or thermal insulation of the surface. If necessary, you can strengthen the screed with reinforcement. This will depend on what type of concrete screed will have to be done. As an example, we consider the easiest connected screed.
So, we apply a primer of deep penetration and let it dry. Then we smear all the joints and corners of the waterproofing mastic and also let it dry. To obtain better adhesion, we smear the entire area of \u200b\u200bthe floor with an adhesive primer and let it dry. If necessary, lay the reinforcing mesh. Only after that can you start filling with concrete.
Pour concrete screed
We knead the solution in the trough or any other large container. To accelerate and facilitate the knead, we use a punch with a mixer nozzle. We pour the dry mixture into the container, add a little water and knead to a state of thick sour cream.

Then we lay out the solution and tighten it with a metal rule according to the guides. It is most convenient to start making a screed with the opposite of the room of the corner of the room.
As soon as the screed is ready, we leave it to dry. This can take from 14 to 20 days, depending on the speed of evaporation of moisture. But after a few days, when the solution froze, and you can walk along it, scatter the sawdust over the entire surface and moisten them a little. This is necessary so that the screed does not crack, but gradually reaches a state of readiness. After a few days, remove the sawdust and let the screed completely dry.
It is necessary to do all the work in one entry without leaving anything tomorrow. The process of creating the screed itself is quite painstaking and long, but subject to technology you can create a really durable and reliable concrete base with your own hands.
![]()
StrPort construction portal 2011-2018. Articles about repair, construction, building materials.
Copying information from the site is possible only with permission of the editorial office Or indicating a direct link to the source. Legal justification
Currently underway
The construction of our country house is currently underway. The area is not small, almost 370kvm, the entire building material is supplied by the HTTP: // Republic. RF/P. Deliveries are carried out in parties. You do not have to call and remind you that their managers themselves call and clarify that, for example, tomorrow they supply such materials. The service here is at the level, it was not in vain recommended. I plan to buy finishing and repair materials right there.