Each owner of a wooden house sooner or later is faced with the need to replace ...

|
|
Have you conceived the repair? To keep up with the times, you need to know not only for a long time ... |
Protection of the basement from the water is one of the main tasks in its construction. She is... |
Installation of roller shutters: step -by -step instructions

Rogstavni is a modern solution in the field of ensuring the safety of commercial real estate, country housing and apartments. Installation of role -playing systems is carried out in shop windows, garage gates, door and window openings.
Consider the purpose and design of the protective blinds, as well as give step -by -step instructions for installing roller stories on the windows.
- The purpose of the roller shutters and the advantages of their application
- Types of roller shutters
- The constituent elements of roller shutters
- Methods of installation of roller deer
- The choice of fasteners
- DIY roller installation
- Basic requirements for the installation of roller
- Roolest system maintenance
The purpose of the roller shutters and the advantages of their application
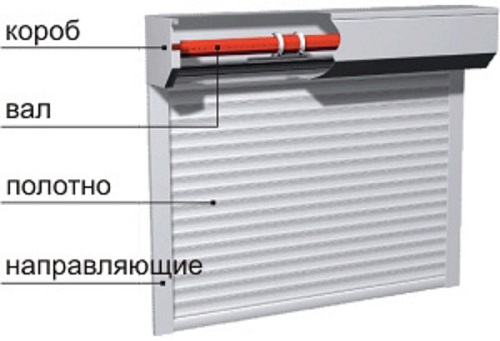
Rogstavni is an improved prototype of ordinary shutters. The role -playing system is a metal canvas, which, when opening/closing, slides along the side guides. At full opening, blinds are curled up in the box installed above the window opening.

Modern roller shutters simultaneously perform several functions:
- Protection from vandalism. Thanks to the improvement of models, such designs can be monolithic and reliably protect property. To hack the roller shutters, the use of metal -cutting tools, the use of which will create noise. To increase the safety of the house on the rolls, you can set the alarm.
- Improving the sound insulation of housing. This property is especially relevant for houses located near the roadway. Rollets in a closed state reduce the noise level by 12-15 dB.
- Regulation of the illumination of the room. Rogstavni can be partially opened by configuring the optimal amount of light. In addition, there are models in which the illumination is regulated by the direction of lamellas on the canvas.
- Additional thermal insulation. The use of role -playing systems with lamps filled with insulation allows you to reduce heat loss in the cold season by 20%.
- Decorative design of the facade. Rolelings canvas are produced in a wide range. You can make lamellas with the image of flowers, trees and another pattern that complements the exterior of the house.
Types of roller shutters
The main criterion for choosing role -playing systems is the material manufacturing. It is this parameter that determines the strength and reliability of the roller shutters. According to the degree of protection, facade blinds are divided into eight hacking classes:

- P1-R2 plumbing (classic) roller shutters primarily serve as protection from wind, dust and noise. Such models do not protect from hacking and penetration. Usually these are roeled roller rolling systems.
- P3-R5 steel or extruded profiles provide sufficient protection against vandalism. Window grilles and gates are often made from the same material.
- P6-R8 high degree of protection. Usually these are bulletproof and armored roeled systems.
By the method of control of the roller shutters are manual and automatic.
Hand roeles Open/closed directly by hand or using a mechanical handle. Similar systems are equipped with an external lock to block roller steers. Position automatic roller ones It is regulated by pressing the button from the keyener or on the control unit.
Roller cloths are most often made of aluminum or steel lamellas. Each of the materials has its own advantages and disadvantages.
Steel Roltavni They are distinguished by high noise pounding and thermal insulation. The inner emptiness of steel lamelles is filled with polyurethane foam.

The disadvantages of steel circles can be attributed:
- a large weight of the structure creates an additional load on the control system (only automation is used);
- the susceptibility of steel lamps to corrosion (when using anti -corrosion impregnations, this drawback was possible to almost completely exclude).
Aluminum constructions They have excellent decorative qualities and are easy to manage. In addition, such roller shutters are able to protect the room from noise, dust, sun and hacking. An additional advantage of aluminum anti -icing circles is a small specific gravity.
Roller shutters: photo examples of execution
The constituent elements of roller shutters
Before installing the protective canvas on the windows, it is necessary to understand what elements the roller -start consists of. The design of the system is quite simple:
- The canvas is the main part of the circles, consisting of the lamelons of the same width and length interconnected by each other.
- The guide of the profile ensures uniform movement of the planks of the canvas.
- The control mechanism is placed in the box and can consist of various elements (control panel, handles, etc.).
- Locking lock system.
A simple roller scheme allows you to perform the installation of the design on their own.
Methods of installation of roller deer
Installation of roller shutters is performed in different ways.
External installation (invoice)- the most common and simple method of attaching roller shutters. It does not require the manufacture of a niche for a box. The box with the canvas is installed above the opening, directing the rails from the side of it.

Features of overhead installation:
- it is used to arrange already built buildings with installed windows;
- the method is suitable for installing different types of drives;
- roller shutters do not block the light opening;
- the box protrudes behind the plane of the facade.
The overhead role system is more expensive than built -in. The difference in price is 2000-3000 rubles
Built -in installation The guides and the box are mounted directly in the window opening (on internal slopes).

This method has its own characteristics:
- suitable for large windows, since with this installation scheme the back of the box and the guides partially overlap the light opening;
- with a built -in installation, an electric drive is usually used, since the shaft output falls on the glass;
- built -in installation is most resistant to hacking.
Combined installationit requires the arrangement of a special recess at the top of the window opening, which must be provided at the stage of building a building or during the reconstruction of the house. With combined installation, variability in fixing the box and guides is allowed.
The choice of fasteners
Before starting to install roller shutters, you must choose the correctness:
- if the window opening consists of natural stone, monolithic brick or concrete, then the optimal fastener is plastic dowels with a nail screw or entered with a screw; As an option, you can use spacer steel anchors; mounting depth of at least 3 cm;
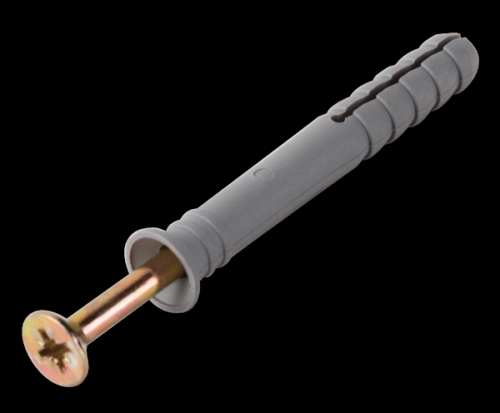
- when installing roller shutters on a window opening made of material with internal voids, it is better to use spacer surroundings made of steel; the depth of the survey is at least 6.5 cm;
- fasteners for metal structures, self-tapping screws;
- installation in a wooden opening through streaming hairpins or screws;
- rolescence control elements are attached with nail screws or plastic dowels with screws.

DIY roller installation
Preparatory work
Before installing the roller, the following preparatory measures are performed:
- Check the evenness of the window opening. To do this, using a tape measure, you need to measure the diagonals of the windows and compare them with each other. The difference between the size of the diagonals should not be more than 5 mm. If these irregularities are neglected, then subsequently this will lead to not tightness and not sufficient safety of roller -vanities. The dimensions of the diagonals must be leveled.
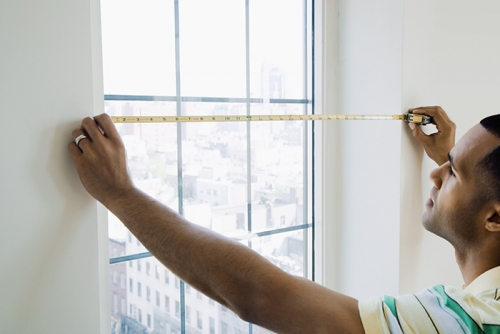
- The construction level check the horizontality of the upper/lower slopes. With the help of plumb line, control the verticality of the side sides of the window opening. The permissible deviation of 1.5 mm for each linear meter.
- Remove irregularities, chips and cracks on the slopes. The finish can be performed by plaster or installed special overlays. The use of additional devices affect the appearance of the facade of the building and increase the cost of installation work.

Tools and materials
The following devices will be needed to perform the independent installation of roller shutters:
- drill;
- punch;
- a set of drill and concrete drill;
- cloth pistol;
- scorching;
- scissors for metal, pliers or nippers;
- set of wrenches;
- screwdrivers;
- roulette and construction level;
- a hammer;
- marker;
- to perform work at an altitude of more than 1.5 meters staircase:
- indicator screwdriver, multimer for connecting the drive;
- installation pistol and sealant for sealing the joints of walls and guides.

Before installation, you need to check the kit for the presence of all elements and the absence of defects
Assembly and installation of the box
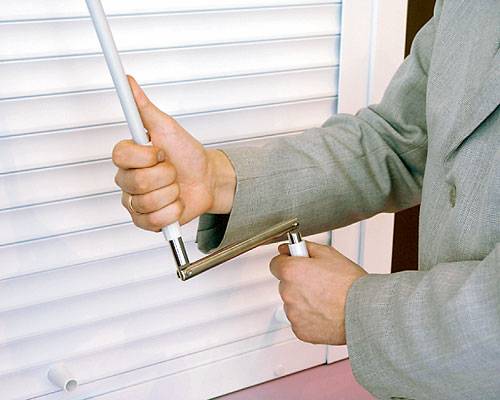
We will analyze step by step how to set the roller shutters in the overhead way.
- Preparation of the side guides:
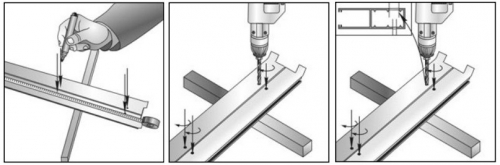
- put the guides in pairs and marker mark the markings under the holes under the holes; the step between the holes is 40-50 cm, the first mark at a distance of 10 cm from the cutting of the guide tire;
- drill a through hole with a diameter of 8 mm;
- on the upper side of the guide diameter of the holes, make 11.8 mm (it is necessary for the subsequent installation of a decorative plug).
- Preparation of the box for installation:

- attach the lid to the box;
- drink through 2 holes on each side (diameter 4.2 mm); The holes will be needed to install rivets when the installation of the roller shutters is completed;
- determine the location of the holes for fixing the box (for external installation from the back of the box, for the built -in from above);
- make markings and drill holes with a diameter of 8 mm;
- drill one hole for placement of the drive;
- combine guide tires with the box.
- Marking for fasteners:
- the frame from the roller shutters attach to the opening (all elements of the system should be on the wall);
- check the horizontal box and the verticality of the guides, compare the length of the diagonals (permissible deviation of 2 mm);
- mark the holes from the guides/boxes that are drilled earlier to the wall.
- Drilling holes for fasteners:
- remove the frame from the wall;
- lay the holes by marking;
- install dowels in the wall;
- drill a hole for the drive (diameter of 12-20 mm, depends on the model of roller shutters);
- place a protective spring in the hole;
- if necessary, in the lower part of the guide make holes for the installation of locking elements.
- Roalh system frame fastening:

- from the back panel of the frame, remove the protective film;
- the assembled frame is brought to the installation site;
- compare the marking of holes;
- using a screwdriver and screws, fix the frame.
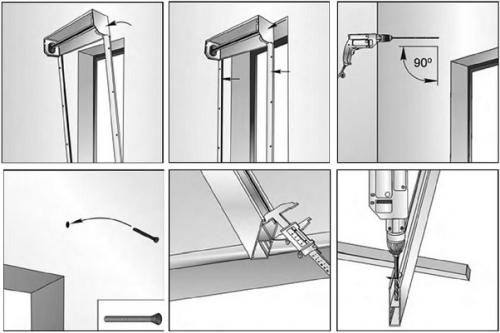
- Installation of the control system:
- from the inside of the room on the wall, apply marking;
- drill holes;
- fix the ribbon and guides.


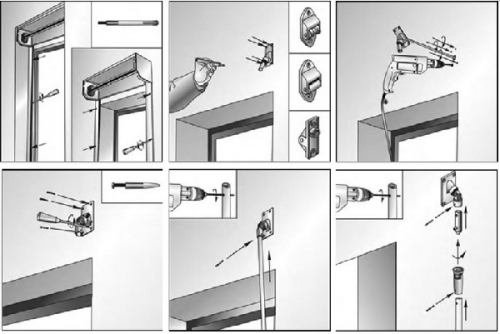
Installation of the canvas
- On the upper shaft, set the distance rings (the distance between the rings is 40-50 cm).
- On both sides of the final profile of the canvas, set the crossbars.
- Wrap the canvas from the upper side of the shaft and bring it into the guide tires.
- Set the traction springs from the upper edge of the canvas and fix them into the perforated shaft holes.

After the installation of a role -playing canvas, it is necessary to close the assembled box, peel off the film on the front side of the roller, install the plugs and treat them with silicone sealant.
Roalh system drive connection
The final stage of installation of a role -playing system Connect automatic control of the canvas. When performing this work, a number of rules must be observed:

- all parts of the connection of the electric circuit must be placed in distribution boxes;
- when calculating the minimum section of the wire, it is necessary to take into account the power of all drives;
- to connect automation, a wire with a cross section of 0.75 mm2 or more is suitable;
- you can not use wires with a plastic membrane;
- for each group of the electric motor, a separate cable must be used.
Roller installation sequence: video
General requirements for the installation of roller
The appearance and functionality of the design as a whole are largely determined by the quality of installation work. When installing, it is necessary to control the fulfillment of the following requirements:

- the box is mounted horizontally;
- the box in relation to the guides is located strictly at an angle of 90;
- the bend of guide tires or boxes on the relief of the wall is unacceptable;
- the end profile is best placed on the most even and horizontal surface.
Roolest system maintenance
To maintain roller stanim in good condition, guide tires and canvas must be periodically cleaned of dust, dirt, snow, ice and foreign objects (branches, leaves, small stones, etc.).
Important! When icing roller shutters, before putting them into work, it is necessary to carefully cleanse the canvas from the ice with your hand from the inner and outer side of the lamellas
You can remove dust and dirt from the canvas with a soft cloth moistened in soapy solution. It is recommended that a technical inspection of the design with the participation of specialists of the supplier company is recommended.

![]()
StrPort construction portal 2011-2018. Articles about repair, construction, building materials.
Copying information from the site is possible only with permission of the editorial office Or indicating a direct link to the source. Legal justification
Here I am fabric rolles myself
So I myself have tissue nikoss roofs on the windows and was tired. And I would have to persuade the manager and ordered the roller.