For the interior doors, Eco -rospon is the best replacement for heavier and more expensive ...

|
|
The dismantling of the brick wall implies a complete or partial demolition of the reference point ... |
Linoleum is one of the most popular finishing materials. The scope of its application is not ... |
How to install cornices for curtains?
So the repair and finishing work was left behind. The choice of curtains and cornices according to your idea has been implemented. The next stage is the installation of cornices for curtains. Their purpose is not reduced only to the practical function. In the design of a modern apartment or cottage, the cornice should be considered primarily as an addition to the interior. An experienced home master any task on the shoulder be it, whether it is the installation of a string cornice or a lifting mechanism for Roman curtains. But beginners, nevertheless, are recommended to start with the installation of round cornices, the configuration of which includes all the necessary fasteners.
Depending on what materials are made of, cornices can be metal, plastic or wooden. By type of design, they are divided into single -row (only curtains or only tulle), two -row (both curtains, and tulle) and three -row (curtains, tulle and lambrequin). Of course, the installation of multi -row structures will require more experience and dexterity, but it gives more space to create extraordinary volumetric compositions.
- Installation of cornices for curtains
- Installation of round cornices
- Installation of a rail cornice
- Installation of a profile cornice
- Installation of a string cornice
- Installation of a baguette cornice
- Installation of the cornice on drywall
- Installation of the cornice in the cavity of the stretch ceiling
Installation of cornices for curtains
When installing an inexperienced master, the question can be affected: how to make a cornice for curtains reliable. It must be remembered that the more complicated the construction of the cornice, the greater its weight. This means that the surface should be the surface on which the installation will be performed. Otherwise, the probability of collapse of the structure increases. Therefore, sometimes you have to sacrifice an aesthetic aspect in favor of the safety of relatives and friends and choose a lighter design.
To make heavy curtains more reliable, you can add a small amount of epoxy resin to the hole prepared for self -tapping screws and insert fasteners. The installation of the cornice continues after the resin dries completely.
The following tools and materials will help to accelerate the process of installing the cornice:
- ladder;
- punch;
- screwdriver;
- pencil and roulette;
- dowel with self -tapping screws;
- construction level (level).
Before starting installation, you need to make sure that the cornice does not stop opening the window. Another important point so that the curtain does not lie on the windowsill, the brackets should exceed its protruding part in length. It is necessary to take into account the dimensions of the heating pipe if it passes along the wall at the location of the cornice.
![]()

When marking under the bracket with a tape measure and level, pay attention to the distance along the edges of the window opening. It should be the same, with the exception of the case when the installation of the cornice is carried out along the entire wall.
Typically, the installation of a wooden or plastic cornice bracket is carried out by one self -tapping screw and dowel, and a metallic three.
First you need to drill holes for the dowel and install it there. Then the bracket is attached with self -tapping screws. Before the second bracket is fixed, check the distance again. After docking with the bar, you should check the reliability of the connection.
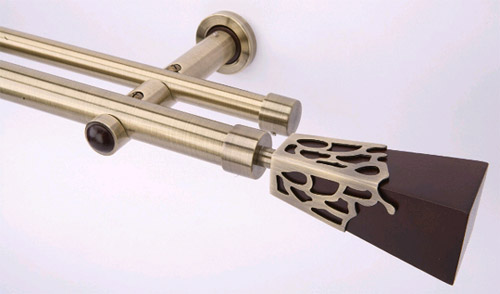
Rings on the bar are dressed in advance. Fixation of the rods is carried out so that on each side behind the bracket (in front of the tip) there remains one ring. It is much more convenient to first put hooks on the curtain, and only then fix it on the rings.
On each edge of the bar, you can wear decorative fllerons. A variety of decor elements along the edges of the bar will not let the last ring with the curtain slip.
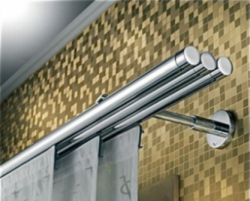
Installation of round cornices
Even if you do not have the experience of installing cornices, do not be afraid to try to fulfill it with your own hands. Many salons for the sale of curtains and even builders are provided with a service such as installing cornices for curtains (the price depends on the length and model of the cornice).
When buying a cornice, check the presence of fasteners. Sometimes the standard fastener is best replaced with a more suitable one. For installation in loose walls, you will need screws and dowels 5*80.

If the length of the round cornice exceeds 2 m, then the third additional bracket for fixation in the center cannot be dispensed with. In this case, it is reasonable to opt for a design with open brackets, where the bar with rings simply spreads into a small recess. Then it will not be necessary to remove the cornice from the wall every time.
During the installation of the ceiling cornice, make sure that the curtain protrudes slightly beyond the edge of the window sill and heating batteries.
To make the folds of the curtains even, use a special tape for edging the upper edge, equipped with cords for assembly, tighten the curtain, adjusting the size of the folds, and only after that they put the rings every 10 cm.
Installation of a rail cornice

You can install a rail target cornice both to the wall and the ceiling. The flexibility of the structure allows you to install such cornices on bay and other non -standard window openings. Rail cornices are delivered in a set with screws, brackets, limiters that prevent the slipping of runners and rings, rollers and hooks.
The most latter of the lineup of the rail cornices are equipped with a mechanism for overwhelming the runners, which allows you to close the overlap if necessary. Such a cornice looks less massive and fits well into the interior. But, unfortunately, this mount is only suitable for curtains from light fabric.
Installation of a rail cornice also begins with markings. When installing the cornice on the wall of the edge of the brackets, it is placed above the window opening by 5-7 cm. During ceiling installation, the distance from the wall depends on the layout, as well as the size of the heating radiators and should be at least 10 cm.
In the process of installing a rail cornice above the bay window, the marking using a roulette is somewhat difficult. Everything needs to be thoroughly measured. Therefore, in order to determine the location of fasteners, it is better to use the leveling level.

In addition to the extreme points of the rail location, it is also necessary to note the installation location of the brackets. To do this, apply marks on equalized segments (approximately 25 cm) along the entire length. In the marked places you will need to drill along the hole, and then, using the screws included in the kit, thoroughly screw the bracket.
Now it is necessary to attach the rail to the front side of each bracket. At the final stage of the installation, you need to tighten the adjusting screws located on brackets throughout the rail. Only then limiters are installed.
Installation of a profile cornice
Profile cornices are more often installed on the ceiling. Although, installation can be carried out on the wall. The color can be any of the golden to the shade of the dark tree. If you choose the cornice to match the ceiling, it will be practically not visible. Profile cornices can be equipped with a mechanical drive, which is especially important if the large length of the curtains does not allow you to open the window manually. In expensive models, elements for fastening curtains located inside the profile are covered with Teflon. This design improves sliding rings along the recesses at the base.
The installation of a profile cornice is carried out in the same sequence as the rail and in the same way - on self -tapping screws with dowels. The curtains are attached to the base for Velcro or ring.
Installation of a string cornice

As the basis for fastening of curtains of such a cornice is a string of steel or polymer thin cable. This type of cornice is not suitable for hanging tapestry and other heavy curtains. The cable, of course, is able to withstand such loads, but pulling it so strongly that there is no sagging in the center, in this case it will be difficult.
String cornices are more often located on the ceiling. They can be one- or multi-row.
The factory packaging contains everything you need for installation: two boxes with a stretch mechanism, strings, clamps or hooks, as well as dowels and screws.
The dowels are clogged in the holes in the ceiling, and then the mounts are screwed. The string is threaded in fastening and fixed with a tension device. After that, the design is closed with plastic boxes. Then, the upper edge of the curtains is collected with clamps.
Installation of a baguette cornice

This device is a ceiling hollow tire connected to a baguette bar made of wood or polymers with sidewalls. Self -tapping screws, dowels, traffic jams (used in order to mask holes for screws) and fabric hooks are also included in the kit.
First, it is necessary to assemble the design according to the manufacturer’s scheme: connect the barget and the tire bar. The inserts in the shape of corners are attached to the sidewalls, and then the base is attached.
In pre -marked places, the holes under the dowels are made. The structure is attached to the wall with brackets, and the cornice itself is screwed to the ceiling with the upper plane. Sometimes the baguette cornice is attached only to the wall.
After installing the base of the cornice, you can proceed to the fasteners of draperies. The lambrequin is fixed to the facade of the cornice with a special adhesive tape sewn to the fabric. The curtains are collected with a curtain ribbon in folds, dressed on hooks with rollers. The videos are found in the holes of the tire, after which the sidewalls are closed with special stoppers.
Installation of the cornice on drywall

Installing the cornice on drywall involves the same set of work. Only a nuance. In order for the cornice (any) to be fixed firmly, special dowels are used for drywall butterfly or dowel-molly with a characteristic ability to straighten the side planes, thereby contributing to a more reliable fastening of the product. It is worth considering that even this type of dowel can withstand the loads of no more than 5 kg with a ceiling and a maximum of 8 kg during wall installation.
Installation of the cornice in the cavity of the stretch ceiling
Owners of suspended ceilings will have to install cornices differently. In the case of the cornice in the ceiling cavity, the basis for fastening will be a beam, the length of which corresponds to the size of the cornice, and the thickness is slightly less than the distance from the base ceiling to the film surface.
The beam is attached using dowels. After installing the frame ceiling frame and the installation of the canvas in the places of attachment of the beam, marking is applied. Then, the rings are attached to the place of future punctures so that the canvas does not break. The holes inside the ring are carefully burned. Now you can fix the cornice.
Manufacturers' offers are diverse. You can choose models of curtains in any of the stylistic directions, whether it is modern, simple-minded, but this is no less original country motives, functional high-tech or restraint and aristocracy of the English style. The choice of cornices and the method of attaching them depend on the style of the room, the selected textiles, the material from which the ceiling and walls are made.
![]()
StrPort construction portal 2011-2018. Articles about repair, construction, building materials.
Copying information from the site is possible only with permission of the editorial office Or indicating a direct link to the source. Legal justification
There is no specific instructions for
There is no specific instructions for connecting the baguette and tires!
Contact you to the address
Contact http://karniz116.ru We will install cornices of any complexity to you. We also have sewing curtains.
Thanks for the article from vosx.ru
Thanks for the article from vosx.ru
You need to trust the installation
Professionals need to trust the installation. We will install cornices in Yekaterinburg umrk.ru
https://umrk.ru/ installation-car
https://umrk.ru/ installation-carnials