Very often, the desire to increase the living space of the house comes to naught because of ...
|
|
The labycle grid is widely used both in construction and in landscape design ... |
The simplest structure near the country house or at the cottage of an additional ... |
Mounting hinged cabinets to the wall
All modern kitchen sets have hinged cabinets in their configuration. They allow saving space with good capacity. Located at the eye level, such cabinets are very convenient during operation and are always filled with a large number of things, creating a serious load on hinged mechanisms. Therefore, it is very important to produce a reliable and high -quality fastener of the cabinet to the wall.
Misractors:
- Choosing the height of the cabinet hitch
- Existing mechanisms of cabinet hoods
- The design of the rear wall of the hinged cabinet
- How to attach a closet to the wall using a mounting bar
Choosing the height of the cabinet hitch
Before starting mounting hinged cabinets to the wall, you need to choose the right height for their hitch. It is determined based on the main criterion - the growth of the owner of the kitchen. On average, the distance is approximately 50-60 cm from the countertop to the lower part of the hinged cabinets. According to GOST, this value is generated 45 cm.


In the case when to place the hinged cabinets is required above the refrigerator or above a high oven, then the height of these objects determines the desired level of hinging cabinets.
Existing mechanisms of cabinet hoods
The use of modern fastener fittings greatly simplifies the work that is associated with a hitch of kitchen cabinets. It allows you to eliminate small errors in applying the marking and increases the strength of the entire structure. At the same time, there will be very little effort, and all the work can be done independently, without any help.
For attaching the cabinet to the wall, a specially prepared rail and a device called a hitch is mainly used.


The weight is equipped with crocheted, which is attached from the inside to the side wall of the cabinet and remains invisible from the side.
Mounting bar
The first way is a hitch on the mounting bar.
Advantages of this method:
- all work may well be done by one person, since there is no need to support the cabinet when marking is done. This greatly facilitates the task, and also allows you to hang cabinets with high accuracy;
- thanks to special adjusting screws, the location of the cabinets can be changed by making them above, as well as closer to the wall or move away from it. This mechanism allows you to almost accurately align the cabinet, which is quite difficult, and when using ordinary loops and it is not always impossible;

- on the tire for hinging the cabinet there are specially made notches, with which you can easily adjust its length;
- all the necessary installation can be carried out even when the kitchen apron is already attached;
- there is no need to use the curbing border;
- it is quite easy to do not only installation on the rail, but also dismantle. Basically, a hitch of kitchen cabinets, in this way, takes no more than 1.5 hours.
Flaws:
- first of all, the high cost of the entire kit, which includes a mounting rail and hitch. But this is not such a serious problem, given that the result is a lot of time;
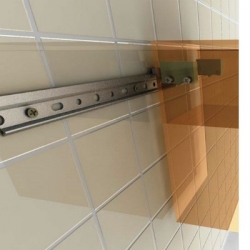
- another disadvantage of this method is that due to the loose fit of the cabinet to the wall, a small gap is noticeable in the upper part.
Furniture loops
The second method is more affordable, but will take more time, in addition, additional help will be required. It will use loops and fasteners.

Initially, the upper boundary is determined and the horizontal line is applied along the length of all the cabinets that need to be suspended.
Then, the level of its setting is determined by the level (there are cases when, due to the uneven sex, the result is distorted).

The first point is marked on the resulting line, a hole is made using a perforator or drill, and fasteners are installed. Then the cabinet is taken, and temporarily suspended in order to determine the place of the next fastener with absolute accuracy. In this case, one should not be guided by one drawn line, but even the evenness of the cabinet itself must be checked by the level.
The entire further process is carried out in the same way. When all the cabinets are attached and their location is checked by the level, you can start connecting them with furniture screws among themselves. The final stage of work is the installation of a connecting decorative cornice, which is screwed to the upper base using screws.

Now it remains only to hang the facades, install the shelves, see whether the doors work normally, and if there is a need to adjust the inaccuracies using the adjusting screws. This whole process requires concentration and good attention, as well as an insightful assistant, without the help of which it is quite difficult to correctly calculate the required distance for fasteners.
The design of the rear wall of the hinged cabinet
The course of work on the hitch will directly depend on the design of the posterior wall of the hinged cabinets.

In the first case, the back wall is nailed to nails and has no recesses. Therefore, when hung on the mounting bar, the upper part will not fit tightly, and the cabinet will turn out with a slope. In order to avoid this, a waste should be provided at the bottom of the cabinet, which corresponds to the width of the mounting bar. To do this, you can nail a thin rail or calculate the height of its hitch so that it enters the kitchen apron. In the latter case, the fasteners should be carried out already with the installed kitchen apron.

In the second case, the back wall is attached to the recess.

This design of hinged cabinets is more convenient, as it allows them to be hung not only in the overlap on the kitchen apron, but also in the water. But when installing cabinets without overflow, it is important that the apron is located perfectly evenly, since even a small skew will immediately catch your eye.
How to attach a closet to the wall using a mounting bar
Preparatory work
- It is desirable that the walls are smoothly leveled;
- if the work is performed in the corner kitchen, then the angle formed by the walls should be exactly 90 degrees;
- all work on electrical installation, placement of outlets for extracts, the conclusions of the upper lamps must be completed;
- you should also immediately prepare the wall on which the cabinets will be hanged. It must be painted or covered with wallpaper and fixed in advance a kitchen apron. Since all this will be extremely difficult to do with installed cabinets.
Tools

In order to highlight the kitchen cabinets at hand, you need to have the following tools:
- the drill can be electric or manual. It is needed to drill holes for fasteners. If you have to work on a load -bearing wall, you will need a punch or drill with such a function;
- level;
- roulette;
- screwdriver;
- a hammer;
- clamps - an auxiliary tool that will need to be combined if you want to connect the boxes among themselves to create the effect of the monolist of the entire structure;
- if the installation is carried out on an anchor, then a wrench will need a corresponding size;
- well, of course, that you need to prepare the required number of fasteners. To fix the hitch to the cabinets, screws are needed (as a rule, manufacturers complete them with hinged cabinets). To fix the hinged tire to the wall, screws with dowels will be required. If desired, you can buy special screeds for fastening cabinets with each other.

How to fix the cabinet to the wall step -by -step instructions

First of all, using adjusting screws, it is necessary to fix the hooks in the middle position. After that they are attached from the inside on the side walls so that the hook peeps out by only 2-3 millimeters and can freely cling to the fastener.
Now you can start applying marking on the wall. In this case, one should be guided by the basic rules:
- if the location of the hinged cabinets depends on large -sized kitchen appliances or high objects, then during the markup they must be put in place;
- when hung on the mounting rail, you need to know in advance whether the cabinets will be installed on the kitchen apron, or still close with it;
- the fasteners should be located lower than the upper edge of the section by 3-4 cm. In order to correctly calculate this distance, it is necessary to attach the bar to the rear wall of the cabinet, so as it will be mounted on the wall. Then it will become clearly visible how many centimeters you need to take into account when applying the final marking.
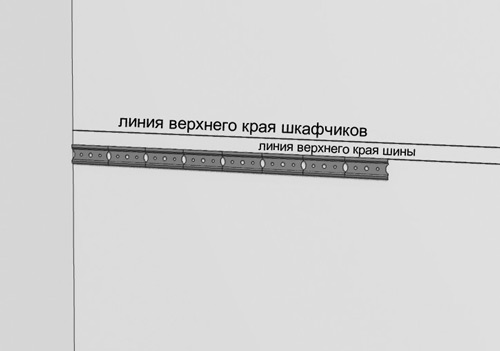
Taking into account all these recommendations, using the level, two lines are applied, starting from the corner of the kitchen. Of these, one feature shows the upper edge of the hinged rail, and the second indicates the top of the cabinets.
Tip: In order to determine the horizontal position of the cabinets, it is best to use the level, rather than measuring the distance from the ceiling or floor, since subsequently errors may occur. Even if there is confidence that the ceiling or floor is quite smooth, you should not take risks, otherwise you will have to redo all the work again.
The upper edge of the bar is pressed to the prepared marking line (lower) and the required number of marks for openings for fastening is made.
If the walls are durable and have a good bearing ability, then it is quite possible to divide the rail into small pieces of 15 cm, and each of them should be installed in those places where the awnings will be located. But if there are at least the slightest doubts about the strength of the walls, you should not divide the rail, but on the contrary, more steadily to fix it for a larger number of fasteners.

Further, a drill of a certain diameter, a small hole for installing the rail is carefully made in the wall. The following will be set out several basic recommendations:
- often you can face such a problem when at the very beginning of the drilling the drill, as it were, jumps. To eliminate this discomfort, small excavations are performed in places of drilling. They are made with the help of a hammer with a hammer or, in its absence, on a strong nail;
- if the wall crumbles when drilling, then first you should make a hole of a slightly smaller diameter, and then expand it with a drill of the desired size. Thus, it turns out much more accurate;
- to measure the depth of drilling, the prepared dowel is taken, applied to the drill and the desired distance is accurately remembered. If the hole has already been done and the turn has come to score a dowel into it, then you need to make sure that the depth is enough. Too deep hole will make the work uncomfortable;
- in a concrete wall, it is quite difficult to drill a hole, even using a drill with a winning tip. Therefore, in the absence of a perforator, a pair of non -strokes with a hammer on a punrate will be required;
- during the work, special attention should be paid to the places where the wiring takes place.
Then, dowels are neatly driven into the holes, and the mounting rail is installed on the fasteners. On it, with the help of a hitch, cabinets are attached. Their position is regulated by the screws with which the hinged mechanisms are equipped.
To create the effect of the cabinet throughout the wall, you need to tightly connect them to each other. To do this, they need to be fixed in pairs in clamps, starting from the corner cabinet. In order not to spoil their surface, you should put a wooden wedge between the cabinet and the clamp.

Next, a hole between the connected cabinets is drilled under the intersection screed. With through drilling on chipboard, chips are often formed.

To prevent this problem, it will be necessary to apply one of two of the following methods:
- in the places where the drill comes out, it is necessary to crush a wooden bar (the denser, the better);
- first, a thinner through hole is drilled, and then, a drill of the desired diameter, it expands on both sides.
On this fastening of the hinged cabinets is finished, it remains only to install the shelves, fix the doors and adjust them with the help of the screws that are on the hinges.
![]()
StrPort construction portal 2011-2018. Articles about repair, construction, building materials.
Copying information from the site is possible only with permission of the editorial office Or indicating a direct link to the source. Legal justification
Very useful article!
Very useful article! Thanks a lot!
I'm shocked! I cook the kitchen to
I'm shocked! I am preparing the kitchen for installing furniture ... It turned out that the wall between the kitchen and the toilet is 4 centimeters !!! What to do? How to hang cabinets?
Where to find this master?
Where to find this master? mirhar@mail.ru
Thank you! I'm not a handle, house
Thank you! I am not a handle, I built the house myself. Accordingly, I make the kitchen myself. Your advice has helped. Thanks again!
Aunt in the video full
Aunt in the video is complete inadequate! It was necessary to control the kitchen so as a hysteria! "I do not know how you can do it, I don’t know, but do it!"
Thank you, conceived a custom
Thank you, conceived a custom cuisine, it was not the first day that the network was in search of how to avoid distortion when attaching to the mounting bar (for the corner kitchen is critical), perhaps for many this is obvious, but my first time is the first time;) everything is very clear and informative Spastbo again!
The article was written by a full profan.
The article was written by a full profan.
evaluates \u003d equals
evaluates \u003d equals
Nonsense at the end of the work of the master,
Delirium at the end of the work of the master, he was too lazy to put the door to put on the door, he is obliged to do work to the end. When your wife begins to cook, and then he says to the end, you yourself cook, but if he suddenly produces the brains, so here. Nonsense master, nizachot.
All characters are full.
All characters are full. One hysteria, the other itself cannot, the third if you undertook to correct, then there is nothing to listen to those who do not think. In general, it was necessary to hang 8mm with a hexagonal header on a dowel. Izh Planet hung on a wall on two dowels of 20mm for almost a year.
And which dowel screwed like this
And what dowel screwed up and said
thanks for the advice useful
thanks for the advice, useful article
Thank you very much! The best article
Thank you very much! The best article on this topic. All the nuances are taken into account. It is your reason that the professional wrote.