Rolled materials cannot be called aesthetically attractive. Nonetheless,...
|
|
In modern society, construction and repair are in demand, and ... |
If the house has already been built and landscaped, and all communications are summed up, but suddenly arose ... |
Installation of a towel in the bathroom with your own hands: assembly technology. What can be made of and how to connect yourself
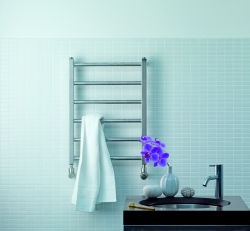
The heated towel rail is an obligatory attribute of any bathroom. The plumbing device provides a comfortable temperature in the room, prevents the appearance of dampness and is used for the intended purpose of drying of linen. In fact, the coil is a local bathroom heating system. To cope with the independent replacement and installation of new drying can do the home master who has skills in performing plumbing work. The contractor needs to correctly develop the installation scheme, take into account the installation requirements and observe the nuances of the technological process. An important factor of uninterrupted and durable operation of the heater is the correct choice of a heated towel rail.
- The nuances of choosing a heated towel rail: the principle of operation, material and shape
- General requirements for installing a plumbing device
- Schemes of connecting a heated towel rail in the bathroom
- How to install a new heated towel rail on old pipes
- Placement of an electric unit
- Installation of a towel in a bathroom with your own hands: Video
The nuances of choosing a heated towel rail: the principle of operation, material and shape
The choice of drying for the bath is based on the assessment of the four main parameters of the equipment:
- type of heating;
- manufacturing material;
- connection option;
- form and design.
Depending on the principle of operation, water, electrical and combined models are distinguished. Each coil has both positive and negative sides.
Water towel. Runny drying is most popular. The coil is inserted into the heating or hot water supply system.

Distinctive features:
- electricity savings;
- diversity of the lineup;
- a limited installation location requires the pipeline.
Important! The pressure in the hydroelectric station of the multi-storey building is 7-10 atmospheres. At the same time, most heated towel rails are designed for small working pressure and have walls up to 1.25 mm thick. In case of inconsistency of indicators, the service life of drying up to 2 years
Electric coil. A heating fluid or dry heater is placed inside the structure. The use of an electric heated towel rail makes sense in the following situations:
- urgent installation is required without reconstruction of the heating/water supply system;
- placement of additional drying;
- installation of a serpentine outside the bathroom is a mobile electric unit.
To warm up the bathroom up to 22-24C, you should choose a model at the rate of 140 W/sq.m. If the backup drying is mounted for the spring-summer season, then its optimal capacity of 100 W/sq.m.
Combined devices Combine the advantages of water and electrical modifications. Disadvantage of deficiency and high cost.
Before installing a heated towel rail from heating or DHW, it is important to choose the optimal material of manufacture.

It can be stainless steel, copper/brass or black steel. Features of different coils:
- Stainless steel: resistance to moisture, demand for water quality, narrowing of the passage crossing over time. The best option is chrome steel, wall thickness of at least 2 mm.
- Copper and brass: high heat transfer, fragility, the coil is deformed with slight effort. With saving operation, it will last up to 20-25 years.
- Black steel: strength, resistance to corrosion. Recommended for connecting to the hot water.
The heater configuration is selected from personal preferences and spaciousness. P- and M-shaped coils are often used to replace Soviet heated towel rails. Radiators are like a Christmas tree, a ladder - compact, but quite spacious.
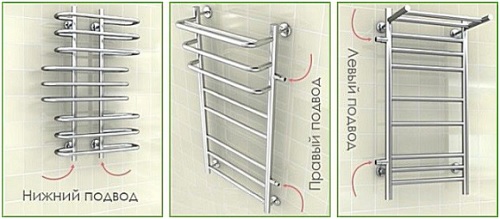
By the method of installation, plumbing accessories are:
- lower or upper connection;
- coolant
- left or right connection.
The most practical side connection. Such models will be able to adapt to various places of installation. Additional plus aesthetics of design.
General requirements for installing a plumbing device
Connection standards are regulated in SNiP 2-04-01-85. Basic Rules:
- Fitings should not narrow the passing section of the highway. The diameter of the riser should be equal to the diameter of the channel of the serpentine.
- The fastening of a heated towel rail in the bathroom is performed with a mandatory note bypass. The jumper supports the pressure of the coolant in the entire riser, and the separation of flows helps to preserve the temperature of the water at the following water intake points. Bypass provides the ability to carry out the current repair of the dryer, leaving the system working.
- On the bypass and a common riser, the installation of shut -off valves is prohibited. Such actions worsen circulation, contribute to lowering the temperature of the coolant.
- The optimal drying installation height is 120 cm.
- The boundary distances from the surface of the wall to the radiator: 4 cm with a serpentine diameter of up to 2.5 cm, 6-7 cm with a section of pipes more than 2.5 cm.
- Installation of cranes on a towel in the bathroom is performed at the entrance/exit from the coil to the bypas.
Schemes of connecting a heated towel rail in the bathroom
The operability of the coil directly depends on the well -chosen insert scheme. The type of connection is selected taking into account the characteristics of the model and the location of a centralized riser.
Recommended insert methods
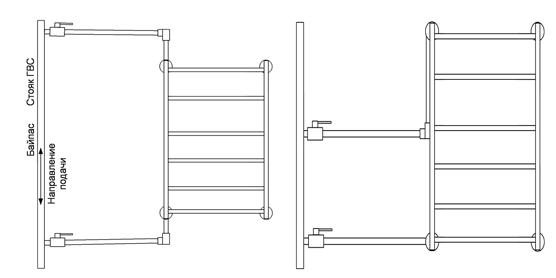
Scheme No. 1. Universal lateral/diagonal connection.
Advantages of the scheme:
- any coolant supply vector;
- suitable at different speed of water circulation;
- there is no need to shake air;
- an arbitrarily large distance from the central pipe.
Requirements for the operation of the system:
- The connection points of the heated towel rail should be placed between the lower and upper tower of the riser.
- The minimum angle of inclination of the summarized pipeline is from 3 mm per 1 m. With a section of pipes from 32 mm and a small distance from the riser, we will allow horizontal installation of the pipes.
- The presence of bends is unacceptable, otherwise the system will be ill.
- For maximum circulation, it is better to choose a coil with a inch diameter (steel models), 25 mm (reinforced PPR), a sizes of a ball crane from 3.4/ inch.
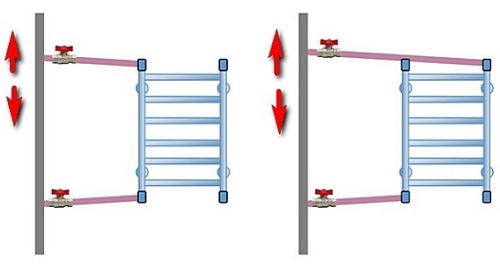
Scheme No. 2. Lower insert.

Features of the scheme:
- the supply of the coolant any direction;
- the possibility of hidden styling placement of the highway under the shower/bathroom;
- in case of interruptions in the supply of coolant, air will be required by means of Maevsky cranes;
- the effectiveness of the lower connection is less than the diagonal or lateral system.
The implementation of the scheme is possible subject to the following conditions:
- The placement of the lower supply is below the level of installation of the coil.
- The absence of failures and elevations on a straightforward track.
- When hiding the pipes into the wall, they must be thermal insulated.
Alternative schemes
With traditional assembly No. 1, a lateral insert with non -standard wiring pipes is acceptable.
Alternative options are displayed in the figure:
- At the entrance and output, vertical segments are added. The basic conditions for placing the chop remains unchanged.
- The top of the drying is above the upper water supply. The circuit requires the use of the air vent on the device due to the formed stage in the absence of water in the system accumulates air.
The lower connection according to the scheme No. 2 allows the following modifications.

In the first case, all the bends are placed under drying, and in the second the upper submarine above the bottom of the heated towel rail. Such a combination limits the direction of the coolant from top to bottom. In the opposite method, the system operates unstable.
Uponable connection options
Typical errors of the insertion provoke disruptions in the heating element. Incorrect assembly schemes:
- The placement of instruments under the level of removal of the riser provokes to stop the movement of the coolant. Water drops down, cools and is not able to rise up due to pressure in the system.
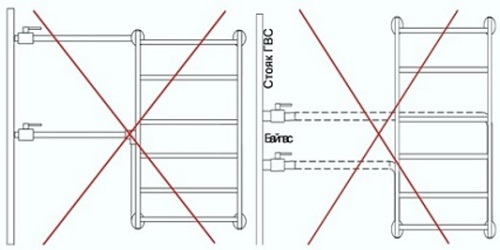
- Side installation with the upper loop. The scheme is used to decorate the pipeline behind a suspended ceiling. Air accumulates in the loop, overlaps the supply of the coolant into the radiator over time. As a result, cooling the coil.


The combination of two non -working compounds at once is observed when builders try to hide the lower line on the floor, and the upper in the ceiling space.
How to install a new heated towel rail on old pipes
We will analyze step by step how to connect a heated towel rail in the bathroom to replace the old worn equipment. The technology is quite simple and includes several mandatory stages.
Selection of working equipment
The list of tools depends on the type of water pipeline material. Installation through plastic reinforcement will require the presence of brackets, ball valves, pipes, a construction knife, laser or water level, as well as a soldering iron for working with polymer products. Additional inventory: hammer, screwdrivers, divorce keys, paclies or an alternative seal.
As a rule, the coil comes in standard configuration:
- transition corners;
- silicone and fluoroplastic gaskets;
- telescopic brackets;
- cut nodes.
It is convenient if the set includes: Maevsky crane, a stop screw and a decorative cap.
Dismantling an obsolete coil
Before installing a water heated towel rail in the bathroom, a neat removal of old equipment will be required.

Procedure:
- Contact the ZHEK with a statement about the temporary termination of hot water supply.
- After the riser is overlapped, you can proceed to the direct dismantling of the coil.
- With a threaded connection, it is enough to unscrew the drying with a key and disconnect it from the pipeline. It is better to substitute the container under the mounting location, since water can remain inside the circuit.
- Typically, a heated towel rail is welded or a threaded connection for the years has been so clipped that you can’t do without cutting. For dismantling, you can use a grinder. The main thing is not to overdo it and not remove the necessary centimeters of the pipe for cutting threads for fittings.
- Remove the old device from the holders.
Important! The cutout in the centralized supply pipe should be more than the distance between the pipe of the installed coil for the total length of the elements necessary for the mounting of the bypas.
Baypas and cranes fastening
The installation of bypass is not compulsory, but an extremely desirable condition for replacing a heated towel rail. The elementary replacement of sealing rings and gaskets in the places of connecting the coil requires overlapping water in the system. So, you will have to waste time and apply with a statement to the housing office. By including a jumper in the circuit, you can turn off the coil circuit and carry out planned repair work at your discretion.

The role of bypass is played by a regular pipe made of polypropylene, copper or steel. It will require three ball valves to install it. One element of the locking reinforcement is installed directly on the jumper, and two taps on the fittings of the return and supply of the coolant.
The ball valve on the jumper will regulate the intensity of the water supply to the circuit of the heated towel rail. However, this decision is quite controversial. Many plumbing are opposed to the insertion of locking reinforcement into Bypass.
Installation procedure:
- Cut the thread on the pipe taps.
- Plant tees on the pipes.
- Mount locking reinforcement and bypass.
Installation and connection of new drying
When choosing a way to fasten a heated towel rail, it is necessary to give preference to brackets, and not a hard mount through the wall. This solution protects the wall and pipe from the loads caused by temperature deformations.
Important! The coil must be installed strictly horizontally. With distortion, a heated towel rail can be disrupted under pressure

The course of work:
- On the wall, mark the location of the drying.
- Drill holes and install dowels.
- Fix the brackets on the coil and try on the wall.
- If the horizontal and the recommended radiator apologists from the wall are observed, then you can fix the device with screws.
- Combine plumbing bounces by means of fittings using sealing winding.
- Check the tightness of the docking elements and gradually open the taps. Checking the connection of a heated towel rail should be carried out with a small pressure of the coolant.
If there are no leaks, you can transfer the coil to the standard mode of operation to completely open the ball valves.
Placement of an electric unit
Installation of an electric drying model is somewhat simpler than a water analogue. The main thing is to observe safety measures during the installation and operation of the electrical appliance.
To understand how to make a heated towel rail in the bathroom, we list the basic requirements for its installation:
- Distance from electric drying to wet plumbing (bath/washbasin/shower) from 60 cm. The minimum distance to the floor is 20 cm.
- For connection, a moisture -proof outlet with a special visor from moisture is used.
- Mandatory conditions for the installation of electrical wiring: three -core cable, grounding, hidden wiring and the use of RCDs.

The type of connection depends on the modification of the electric heater. Oil units are mounted strictly horizontally and require hard fixation. Cable coils can be deployed in any direction.
If we talk about the effectiveness of the devices, then oil drying more warm -consumes, they are heated for a long time and cool down just as long after disconnecting. Cable, on the contrary, quickly warm the rooms and quickly cool.
Installation of a towel in a bathroom with your own hands: Video
A visual video instruction on the installation of a heated towel rail with a side connection:
Master class on installing a coil ladder with the lower heat generator supply:
![]()
StrPort construction portal 2011-2018. Articles about repair, construction, building materials.
Copying information from the site is possible only with permission of the editorial office Or indicating a direct link to the source. Legal justification