Often cottage villages and horticultural massifs do not have a centralized ...
|
|
The project is prepared before the start of any construction. It doesn’t matter if it will be ... |
If you are the owner of a private house or cottage, you probably know that ... |
DIY wiring in the house

The text of this article describes how to properly make the installation of electrical wiring with your own hands. At first glance, this process may seem too complicated, but following the advice and observing the rules, everyone will achieve success.
Table of contents
- Preparation for the installation of electrical wiring with your own hands
- Rules and safety measures when installing switches and outlets
- Installation of sockets and switches
- Control over the operation of electrical wiring
- Approximate calculations at the cost of installation of electrical wiring
- Connection to the network
Where to start installation of the wiring
Starting the installation of the wiring in the house with your own hands, you need to try to make the opportunity, wire or cable, replace or delete, and at the same time do not harm the house. For this purpose, it is necessary to make a laying of wires in special pipes laid during the construction of the house or through building structures created for this purpose. The gaps formed during the installation between the pipe and the cable must be compacted by cramping with non -combustible solution, which, if necessary, can be easily removed. For these purposes, cement or sand clay, clay with cement and sand may be suitable. It is forbidden to lay wiring at air temperatures below 15 degrees. It is better to buy an isolated cable, and the wires with a protective shell with copper veins.
Methods for installing electrical wiring
The installation of electrical wiring is carried out in two main methods - open and hidden electrical wiring.
Open wiring
This type of wiring is performed along the walls, in special skirting boards for cable, in plastic pipes. The installation height of the open electrical wiring is not normalized. In the process of laying open wiring of cable skirting boards, you can not arrange power, low -current and lighting wires together. The skirting board should fit tightly against the wall, the gap between them should not reach a distance of more than 2 mm. It is recommended to purchase skirting boards from non -combustible materials with electrical insulating properties.

Hidden wiring
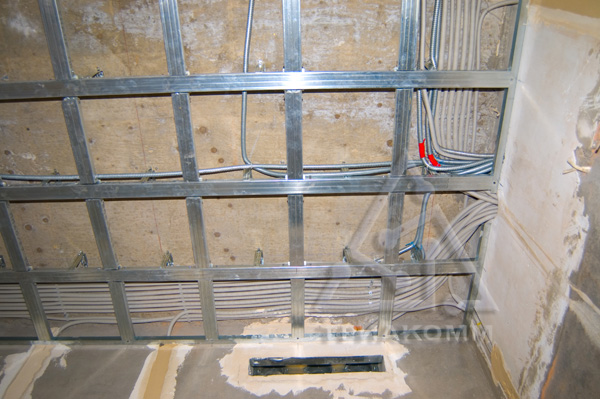
This method allows you to install electrical wiring hidden. Such wiring is located in the buildings intended for this void, inside the partitions, in the designs of suspended ceilings. Horizontal sections of the power cable wiring are laid in the preparation of the floor.
If it is supposed to be wiring a lighting network located in constructed voids, under plaster or in partitions, it is better to use wires and cables protected from mechanical damage. When installing hidden wiring under a layer of plaster, the wires should be located strictly vertically or horizontally. In the partitions, you can make a laying in the shortest ways, provided that the thickness of the partition is more than 80 mm. When using this method of electrical wiring, it is necessary to ensure that the wires are tightly adjacent to the base of the stroke.
It is very important to remember that in panel houses, the use of the method of frozen laying is not allowed when installing the house.
For installation of electrical wiring in the design of suspended ceilings, only non -distributing and not supporting cable and wires do not support. When laying electrical wiring in rooms with high humidity, in order to protect yourself from electric shock, wires protected by polyvinyl chloride shell can be used to install hidden wiring. The wires in the metal shell for these purposes are prohibited. The wiring in steel pipes is not allowed.

It is important that the layer of plaster over the pipe is at least 10 mm thick. When performing external wiring using unprotected wires, it is necessary to ensure that they are not available in places of frequent, regular visit. Such places include, for example, a balcony.
Preparation for the installation of electrical wiring with your own hands
Before proceeding directly to the installation of electrical wiring, preparatory work should be carried out: procurement, marginal and punching. First of all, it is necessary to determine the location of the wiring in the house. At the initial stage, you should draw up a circuit for the installation of the electrical wiring, noting on it the location of the input of cables into the house, plug outlets, lighting devices, switches. The next stage of the marking work is the marking in the circuit of the electrical wiring circuit, along which the wires and the place where the distribution panel will be located will be held, which is usually installed at an altitude of about one and a half meters from the floor in a heated place.

When marking the wiring, it is worth starting with the laying of the lines of the main beam of wires, its branches and indications of the places of their turns. Do not forget that they should be located in a strict vertical and horizontal position. It is recommended to carry out horizontal stripes, retreating approximately 20 cm from the ceiling. Having finished marking along the walls, it will not be superfluous to make a drawing on paper, which can be useful in the future when reconstructing and repairing electrical wiring.
After that, you will need the help of special devices and tools, depending on the material from which the wall is made, namely:
- a grinder with a diamond disk for concrete with this tool can work on any surface, regardless of the material from which the wall is made;
- this tool is used in a limited area of \u200b\u200bapplication and a hammer, since they are not suitable for brick walls and concrete partitions. They can be applied on relatively light materials, such as plaster, foam blocks. This is more preferable, since when using a grinder, a lot of dust is formed, which creates additional difficulties in the work.
We will need the above tool in order to make a stroke (deepening) in the wall for laying in it wires for electrical wiring (with a depth of 2 to 3 cm and about 2 cm wide). After you have done the indicated manipulations, you must begin the procurement stage of installation of the electrical wiring, which includes cutting cables and wires. Cutting them into necessary pieces, it should be added to their length 10-15 cm, which will be needed to connect them. Based on this, when buying the necessary materials necessary for installation, you need to pay sufficient attention to the calculation of the electrical wiring.
At the next stage, you will need a construction mixture similar to the one that is applied to the wall as a finish or as close as possible in the properties, in order to fix the inserted wire in the strobe, and level the surface along the entire plane. To do this, you stir a dry mixture of water until a homogeneous mass, and using a spatula, apply it to the wall to the right places. After application, it is necessary to wait some time in order to dry out, and align the formed irregularities with circular motions using foam grath.
Rules and safety measures when installing switches and outlets
Where the wires are branched to the sockets and switch, the branch boxes are installed. When installing hidden electrical wiring, sockets and switches are most often used. The switches, as a rule, are mounted at the entrance to the room, inside or outside it. At the same time, the location is preferable from the door handle. The switch must be installed so that it does not touch the door. For switches, as well as for sockets, the height of the floor does not matter and is not regulated, but it is more practical to install sockets below the switches, but at a certain distance from the floor. This measure will help with the possible flooding of the room and protects the residents from electric shock, and will create a certain convenience in eliminating the consequences.
According to safety measures, it is forbidden to install sockets near grounded metal devices such as gas or electric slabs, shells and so on. The presence of a socket near such devices is allowed only if the distance between them is more than 50 cm. There is also a ban on the establishment of sockets in wet rooms. Mount a socket in a sauna, bathroom or shower is allowed only at a distance of 2, 4 meters from the water source and the bath itself or shower itself.
Installation of sockets and switches
Before you purchase the necessary materials in stores, you need to establish the availability of documents confirming the safety of these products, they must be made of materials that I do not support combustion.
In order to connect the wires between themselves in the places of input and output of wires from boxes, outlets, switches, the method of welding, crimping or various clamps is used. When electrifying rooms with low humidity, wiring can be carried out in niches of partitions or walls, in the voids of ceilings.

You can install plug outlets and switches in two ways: open and hidden. In the first case, this is done using sockets performed by their materials that do not conduct current. The sockets are attached to the wall with glue or screws, screws. The circuit breakers, as a general rule, are installed with a fascist wire. To place the wires in a hidden way, specially produced outlets and switches are used for this. They are mounted in installation boxes, which, in turn, are installed in holes in the walls.
These holes are made using special nozzles that come in two types: for concrete walls and for wooden ones, which are installed on a perforator. They also differ in diameter, which allows you to choose the necessary size, depending on the selected socket. For concrete walls, the nozzles are made with winning tips, since when using another material it quickly fails. It is worth noting that you can not use nozzles not for your surfaces (winning nozzle on a wooden wall and vice versa), as this will significantly reduce their service life.
Control over the operation of electrical wiring
Subject to the installation rules of the electrical wiring, further operation will be safer for residents and various electrical equipment. The basic requirements for the use of this type of technique are spelled out in various arches of the rules. The energy-saving organization concluding the contract with any owner regularly conducts planned unscheduled inspections. As a result of such audits, the degree of proper handling of electrical installations and their safety is clarified. If shortcomings or serious violations are detected, a fine is imposed on the responsible person.
Approximate calculations at the cost of installation of electrical wiring
It is no secret that a lot of time can be saved by resorting to the help of professionals. In addition, this will protect from excitement about possible errors when installing with your own hands. However, you always have to pay for qualified assistance. Prices for the installation of electrical wiring depend primarily on the room. It matters, a power grid will be carried out in a house or in an apartment, and the cost of electrical wiring will change depending on the area of \u200b\u200bthe room. Most companies involved in the electrical installation of premises accept orders with a minimum work of work from 12 thousand rubles. On average, the electrical installation of a one -room apartment will cost about 20 thousand rubles, and a wooden or brick house with an area of \u200b\u200bup to 70 square meters. 45 thousand rubles.
Connection to the network
At the end of electrical work, the house is ready to supply voltage. In order to obtain permission to supply voltage, electricity to the house, it is necessary to conclude an agreement with the company for a receipt-gender test, as a result of which the issue of connecting electrical wiring and constant supply of energy voltage to the object is decided.
Thus, if you decide to save or, for any other reasons, lay the wiring in the house yourself, then the main thing is to remember the basic requirements for the installation of electrical wiring. It is imperative to make calculations, lay wiring in places easily accessible to change wires and cables, follow the instructions for the installation of sockets and switches in non -residential rooms. The expanded list of requirements is indicated in the rules for the device of electrical installations.
![]()
StrPort construction portal 2011-2018. Articles about repair, construction, building materials.
Copying information from the site is possible only with permission of the editorial office Or indicating a direct link to the source. Legal justification
Thank you for the article
Thank you for the article