After the repair of their housing, whether it be an apartment in a city line or a house in rural ...
|
|
Modern landscape design often includes such a component as forged ... |
Many different solutions are used to design the ceiling. Each option has how ... |
DIY Foam insulation with a foamyplex

More recently, no one thought about thermal insulation of the foundation, and all the heat loss was compensated by a more powerful heating. Today, the policy of saving energy resources makes you look at the problem in a new way. It turns out that the insulation of the foundation will not only avoid almost 20 % heat loss, but also provide the foundation with comfortable conditions, increasing its life. As practice has shown, properly waterproofed and insulated foundations are not prone to destruction longer, which means they live longer. On the question of what is better to insulate the foundation, in the good old foam, the palm of the championship intercepted the new material of extruded polystyrene foam. Despite the fact that this material costs almost twice as much as foam, insulation of the foundation with a foamer becomes widespread fashion. And all thanks to its unique qualities and durability.
- Meet the foam -polex
- How best to insulate the foundation outside or from the inside
- Calculation of the thickness of the foam pool for thermal insulation of the foundation
- The technology for insulation of the foundation with a foamyx
- DIY Foam insulation with a foamyplex
- The insulation of the foundation with a foam: video
Meet the foam -polex
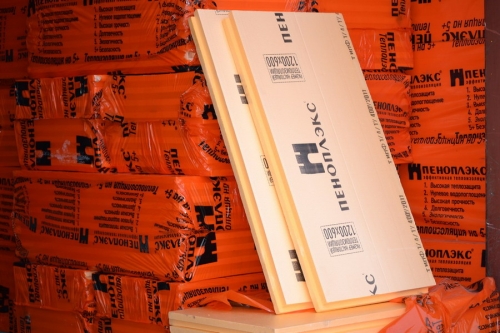
Extruded polystyrene foam is a whole type of materials made of polystyrene foam by foaming at high temperature. As a foaming substance, seven of the gases of freon and carbon dioxide are added to the composition. The result is a strong material with a dense uniform structure in which granules are contained 0.1 0.2 mm.
Penoprophilia is the name of one of the Russian brands, which produces extruded polystyrene foam for various needs, whether it is insulation of roofs, pipes, roadway, walls of the house or its foundation. Each of them has its own unique features that are relevant for a specific place of application. For insulation of foundations, Penopolex plates are used and less often Penoplax 45.
Advantages of using foamplex for insulation of the foundation obvious:
- Low thermal conductivity (\u003d 0.03-0.032 W/(MK)). This indicator is the lowest among public heater, which means that plates of lower thickness will be required.
- The exceptional strength of the compression of 27 t/m2, which is very important, since colossal loads act on the foundation.
- Practically does not absorb moisture. As the experiments showed, in 30 days spent in water, the foam -polex plates were absorbed and filled with moisture only 0.6 %. Given the constant influence of ground and rainwater, the low water absorption of the material guarantees protection of the foundation from moisture, and the insulation itself will not destroy or change its properties from constant contact with water.
- A wide temperature range from -50 C to +75 C. The material withstands both severe frosts and heating.
- Light weight facilitates installation work and allows you not to load the foundation additionally.
- Penopropulek is not afraid of mold, does not rot and does not decompose. Mice do not start in it.
- It is resistant to many aggressive substances that can be in the ground.
- The material does not distinguish harmful substances and fumes and is safe for use in residential construction.
- Penoplax plates are easily mounted, as they are made with a spike-puzzle system, they are easily cut, glued and attached.
- The material is extremely durable (up to 50 years).
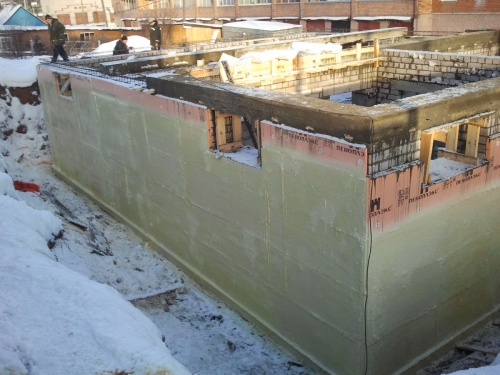
Thermal insulation of the foundation with foamplex plates will ensure the durability of the structure and material of the foundation, as well as the basement or basement. I would like to note that the foam -polex foundation has a class of resistance to the fire of G4, i.e. Burning. But taking into account the fact that the material will be hidden by a layer of plaster and soil, this is not scary.
Foam -polex The foundation is available in plates with dimensions of 600x1200 mm and a thickness of 20 100 mm (20, 30, 40, 50, 60, 80, 100). This allows you to choose the material of the necessary thickness for each specific case.
How best to insulate the foundation outside or from the inside
The location of the insulation on the foundation outside or inside is very important. To protect the foundation from the negative impact of the environment as much as possible, the foundation is necessary to warm the foundation outside. But this is easier to do in the construction process than during the operation of the house. So, for example, those who want to insulate the foundation of the old house really do not want to dig out the walls of the foundation, as it is laborious, hard and long. But know, insulation of the foundation from the inside is actually insulation of the basement or basement, but not the foundation, since the design and material of the foundation remain unprotected and are affected by moisture, frost and soil flowering.
Advantages of insulation of the foundation outside:
- The foundation is protected from freezing, the cold does not penetrate inside.
- The concrete of the foundation is protected from moisture and numerous cycles of defrosting, which extends its life.
- Serves as an additional barrier for ground and storm water, presses and protects the waterproofing layer from mechanical exposure.
- He copes well with seasonal temperature changes.
- An optimal microclimate is created in the basement or the basement or the basement.
- The dew point is shifted, which has a beneficial effect on the material of the foundation.
If you decide to insulate from the inside, be prepared for the fact that the foundation remains unprotected from frosts, letting in soil and water. As a result, seasonal changes in temperature, frosts and heapons of soils will lead to the appearance of cracks in the foundation and its deformation. Think, maybe you should do everything right once than limit yourself to half measures.
Calculation of the thickness of the foam pool for thermal insulation of the foundation
The first question that is interested in when warming the foundation is what thickness the material is to take. To determine this, you will have to perform a number of calculations. Although the manufacturer indicates the minimum thickness of the foam pool for different regions of construction, it is still better to calculate everything yourself.

R resisting heat transfer for a particular region. For Moscow and the Moscow region it is equal to 3.2 m2xk/W;
H1 foundation thickness;
1 coefficient of thermal conductivity of the foundation material;
H2 the thickness of the material of the insulation (foam pool);
2 The heat conductivity coefficient of foamplex.
If we are going to insulate the reinforced concrete foundation (\u003d 1.69 W/m*K) 400 mm thick (0.4 m), then we get:
3.2 \u003d 0.4/1.69+h2/0.032;
3.2 \u003d 0.24+ h2/0.032;
2.96 \u003d h2/0.032;
H2 \u003d 0.0947 m. It is approximately 95 mm.
Total, it turns out that for insulation of the foundation 400 mm thick, a foamplex is required with a layer of 100 mm. Do not round the less, it is better to take with a margin. The price depends on the area of \u200b\u200bthe foundation with a foam with a foam, which must be covered with slabs, and on the thickness of the material.
For example, the height of the insulation is 2 m, the length of the walls is 10+8+10+8 m (for the house 10x8 m). It turns out the area of \u200b\u200binsulation is 72 m2. The area of \u200b\u200bone foam plate is 0.72 m2. For insulation of the foundation, we need a minimum 100 plates of material.
In order to avoid the bridges of the cold and block all the joints and cracks when warming with foam -polex, it is recommended to lay the insulation in two layers with a displacement, in a checkerboard pattern. If 100 mm of insulation is required, then you need to use two plates of 50 mm. In total, we need 200 foam penoples with a thickness of 50 mm. There are 8 plates in the package, which means we buy 25 packs. Total insulation material will cost 930 950 cu.
For insulation of the foundation by the foamyplex, the cost of insulation material is the lion's share of the budget. It will be necessary to add to it the cost of waterproofing, bitumen mastic for gluing insulation, dowels-zontiki, cement for plastering surface. All this is just a trifle compared to the total cost of insulation.
The technology for insulation of the foundation with a foamyx
Penopropliex is very technological material. But in order to fully use its advantages, it is better to observe the technology of its application for different occasions.
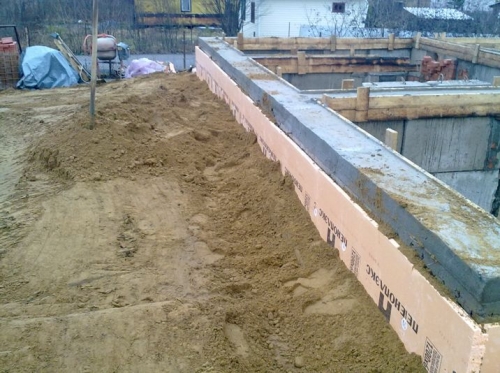
Insulation of the tape foundation with foamplex (insulation pie from the inside out):
- The foundation wall.
- Waterproofing.
- Penoplax plates.
- A layer of cement-sand plaster.
- Filling with soil or sand, expanded clay.
- Penoplax plates (horizontally) under the blind area.
- Blind area.
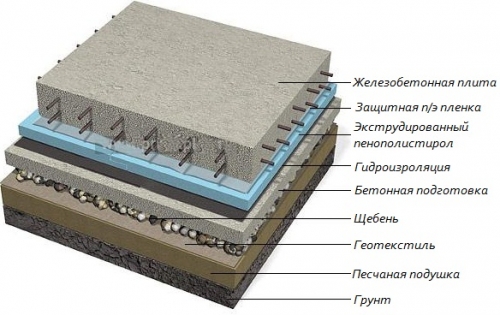
Insulation of the slab foundation with foamplex (cake from the bottom up):
- Sand.
- Penoplax plates.
- Concrete slab.
- Waterproofing.
- The floor screed.
- Waterproofing the end part of the concrete slab.
- Penopropses slabs on the end part of the plate laid from the depths of sand pouring to the very top by 40 50 cm above the ground.
- Penopropsa slabs under the blind area.
- Blind area.
Please note that foampile stoves can be laid on the foundation plate directly under the floor screed.
DIY Foam insulation with a foamyplex
All work on insulation of the foundation with foamplex can be performed independently without resorting to the help of construction organizations. Although it will be possible to save on this. Of course, it is much more convenient to make insulation at the construction stage, even before filling the pit around the foundation. But if the moment is missed, and now there is a need for insulation of the foundation of the old operated house, then you will have to sweat. Consider also that a repeated digging of the foundation can lead to the appearance of cracks on it, since the house will be unevenly sagging. This is dangerous, so it makes sense to calculate the load before starting work.
Consider just this more time -consuming option.
Excavation
The first task is to dig the foundation. Along the perimeter of the whole house, a trench is digged in depth to the very sand, i.e. to the full depth of the foundation, and at least 1 1.5 m wide. The depth of the strip foundation is usually lowered to the level of freezing of the soil in winter, this indicator can be recognized in the local geodetic service.
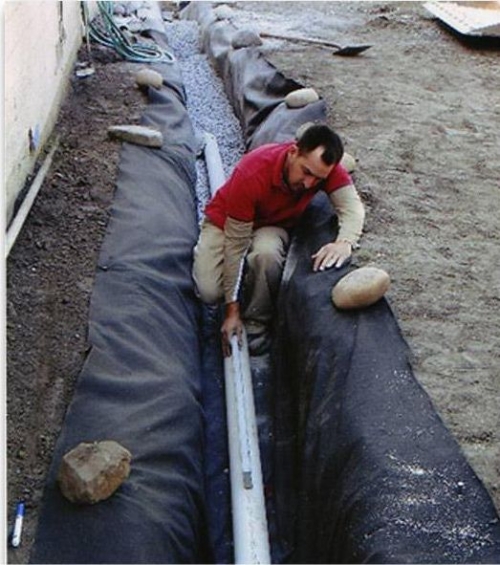
Despite the fact that Penopolex does not pass and does not absorb moisture, it still makes sense to equip high -quality drainage. It is especially necessary if the construction zone has a high level of groundwater or abundant floods. We equip the drainage at the level of the sand pillow under the foundation. Along the perimeter of the entire house at a distance of 50 60 cm from the walls of the foundation, we dig a shallow trench for drainage pipes. At the bottom of the trench we pour sand with a layer of 5 10 cm, then crushed stone 5 10 cm, then spread geotextiles, the edges of which are torn behind the edges of the trench. Inside the trench directly onto the geotextile canvas we lay drainage pipes with holes. The slope when laying drainage pipes should be at least 2 cm per 1 m. Then, sprinkle with a crushed stone with a layer of 10 cm on top, we wrap the edges of the geotextile so that they wrap the pipe. Pipes must be taken to a well for a storm sewer.
Preparation of the surface of the foundation
The wall of the foundation and basement must be cleaned of the remains of soil, the broken pieces of concrete and other dirt. To do this, you can use a brush with hard synthetic fibers. After the surface is completely cleaned, it must be leveled. A flat surface is the key to the durability of the waterproofing coating, which can damage any sharp sticking edge or piece. It is extremely rare after some time of operation of the foundation wall remains perfectly smooth, so it is necessary to plastered them.
Alignment of the walls of the foundation:
- At a distance of 1 1.5 m from each other, we install and fix the beacons. You can use perforated guides. We set the beacons to the full height, to which we are going to fix the insulation from the bottom of the foundation and to the level of 50 cm above the ground.
- We knead the solution: 4 parts of the sand and 1 part of the cement, pour water and knead to a thick consistency, but the solution should not be dry. The liquid solution will immediately drain from the surface.
- Using a trowel, we throw the solution on the walls of the foundation. We make sharp movements with your hand, begin to throw from the bottom up.
- When the entire surface is filled with a solution, we assume a 2 m long rule, apply to the beacons and stretch down from top to bottom, removing the excess solution. It is advisable to pull the rule not directly down, but to make slightly wave -like movements.
- After the first layer dries, the second leveling can be applied.
Important! If there were more 2.5 cm changes on the walls of the foundation, then for plastering it is necessary to use additional reinforcement. You can use a rabid grid fixed by brackets.
Do not continue to work until the leveling solution completely dries. This will take from 7 days to 20, if the foundation was poured for a long time. If we insulate a new foundation, then we must wait a month until the moisture from concrete completely removes.
The waterproofing of the foundation
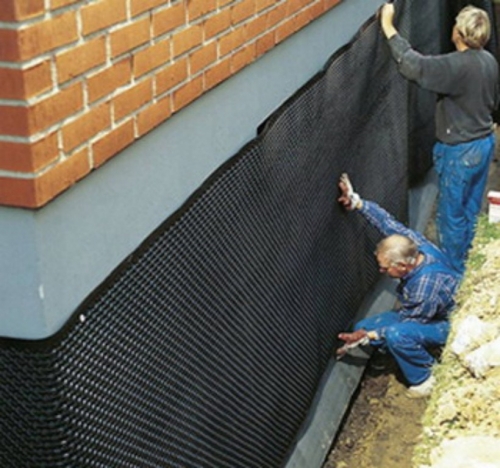
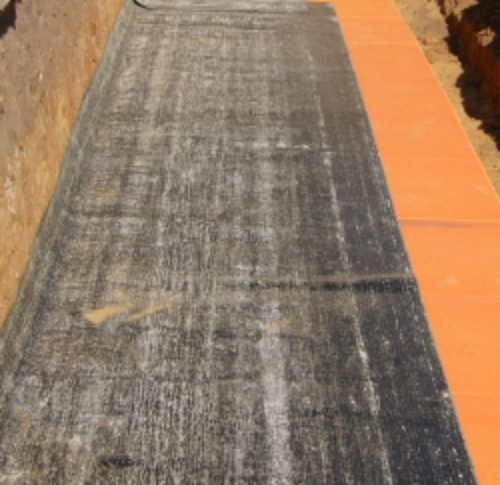
High -quality waterproofing of the foundation is best performed in two layers: the first bitumen mastic, the second sheets of technology.
Bitumen mastic You can buy both the finished unpack and spread it, and cook it yourself from the bought bitumen bug. If you bought dry bitumen, then it must be melted in some kind of container, then add used oil (motor) to it at the rate of 50 liters of oil for 120 150 kg of bitumen to it. The oil will add bitumen plasticity and then in frosts it will not crack.
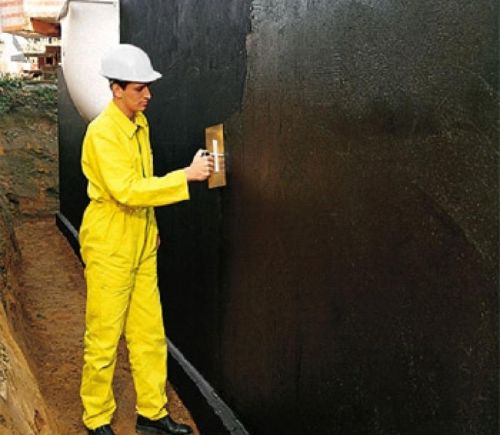
Using a roller, apply bitumen with a layer of 2 4 mm on the entire surface of the foundation and base. We try to fill all the cracks and small pores. When bitumen dries, glue the sheets of technology. We glue the sheets from the bottom up, melting their back with a gas burner. We hold the burner at a distance of no closer than 20 25 cm, otherwise the technonic is on fire. We smooth each glued sheet, releasing air from under it. Glue the sheets with an overwhelming 10 cm, then smear the joints with mastic.
Important! Many do waterproofing the foundation only with the help of technology sheets. This is not the best solution, since it does not allow you to fill small cracks and pores. And in the case of moisture falls under sheets, they will quickly peel off. But smearing with mastic protects the surface better, although the process itself is very dirty and time -consuming.
Insulation of the tape foundation with a foam
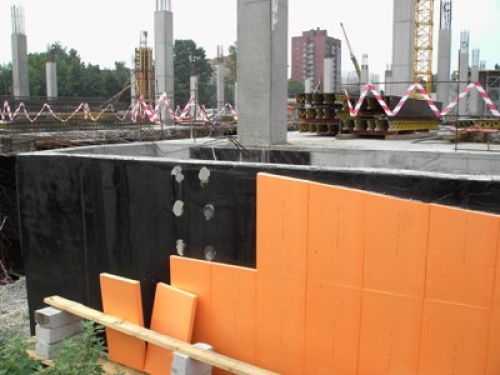
After the waterproofing work is completed, you can proceed to fastening the insulation.
Important! You can find a very important nuance that in order to fix the penoplax plates, it is necessary to warm up the bitumen waterproofing and glue the material on it, in fact, you should not do this. It is likely to damage waterproofing.
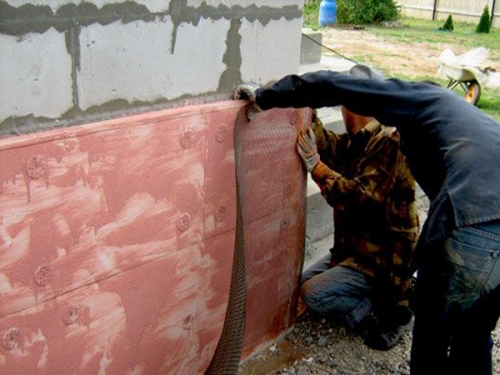
Foam -polex plates are attached to the foundation in an upright position, we begin from the bottom up. We will need to fix it acrylic glue Or any other glue on inorganic solvents. Apply the glue on the stove of the foam -ejected 5 6 points. Then we press the plate to the surface of the foundation and press it to fix it. We wait 1 minute. All subsequent foam plates are also attached, only with the already fixed they must be connected using the spike-paz system. The cracks between the plates are filled with mounting foam or acrylic glue.
We also attach the second layer of foam -polex plates to glue, but with a displacement, to block the joints between the plates of the first layer.
Important! Fixing of foam-polex plates on the part of the foundation that will be sprinkled with soil cannot be made using dowels-gribly, as this can damage the waterproofing layer.
You can use dowels only on the basement, there is fixing 5 dowels (120 mm long, with a diameter of 10 mm) for each plate. The hollows from dowels must be covered with acrylic glue. We continue further work only after the glue dries completely.
Surface leveling
Now the foam -polex insulation must be protected from soil exposure, for this the surface is again plastered.
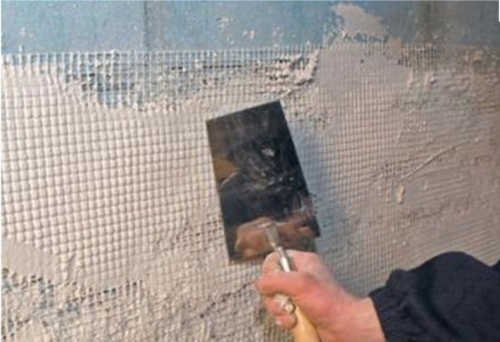
On top of the foam pool, we fix the reinforcing mesh made of fiberglass, we join the canvases with an overlap of 10 15 cm so that cracks or chips do not form at the joints of the mesh attachment.
In some sources, it is recommended to make all the alignment using only one acrylic glue, applying it in several layers until the surface is leased. But you can perform classic leveling using a cement-sand mixture. After the layer of plaster completely dried, you can fill the pit.
Reverse backfill and warm scrapel from foamedex
Instead of the soil removed from the trench, you can fill sand or expanded clay under the house to improve thermal insulation. Although you can fall asleep the soil that was there. But not to the end. The final stage of insulation of the foundation is a warm blind area.
At about a depth of 30 cm from the top, pour 10 cm layer of sand and carefully compact. Then we spread from the foundation itself 1 1.5 m from it waterproofing material. It can even be an ordinary roofing material, whose joints are carefully smeared with bitumen. After solidification, foam poum slabs are laid on top, the joints are smeared with acrylic glue or filled with mounting foam.
When a layer of insulation is laid on the ground, you can equip a blind area on top. To do this, a concrete screed is poured under the slope from the foundation of the house to take the waste and storm waters from it.
The base of the house, on which foamplex is also fixed, must be decorated with stone, clinker tiles or in any other way.
Remember a high -quality secure foundation foundation of your home. Make waterproofing and thermal insulation on time, and you will not have to regret it, and you will not remember the overhaul of the foundation for a long time. Penopropliex magnificent technological material, which is very convenient to use to warm the foundation, it is easy to install and does not require a special attitude to itself. It is important to know only one extruded polystyrene foam is destroyed from contacts with acetone, benzene, alcohol and other organic solvents.



about
about
is it possible instead of waterproofing
is it possible to use a foam -polex instead of waterproofing if there is a good drainage system