Modern comfortable cuisine is the dream of every mistress. An indispensable attribute ...
|
|
To date, they use very popular in the field of low -rise construction ... |
Roofs, for the installation of which asbestos slate are used, for many ... |
Painting the ceiling with water -based paint with a roller
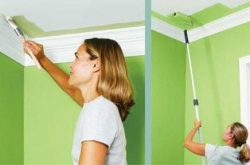
Having shutting off the repair of their housing, whether it is an apartment in a city or a house in rural areas, any developer understands that the ceiling is a rather difficult stage in the work. Today there are all sorts of solutions for the ceiling: cladding with ceiling tiles or wallpaper, suspended and suspended ceilings. But not every owner can afford such options. Since the cost of painting the ceiling with water-based paint is quite democratic, this type of finish is still relevant. And if you use the most ordinary roller for work, then even more so.
Content:
- The right choice of tool for painting
- Removing the old finish from the ceiling surface
- Alignment of the ceiling before painting a roller
- Preparatory work before painting the ceiling
- Painting the ceiling with a water -based mug using a roller
The right choice of tool for painting
Since most ceilings are large and even surfaces, the painting roller is the most practical tool for applying paint. You can, of course, paint the ceiling and brush, but all smears will be obvious, and for the ceiling, such a picture is completely unacceptable, since it will be perceived as unevenly painted. Therefore, it is customary to use the brush only for painting angles and inaccessible areas.
There are quite a lot of their different types in the construction tools market today, which complicates the procedure for choosing for beginners. These are velor, foam rubber and villous rollers. The price for them does not differ much, which can mislead about them as if the same qualities. But the differences are actually very significant. And the chosen roller will be more affected by painting the ceiling.
Of the all kinds of diversity of rollers, the best result is achieved when using a roller with a pile (threads). In such a situation, foam rubber is not suitable due to the fact that it absorbs too many paint that accumulates on the ceiling surface, and because of this, bubbles appear on it. But velor tools take little paint.

If you are going to paint a large area, an important point is the choice of as much roller as possible, since we are talking about the area of \u200b\u200bthe coloring surface. You can also paint the ceiling with water -based paint with a spray gun, but today we will talk about the simplest option.
Valik’s pile is best chosen by the average due to the fact that large absorbs too much paint and thereby applies a rather large layer of paint, and the small pile will most likely leave not painted places. The rougher the ceiling surface, the longer you need to choose a longer pile at the roller so that the paint covers the entire texture and fills all the recesses. We also recommend that you do not use rollers with a handle on a bolt or foam, because they quickly fail.
In addition, you should know how experienced craftsmen select rollers, and how to distinguish a quality tool from poor quality:
- When choosing a roller, it is recommended to squeeze it in the hand: at the same time, a high -quality roller as a result of compression will not be deformed.
- Carefully inspect the seam on the roller: a high -quality product of a clear joint has no fabric, since such seams can leave on the ceiling during the painting of the strip.
- Check for the strength of the villi by pulling them at the same time: a high -quality roller will not give a single vill to stretch, while cheap fakes will leave a noticeable handle in the hand.

Under your roller you need to choose a painted plastic dish, into which the paint is filled and where then the substance is rolled up with a roller. Remember that when the roller is just in a bucket with paint, you can not expect a beautifully painted ceiling! In order to use a roller from the floor without the use of scaffolds, you need to purchase a special telescopic tube. Using such a long folding handle, you can reach any right place.
To access various corners, as well as similar places to corners, use a brush. For this type of work, a flute brush is used. In retail trade there are special types of this tool. These brushes after themselves do not leave characteristic stripes and provide almost the same result as the roller. Regarding the width of the hands - it is better to purchase a brush with a very small thickness (3 centimeters) and a tool slightly wider (8 centimeters).
Removing the old finish from the ceiling surface
Before staining the ceiling surface with water -based paint, you need to do preparatory work and protect the floors, window sills, radiators and furniture from spray and dirt (it is better to take it out at all). You can cover them with plastic film, newspapers or fabric, fixing with a slightly red tape. It needs to glue the walls around the perimeter, risers of gas and heating pipes. This sticky paper tape is easily removed, does not leave the traces after this. You can remove it as soon as the paint thickens.
After that, the ceiling should be freed from layers of old paint or whitewashing. In order to get rid of lime or chalk whitewashing, it is necessary to moisten it abundantly with water with a painting roller, then scrape, while using a steel spatula or a chisel. Wash the ceiling at the end with a sponge.
To update the ceiling painted with water -based paint, you need to spend more time on preparatory work. All this is due to the fact that the process of removing the old paint is a laborious work, since the previous layer does not dissolve almost in water, and therefore it is not possible to scrape away from the ceiling.

Such work most often consists in removing the exfolved paint with a spatula, as shown in the photo about painting the ceiling with water -based paint. To facilitate this not quite pleasant work, you can use the following technique. Moisten the previous coating with a plentiful amount of water, using a foam roller or water spray. This procedure must be repeated twice with a gap of twenty minutes.
Moisture should well soak the previous coating. After that, you need to make a draft, opening all the windows and doors. The layer swollen from the water forms the swelling of the old water -based paint, which to remove with the help of a spatula is not difficult. Such work must be performed quite quickly, so that the surface on which the work is carried out does not have time to dry. Next, you need to treat the rust and stains from the subtexts with a 5-percent solution of copper sulfate.
If your ceiling is difficult to remove, the following composition can be applied: two or three percent solution of hydrochloric acid (gently wipe the spots, trying not to get on the skin). The following recipes are also known: a solution of twenty parts of the indented lime, which is divorced by one part of the Olifa, a thick solution of lime and water with the addition of denatured alcohol (about 50 ml) to it. Any of the last two mixtures is applied to pollution for 10 15 minutes. And you repeat all this until completely removal of pollution. Typically, two procedures are enough.
Alignment of the ceiling before painting a roller
After complete cleansing the ceiling surface, it must be aligned. For this purpose, a thin -layer putty is best suited, which has good clutch properties. It has excellent plasticity and gives an almost even surface, which is perfectly treated with fine -grained sandpaper. Using a spatula, the substance is applied to the ceiling. Quite often, the ceiling is leveled by applying a butter-beam-based putty on it, which is distributed evenly along the surface with the help of a brush, spatula or roller.
Remember that before this it is necessary to close all the cracks and cracks in the ceiling, having previously watched a video about painting the ceiling with water -based paint and filling them with a specially prepared composition. To completely fill the cracks with putty, it is necessary to expand them before applying. The next preparatory operation is a primer of the surface, which is produced by the same paint. It is applied with a very thin layer, then the composition is allowed to dry thoroughly so that there is no tearful putty.
Preparatory work before painting the ceiling
First, make the opening of the cooked paint and, in accordance with the instructions, dilute the paint to the desired density. Manufacturers very often recommend adding approximately 5-10% of water to the solution. If, nevertheless, the manufacturer does not recommend diluting the paint, then it only needs to be mixed. This is easily done with the mixer nozzle on an electric drill. For painting the surface in one layer, this mixing will be quite enough.
You can not use a roller with which you applied a primer for painting the ceiling, it is better to take a new one or replace a fur coat with an old one. Take the roller in your hands and dip it in dishes with paint. It is important to note that, according to the technology of painting the ceiling with water -based paint, you should not completely lower it into the container, but only to dwell. The roller usually gets wet on one side and the edge, which is wet, becomes heavier. But you need to ensure that the entire circumference of the tool evenly absorbs paint.

To do this, you roll the roller on the trough (special dishes that is sold in special painting sets), a grid or a clean sheet of an organ, linoleum, but not on a ceiling surface. A little pressing a roller to the sheet, you can evenly paint the entire surface with paint. After that, you need to dip the roller into the paint again and roll it out again. If suddenly you can’t wet the roller evenly, then at the end of the repair there will be non -color. After drying, it is they who form the ill -fated spots, which we talked about at the very beginning.
Enough experienced painters do it automatically, but you, of course, need to practice. Such work is not very complicated, but here you need to be careful. For more confidence, you can practice on the site of an unprepared wall, a piece of drywall or any surface that is not a pity to use for an experiment.
Painting the ceiling with a water -based mug using a roller
As soon as you rolled the roller and the threads were filled evenly with paint, start painting the ceiling with water -based paint. All work is best done in daylight hours, starting with a remote angle. The main thing is to remember that the paint should be applied to the surface of the ceiling evenly, without delaying the entire process. Enlargling the ceiling even in a large room takes only 15-20 minutes.
Apply water -based paint to the ceiling with parallel stripes. Try to make stripes that have a width close to 50 centimeters. You need to paint over, each new strip should be applied to the previous one by 8 10 centimeters. Rub the paint thoroughly and make sure that the edge of the paint does not dry out at the layer.
When working, do not tear off the roller from the surface, increasing the pressure of pressure as the paint spent. Traces from the edges of the roller must be rolled out in the perpendicular direction. If you plan to paint the ceiling with water -based paint in several layers, then remember that the last layer should be placed in the direction of the windows, and the previous one in the perpendicular direction.

For painting the angles of the ceiling, you need to use a brush. Dip it into the paint for one third and squeeze it on the edge of the can of the Excess composition. Place the paint with narrow strokes along the perimeter of the ceiling with a strip, which has a width is close to 5 centimeters, and rub thoroughly. It turns out a thin and even layer, which will merge in the future with a fresh layer of paint of the main surface.
The painter, coloring the ceiling, looks at him at right angles and does not see the place where he had already walked a roller. His vision also does not allow to see how many times he touched a certain site with a roller. The entire ceiling for him acquired a wet uniform shade and therefore visually seems that the entire plane is painted the same. This is where another mistake is hidden. Malyars with extensive experience in this case sometimes move aside and look closely at the ceiling from a different angle, as non -coloring immediately become visible.
When non -color arose, it is necessary to fight them. It happens that the spots remain after even your efforts to intensive the ceiling. Further work is useless and only leads to the overspending of the material. Such work needs to be redone. You can fix errors only in this way the entire ceiling is polished with fine sandpaper. If you have painted only 1-2 layers, then everything will work out. But if you went through a lot more, you will have to grind and putty and beautifully paint everything.

Eliminate all drafts in the room, curtain the windows so that direct sunlight can be avoided on the surface of the ceiling. You can not use additional heating devices in order to accelerate the drying process, because the temperature regime in the room should fully comply with the instructions indicated on the label of jars with water -based paint.
And finally, remember that you should not focus only at a low price of painting the ceiling with water -based paint, it is necessary to strictly follow the technology! It is best to do work in the afternoon in order to repeat the process in the morning. Remember that the surface after each layer of paint should dry well. If the first layer is not allowed to dry, then the second will be soaked and lift the existing paint.
![]()
StrPort construction portal 2011-2018. Articles about repair, construction, building materials.
Copying information from the site is possible only with permission of the editorial office Or indicating a direct link to the source. Legal justification
Whether the velor is suitable
Is the velor roller suitable, lace paints of ceiling embossed wallpaper?
thank you for the article
thank you for the article