Today, interior double doors are very popular. They are...
|
|
The presence of a beautiful veranda in the country makes it even more attractive and comfortable. This ... |
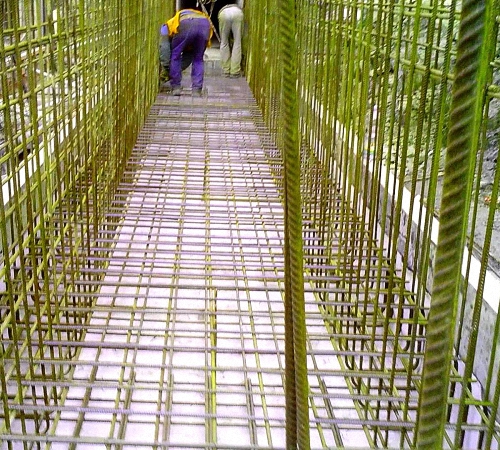
Georste - a universal material that is used to strengthen various ... |
Laying bitumen tiles

Bitumen tiles are used to finish the roof due to the large number of advantages over other roofing materials. Its main advantage is the duration of operation, reaching fifty years. We will talk about the advantages, varieties and features of laying bitumen tiles further.
Table of contents:
- Bitumen tiles - characteristics and advantages
- Bitumen tile roof - preparatory stage of installation
- Bitumen tiles - installation technology
- How to care for bitumen tiles
Bitumen tiles - characteristics and advantages
Another name of bitumen tiles is a soft roof, a linen or flexible tile. It is a modern building material, which is based on the use of a fiberglass coated with a modified bitumen solution and stone sprinkling.

The appearance of the bitumen tile resembles a flat sheet, a small size that has cutouts from one end.
There are many forms and varieties of bitumen tiles;
- triangular;
- rectangular;
- rhomboid;
- hexagonal;
- square;
- oval, etc.
In the process of manufacturing tiles, stone spying is used, which determines the color of the tile itself. Therefore, bitumen tiles are characterized by a variety of colors, textures and shades.
As a basis for bitumen tiles, fiberglass or fiberglass acts, which is impregnated with a mixture of bitumen on both sides. The main task of the basis is to strengthen the stove and give it strength. It is it that is the connector of two layers of oxidized bitumen with a certain number of modifiers and various kinds of additives that make the tiles strong, plastic and stable before the deformation.
To cover the upper side of the bitumen tile, mineral crumbs, colored basalt granulates or sprinkling from shale, making the material with colored and protecting it from the effects of external stimuli, especially from sunlight. The reverse side of the bitumen tile is treated with adhesive bitumen, which is covered with a film made of polyethylene.

Therefore, the structure of bitumen tiles consists of:
- color stone granules;
- modified high -quality bitumen;
- high -strength fiberglass;
- self -adhesive layer;
- Polyethylene films.
The use of bitumen tiles is possible on all roofs, the slope of which is at least twelve degrees. It is used both in the manufacture of a new roof, and in the restoration of the old. Perfectly covers the roofs of residential buildings, cottages, industrial and public buildings.
Among the advantages of using flexible bitumen tiles should be highlighted:
- The material used in installation practically does not leave waste, even when arranging roofs with a complex geometric design, so it turns out to save money on the purchase of tiles;
- On the roof that is installed, the bitumen tile is not heard by the noise of neither rain nor snow;
- stable before corrosion and decay, unlike metal roofs;

- It is resistant to biological microorganisms, such as fungus, moss or lichens;
- stable in front of chemicals;
- when using bitumen tiles, under the influence of ultraviolet radiation, it becomes a homogeneous layer, which is very stable before the influence of moisture;
- It differs from metal tiles in that it is not capable of conducting electricity, thereby creating safe conditions during a thunderstorm, for people living in the house;
- does not require additional care during operation;
- It is stable before exposure to high and low temperatures, tolerates a sharp change in climate;
- stable in front of strong gusts of wind;
- capable of covering the roofs of any configuration, shape and complexity;
- stable before deformation of the roof during its operation;
- In the presence of small damage, they are quickly eliminated by installing a separate tile;
- It has a slight weight and is packed in a convenient container, thanks to this it is easily transported to the laying place;
- does not require a special installation tool;
- It has excellent performance, used for more than 50 years.
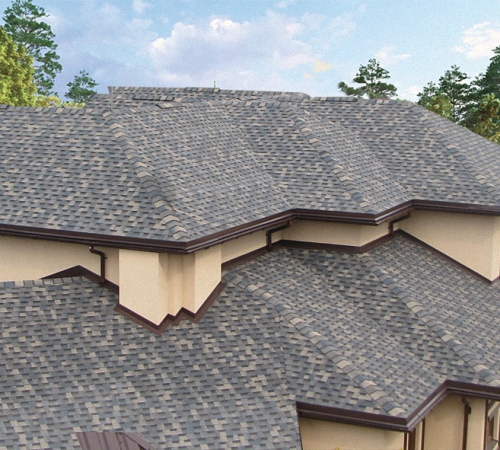
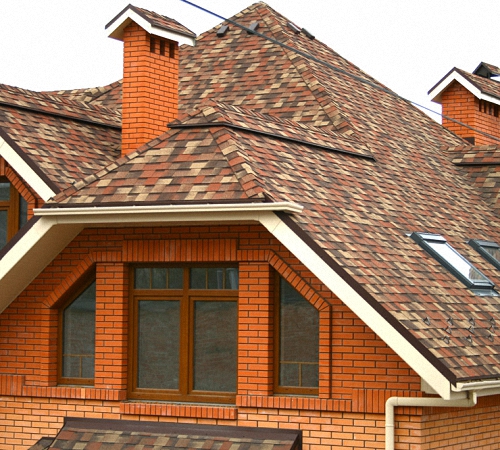
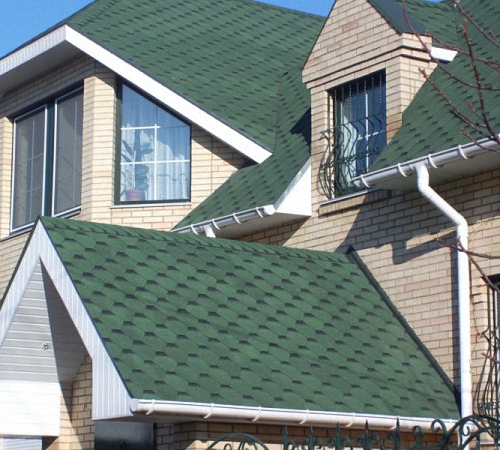
Bitumen tile photo:

Despite the huge number of advantages, bitumen tiles have some disadvantages. The first of them is the lack of the ability to use bitumen tiles on the roof, the slope of which is less than twelve degrees.
It requires a continuous flooring for styling, so you need to spend money on its purchase and installation. Repair of such a roof requires special work skills and a special tool, since during operation the tiles are glued together. Particular attention is required to pay the installation of tiles, since when using improper technology, the waterproofing and roofing system is disturbed. Therefore, first of all, it is required to equip a reliable crate, to fix the tiles.
The cost of bitumen tiles of the tiles of the shinglass is much exceeds the styling, for example, metal tiles, although a large number of its advantages, and, in particular, an attractive appearance, quite justify its price.
Bitumen tile roof - preparatory stage of installation
Before starting installation work, you should take care of the preparation of the base on which the bitumen tile will be laid. The main requirements for the base are:
- its dryness;
- rigidity;
- evenness;
- the presence of continuous flooring;
- The absence of differences, hazing with an exception of small irregularities up to 2 mm.
Large -free flooring is installed with shutters of the joints and fixed using nails or screws. If plywood is used as the main material for laying tiles, then you need to leave up to five millimeters of the gap, which compensates for thermal expansion.
During the installation of wood, pay attention to the fact that the annual rings are installed with a convex part to the bottom. Make a sample with the help of boards, for a gradual and uniform change in the thickness of the coating. Laying thicker boards is carried out in the cornice of the part. The butt sections should be located on the support. For their overlap, nails are used, in a minimum amount of four pieces. If a wet tree is used, then each side of the board is fixed using screws.
To strengthen the cornice overhang, the installation of cornice strips is required, the laying procedure is quite complicated and requires the location of their tears on a continuous base. To fix this material, special roofing nails are used, which are clogged in a ratio with a chess order, an installation step from 12 to 16 cm, and with an overlap 2-4 cm.
The next stage of preparing the base is the installation of a lining carpet. Each installation of roofing equipment requires a lining carpet, which is mounted over the entire area of \u200b\u200bthe roof. Endovs or cornice overhangs require the installation of self -adhesive material on which the base will be attached.
The laying of such a material in the yndov is carried out in a total width of 100 cm, half a meter in each section of the slope. If possible, try to install a continuous carpet, on the total area of \u200b\u200bthe yendova. If you cannot set the lining base in this way, then take care of the presence of an overlap, whose seam requires mandatory gluing. The average size of the overlap is 25-35 cm.
A self -adhesive base is installed on the cornice overhang, as in Endov. Its laying is carried out directly to the cornice area with an addition of 60 cm, from the inside of the cornice to the wall. It is this option for laying the lining base that is able to prevent the appearance of leaks, condensate and other unpleasant phenomena, which very often appear precisely in the area of \u200b\u200bthe cornice zone.

To cover the rest of the surface, a standard lining base is installed, which differs in the presence of mechanical fixation. The material is laid down from the top down. The standard size of the overlap is 10 cm. Fixing the lining carpet on the basis is carried out using special zinc nails with a wide hat. Squeeze the sections of the overlap using bitumen mastic.
To strengthen the front -line sections of the overhang, use metal end strips. They are installed directly on the lining layer, an overlap 3-5 cm and fixed using special roofing nails. Before proceeding to laying the tiles, take care of smearing this section with mastic.
Preparation for the installation of bitumen tiles involves the preparation of the apples. On them, bitumen tiles are mounted in two ways:
- open;
- Sharp.
The first option involves the installation of an apple carpet, which is mounted along the axial part of the yendova. Next, there is a smashing of this carpet using bitumen mastic. Keep in mind that you need to smear not only the entire perimeter of the carpet, but also the surface near it for ten centimeters from all sides.
If the apple carpet is absent, it is replaced by a steel sheet, which has an anti -corrosion coating. The front part of the carpet is fixed using roofing nails, with an installation step of 200-250 mm. Try to equip the carpet in such a way as to avoid overlap. If this could not be done, set the carpet over 300 mm and take care of gluing the seam.
The second option involves the use of a cut. It does not require a waste of time to install the apple carpet. Laying tiles is carried out by a random order over the entire area of \u200b\u200bthe roof, including the yendovs. The upper part of the tile is fixed with roofing nails, and the lower one is glued. Do not nail the nails near the yendova by 300 mm, when the installation of the tiles on this site is completed, two coated lines are repulsed using the lace, and an ordinary tile along the lending axis is carried out. To improve the quality of installation, put a small board under it, which will help prevent accidental damage to the waterproofing layer.
The following is the process of smearing each tile with mastic and its gluing. A gutter is installed, with a width of 100 to 150 mm, in relation to the location of the roof. When installing tiles in a building located in the forest, the width of the gutter increases by several centimeters.
Bitumen tiles - installation technology
As a guide, when laying bitumen tiles, marking lines are used. With their help, laying is faster and better, and the tile is leveled both in horizontal and in an upright position.
The vertical line is applied in accordance with the width of the standard tiles, and the horizontal - every five tiles.
Recommendations for laying bitumen tiles:
1. In the process of arranging the roof, it is not recommended to use tiles of different colors, except when it is conceived by the general style of exterior, different code, labeling or manufacturing date.
2. To minimize the color imbalance, open six tile packages and mix it into a spread.
3. When conducting roofing in cold weather, it is necessary to withstand the tile in the room for about 24 hours, with a minimum temperature of twenty degrees. The tiles are supplied in batches of five packs.
4. To heat a self -adhesive strip, use a heat hairdryer.
5. Special wooden substrates will help to avoid a random cut of the substrate, in the process of cutting bitumen tiles on the roof.
6. To move along the roof, use special -purpose grooves. Otherwise, the risk of damage to the appearance of the roof is possible.

7. The fastening of each ordinary tile to the surface of the roof is carried out by special galvanized nails with wide hats. The amount of use is affected by the angle of inclination of the roof. The higher it is, the more nails will be needed, since the load on the building increases during strong winds.
8. Keep in mind that in the process of staying nails, their hat should not crash into the surface of the tile, but should be on its surface.
A starting strip is called universal tiles, which has overlapping petals. It is installed directly on the lining carpet, with an indent from its edge two centimeters. On the surface of long slopes, the first row begins to fit from the central part. Thus, the leveling of the horizontal part of the roof will improve.
Install with diagonal stripes. The second row is installed from the central part to any other side, make sure that the lower edge of the petal is at the same level with the upper masonry, but at the same time there should be a shift of the tile for half the masonry.
The third row requires the same displacement as the second. All the tiles begins to fit from the central part to the side areas. To ensure the highest quality protection against atmospheric precipitation, glue the tile with mastic.
How to care for bitumen tiles
1. Follow the state of the roof in the autumn-spring period.
2. When garbage, branches, leaves or other objects appear on the surface of the roof, remove them by using a brush with soft bristles.
3. It is forbidden to use spicy tools as the care of the roof.
4. To ensure free drainage of water on the surface of the roof, clean the gutters and funnels.
5. During the snowfall, remove the snow from the surface in layers, leave it a small amount to protect the roof from the wind.
6. Pay attention to the condition of steel sections of the roof, butt parts. Do not allow the formation of cracks or cracks on the surface.
Bitumen tile video:
![]()
StrPort construction portal 2011-2018. Articles about repair, construction, building materials.
Copying information from the site is possible only with permission of the editorial office Or indicating a direct link to the source. Legal justification