It is customary to start any repair work with the ceiling, because one drop of paint ...
|
|
Each owner makes maximum efforts so that his house is as comfortable as possible and ... |
The irrefutable advantages of the tree made it one of the most popular finishing ... |
Brick basement siding: installation features
The house is the business card of its owners. The public opinion depends on how presentable and neatly the internal or external decoration looks. The householder who will say that such parameters as the assessments of others are not interested in, he will surely bepocated. After all, that is why, choosing materials for decorating their own home, many pay attention not only to technical characteristics, but also the impeccable appearance of the goods. A basement siding can rightfully be considered such an aesthetic product of the construction industry. The article will talk about how to sheathe with siding under a brick.
Content:
- What is basement siding
- Advantages and disadvantages of basement siding for brick
- How to calculate the amount of material when purchasing
- Buy basement siding for brick
- Cooking the base for installation
- Installation of basement siding for brick
What is basement siding
- As is often accepted in Russia, some goods that have come to our lives from abroad receive a different name on the other hand. So the panels for brick and stone frequently used in Canada and the USA quickly turned into a basement siding. Such a restriction on the place of installation can be explained by the fact that its cost compared to the usual vinyl panels forced consumers to use it only when decorating the basement, while most of the facade was traditionally closed by ordinary siding.
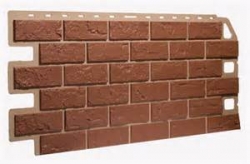
Basement siding for brick photo

- The situation with the price for the material has long changed, but the name has been preserved in its former form. Although houses lined with such panels under the roof are much more common. Each manufacturer tries to expand the line of flowers of products and at the same time, company designers are constantly working on the appearance and texture of siding. Therefore, those who are taking care of the individual appearance of their home should not be afraid to be like a neighbor.
Siding for brick video
Thus, the panels can serve:
- facing material for the base of the building. The thickness of the panels allows them to withstand mechanical damage, which is especially important, because in winter the load on the structure will increase many times;
- partial cladding for the entire facade of the structure. The layout of inserts from a basement and ordinary siding can be varied. Such solutions always look original, fresh and convey the individual style of the owner of the house;
- material for the decoration of the entire building as a whole. In a relatively short time, you can turn a wooden house into a stone impregnable fortress or a brick mansion.
Advantages and disadvantages of basement siding for brick
Like any building materials, basement at home under a brick has its ardent supporters and opponents. It all depends on whether consumers pay attention to the pros or cons of panels. Among the positive qualities can be called:
- the low cost of finishing with siding compared to similar work, but using the materials that the PVC panels are designed to imitate;
- small weight not only of the product itself, but also of the entire structure;

- labor costs when installing this material are much less than cladding with stone or brick. And by the purity of such works, a basement siding wins;
- compliance with the correct installation technology (including when creating a crate) will not violate natural air exchange processes and will not require special means for insulation. The heat -saving material uses standard and at the same time not necessarily expensive;
- basile siding can be attributed to the category of durable materials. Manufacturers claim the life of up to 50 years. Of course, these indicators cannot be compared with the same natural stone, but it is again worth recalling the price difference;
- simplicity in everyday life and excellent color conservation indicators are similar to the usual vinyl siding, but the variety of forms produced and the possibility of imitation of various materials attract many customers. You can choose not only a wild stone or brickwork, but also a bottle stone, wood chips, shingles and other options.

Some disadvantages of basement siding become obvious only in its comparison with materials such as artificial or clinker tiles. But, since they exist, they cannot be ignored.
- Like any material made of polyvinyl chloride, basement siding has such an indicator as compression/expansion coefficient under the influence of low and high temperatures. Failure to comply with the installation technology recommended by the manufacturer entails deplorable consequences for the entire structure to the nearest warm/cold season.
- The second drawback is more likely to the appearance of the panels, but in some cases it may play a decisive role. So,
- The color palette of siding, despite its diversity, loses the same clinker tiles or artificial stone.
- No matter how skillfully an imitation of the drawing and texture on the panels was performed, even at a short distance it will be seen that this is not a noble breed, but PVC siding. Therefore, no matter what sellers say, but basement siding material is material of the middle price category, and not a luxury class.
How to calculate the amount of material when purchasing
- It is necessary to measure the length and height of the walls or those areas on which it is planned to install panels. We must not forget that the resulting figure will not be final, because when assembling basement siding, the cost of adjusting the picture cannot be avoided. They make up about 10%.
- The amount will change in the following ratio: the lower the length of the wall, the less installation costs will arise. This also works in relation to the size of the panels: the increase in the fitting increases along with the length of the material sheet. Large losses during the installation of profiles and rails are not expected, but they must also be taken into account.

- On average, the size of the panel of the basement siding for the brick is 1120x472 mm.
- In most outlets, consultants will offer assistance in calculations. There are similar services on the site of manufacturers of this material.
Buy basement siding for brick
- Despite the relative availability, the cost of two packages of material (similar in appearance) may vary significantly. Why does it depend?
- First of all, the cost depends on the raw materials used. Foreign analogues are made of European raw materials and using local dyes. The price of goods produced abroad will not be low.
- The country in which the goods have been produced also leaves an imprint on the final cost. If the panels were produced abroad, then delivery costs will be added to the cost.
- The difference in price can also be depending on the proximity of the seller directly to the manufacturer. When buying panels from official dealers, you can save a little.
- I must say that among Canadian, American and German manufacturers, Russian companies begin to conquer the market.
Cooking the base for installation
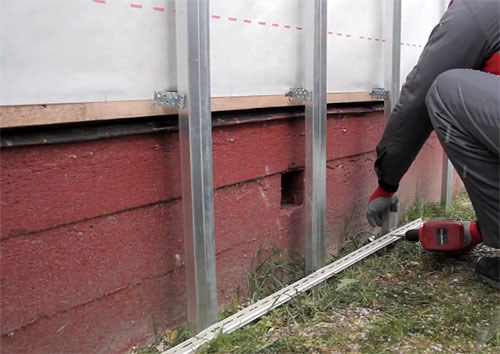
- When the material is purchased, you can start finishing. The surface on which the crate will be mounted should be even and durable. Often there are recommendations for the fastening of basement siding directly to the wall. This practice is not welcome, even if confidence in the evenness of the foundation is 100%. During operation, siding deformations are opposed only to its installation on the crate.

- The most acceptable material for the crate is a metal profile. It is durable, does not require compliance with the indicator of permissible humidity (like wooden rails) and antiseptic processing and fire -retardant compounds (which is required, if done for conscience). Yes, and the bars with knots and irregularities will not work either. Therefore, the metal profile must be mounted depending on the proposed volume of work.
- The horizontal direction is convenient if it is planned to sheathe with siding only the lower part of the structure. The first bar is fixed at a height of 15-12 cm from the soil. This requirement is especially important if the climate does not differ in high temperatures. For ease of installation of panels for the whole house, the crate is better to make vertical. Fainting in two directions will take a lot of time and is not a mandatory requirement.
- But the step with which the guides will be equidistant to each other must be observed. In the horizontal version, this distance equals from the height of the panel. For vertical strips, it is from the length of the siding. This refers to the gap from the right edge of one guide to the right side of the other.

- The vertical elements of the crate in the outer corners of the house are attached to the end. At the inner corners at the distance of the fastener. When buying the material, it is worth checking from the seller whether this manufacturer has a bar on the internal corners. The fact is that some brands of basement siding do not provide for such a component.
Installation of basement siding for brick
The material under consideration has several specific names of the elements that you need to know. With the panels themselves, everything is clear. But some other points may require clarification. Therefore, before starting work, it is worth conducting a small educational program.
- An element that performs the role of fasteners for the first panel and located at the base of the building is called a launch strip.
- In order for the final panel to look neat horizontally, it is framed by the fitting profile. For vertical planes, a J-shaped profile is used.
- External and internal corners help connect the panels of the material among themselves at the appropriate joints.
- In order to gently join two rows of siding sheets, use an H-shaped profile.
- In addition to these elements necessary for the installation of panels exclusively on the base of the building, there are also additional chamfers and overlays, which will provide a reliable and aesthetic connection of the components when completely finished the facade of the house with siding.
Now that it is clear what you have to deal with, you can start the starting stage of assembly with the installation of the starting profile.
- Stage 1. The starting profile should not reach the corner of the house 10 cm. It is attached with nails along the strictly horizontal line (drawn in advance in level). Step of fastening 30 cm.
- Stage 2 It involves the calculation of the required number of panels. To do this, the full length of the wall of the building must be translated into centimeters and divided into 112. The final panel should not be less than 30 cm.

- Stage 3 can be considered the beginning of a full -fledged finish. Here you need to install the first panel. Direction of all work from left to right. The first panel needs to be taken and installed in such a way that its angle does not enter the edge of the starting profile (it was a little lower for a couple of millimeters). It should be shifted to the right almost to the stop and then apply a layer of sealant along the edge. Now you can fully join the siding element with an angle. Before installation, you need to familiarize yourself with the instructions from the manufacturer, where it indicates the size of the necessary clearances between the constituent structures. These seams will become a retreat for the elements of the material with its expansion or displacement. Fastening with self -tapping screws or nails should be strictly at right angles. In this case, it is recommended to use the substrate.
- Stage 4 This is a further formation of a series. The second panel is trained in the start profile and neatly move to the first sheet of siding. The procedure is repeated to the required number of tiles and rows, respectively, the size of the basement. In the case when the panels are imitated by brick or masonry, you need to shift the picture in each subsequent row by 15 cm relative to the previous level. So the finish will acquire a more natural look.

The panels must be joined with smooth movements, without unnecessary efforts. One element is attached to at least five metizes. They should not fall into the mounting pins (these are noticeable columns on the back of the siding). These structural solutions are designed to protect the panels from possible deformation.
- Stage 5 It involves fixing siding at the inner corners, for which a profile or corner is used. After that, the work can be transferred to another wall.
- Stage 6 It is considered final when the fitting profile is mounted. It makes holes slightly exceeding the size of the fasteners in size. It is attached to the foundation, simultaneously filling the edges of the panels into it and performing additional fixation with sealant. If you need to make an angular bend, then the profile is slightly heated and given the necessary shape.
For a successful result (especially if there was no experience with basic siding before) it is better to take a couple of people as assistants. But even this condition, this process will not be fast until the skill is acquired. Although even novice masters are quite capable of this task, you only have to stock up on patience.
![]()
StrPort construction portal 2011-2018. Articles about repair, construction, building materials.
Copying information from the site is possible only with permission of the editorial office Or indicating a direct link to the source. Legal justification