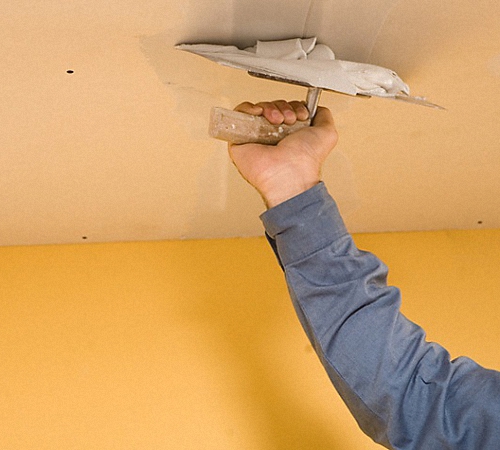
When leveling the lower surface of the room in the most practical and affordable way ...
|
|
The choice of finishing materials for the repair of a small room is not so simple ... |
The endless summer is an unattainable childhood dream, which becomes a reality ... |
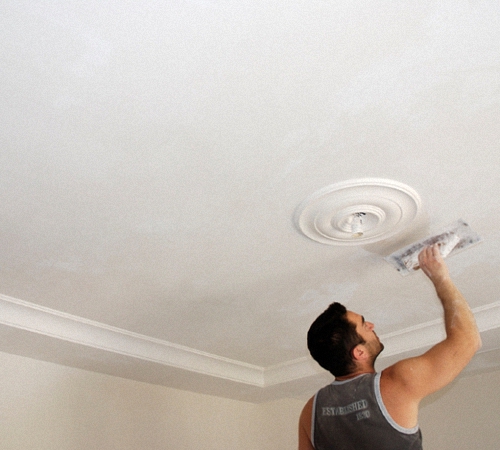
DIY putty putty
After the installation of drywall, the walls in the room remain uneven and have an incomplete appearance. All areas of joints, screws of screws and other repair areas must be puttled in order to remove all flaws. In this article, we will consider the features of putty drywall for painting, embarrassing corners, fasteners and so on.
Table of contents:
- How to choose the right putty for drywall
- Surfacing primer
- Preparatory work before putty drywall
- Pickwall putty for painting
- Features of technology
- Formation of joints between drywall sheets
- Putty screws and corners
- The process of basic putty work
- The final stage of putty drywall
- Material consumption per 1 m2 of drywall
How to choose the right putty for drywall
After the walls or ceiling is finished with drywall, the entire surface must be putty for further painting or gluing the surface with wallpaper. The sheets of the material are even in shape, but there are many joints and places of attachment that must be embedded. It is not difficult to carry out finishing work, but you need to remember some features and rules that will be further considered in the article. First of all, important attention is paid to the choice of material for repair.

The modern market offers a wide selection of dry putty for drywall and different mixtures. The buyer has a difficult task, which consists in the correct choice of building material for wall decoration. Some mixtures are intended only for ceilings or for walls, other substances are used to seal chips and cracks. Experts recommend choosing dry mixes that have a long shelf life.
It is worth noting that the temperature regime and other influences of the external environment, unlike finished goods, do not affect dry putty. Such material can be partially used or used for grinding damaged places of the ceiling, walls and the like. Many are interested in the question: what putty putty drywall to putty, depending on the volume and purpose of work? Putty there are three types, which is determined by the component composition:
- cement mixture;
- gypsum putty;
- a mixture based on polymers.
All three types of putty are suitable for decoration of any room, but there are certain tips when choosing materials. For example, for a kitchen or bathroom, it is recommended to use a putty made on cement, which allows you to withstand a high level of humidity. Regarding the gypsum mixture, with an increased level of dampness, the wall coating will crack. Polymer putty is a universal material that has plastic properties. It is recommended to be used for putty drywall. The consumption of such material is much less, unlike other mixtures.
Different features and characteristics of putty determine its cost and the sphere of application of the material. The use of the component at home is not determined by the properties of frost resistance and fire safety. For processing, it is advised to use a universal mixture that is suitable for apartments and houses.
Surfacing primer
Before starting putty drywall with your own hands, you must first prepare the walls. For this, a primer of walls or ceiling is done. If the area is planned to be glued with wallpaper, then the primer must be applied measuredly throughout the working area. The material should be made on the basis of water, which does not allow the solution to be saturated. Similarly, a film is formed on the working area, through which glue or paint is not impregnated. For use, the primer is mixed in the container, and then applied to the wall with an even layer, the thickness of which should be at least 0.03 millimeters.
It's important to know! For priming walls, it is not recommended to use alkyd mixtures, which can cause deformation layer of cardboard. Flew by drywall turns into bubbles that become stripes of paper. Of course, you will not glue different materials for finishing on such a surface.
Preparatory work before putty drywall
Before you start putting the walls of the walls in the room, you need to carry out some preparatory work. To do this, it is advised to adhere to the following rules:
1. First, it is necessary to align the entire surface. Of course, processing a wall with protruding heads of screws and screws is inconvenient. Therefore, it is important to screw all the fasteners to the end into drywall.
2. It is important to remember that screws and screws should not be recessed in a layer of material. If in the works, such a defect could not be avoided, then it is necessary to replace the fasteners.
3. In the area of \u200b\u200bconnection of drywall sheets, it is necessary to ensure that the top layer of paper is not disconnected from the component of the material. Otherwise, pieces of paper are neatly torn or cut out with a small knife. After that, the defective area must be wiped with sandpaper. Otherwise, putty in the damaged area can be discouraged.
Pickwall putty for painting
All preparatory work has the same sequence as before gluing wallpaper, which is indicated in the previous paragraph. In this case, special attention should be paid to the leveling of walls without unnecessary dents and protrusions. All joints between the sheets of drywall should be thoroughly aligned with the use of putty. Further, the surface of the wall can be primed.
Colorful substances tend to absorb into cardboard products. In case of impregnation of paint into the structure of cardboard, this will cause deformation of the surface of the wall. Therefore, it is recommended to use water -based solutions. All joints of drywall sheets must be cut at an angle of 45 degrees. In this case, it will be possible to form normal reinforcement of the seams.
Features of technology
After the primer dries, it is necessary to accept the technology of putty drywall. In this case, you need to adhere to a certain sequence:
1. First of all, you need to stick a sickle, which is a fiberglass grid. It is used to seal corners, joints or seams. A similar tape is made as self -adhesive material, so all work does not take much time.
2. It is important to make gluing so that the two sides of the joints have the same width under the tape. In fact, the width of the seam should be in the middle of the Serpyanka tape.
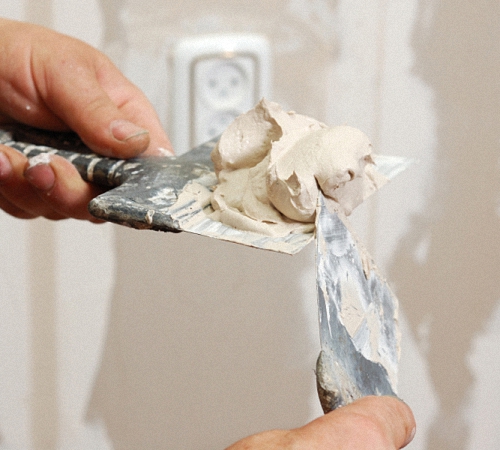
3. Next, you need to dilute the mixture of putty in the required amount. However, it should be remembered that such a solution dries quickly. If you add water to the dried solution, it will change all the properties and features of the putty. Material should be diluted strictly according to the indicated proportions using one gram. As a rule, experts stir their putty for 30 minutes of work, after this time, the mixture becomes unsuitable for use.
Formation of joints between drywall sheets
As the use of putty for drywall seams, it is recommended to use two types of spatulas - medium size and wide shape. Their dimensions should be 11-14 cm and 31-34 cm. Such tools allow the best to apply the mixture to the surface, unlike trowel or graters. So, put the walls of the walls in this way:
1. In order for the putty walls to have an even surface, it is necessary to evenly apply the reinforcing layer along the entire length of the joints. Of course, to apply the mixture, you need to use a smaller spatula. Using a wide working tool, the mixture must be distributed exactly through the entire surface.
2. If when lighting, the joint is completely filled with putty, then the work is performed correctly. An important stage in the walls of walls is the ideal process of reinforcing the joints of drywall.
3. After applying the mixture, the surface of the joints should not have roughness and unevenness. When the mixture dries, it is quite difficult to fix all the streams. In this case, irregularities cannot be wiped with sandpaper or rashpil. And stronger abrasive tools can damage the surface of the working area.

Putty screws and corners
Features of putty of fasteners are a mixture by a cross -shaped option. The solution must be distributed across and along, which allows you to better cover the hats of screws and their heads. This technology is advised to apply professional workers.
A more complex step is putty of the walls of the walls in the room. First of all, the complexity of the work is to fasten the sheets at an angle, which determines some difficulties when leveling the corners. Thus, the finish of the angles must be carried out in two stages:
1. First of all, it is necessary to putty one side of the corner in a standard way.
2. After drying out the first half, you need to do the finish of the second side.
In that case, it will be possible to form even and neat joints. The main thing is that all work should be carried out slowly and sequentially. This will help get rid of alteration of uneven surfaces.
The process of basic putty work
The main process of putting the walls must begin after the mixture dries in the seams and fasteners. All angles in the room must be fixed with aluminum corners, which are fixed on the surface with a putty or a special stapler. The corner needs to measure the required length and cut off, which must correspond to the openings in the windows and in the doors.
All metal corners are fixed by pressing the putty into the profile holes. It is necessary that the entire area is covered with a solution of putty. Thus, it will be possible to preserve the strength and rigidity of the angle, which increases the strength of mechanical influences. Further, with the use of a spatula, level the mixture on the surface. The application method should be accompanied by movements from the edge of the profile to the middle of the sheet of drywall.
If it is planned to putty passages in the form of an arch, then it is necessary to use a special plastic corner. It has a great thickness than aluminum. If the profile is fixed using a construction stapler, then the surface must be covered with two layers of putty. At the same time, it is not recommended to apply too much the mixture, which forms an uneven surface. At first, you need to apply the first layer and wait until the mixture has dried. After that, the second layer is applied, which needs to be carefully aligned and sneaked with drywall. As a result of this performance of work, it will be possible to form perfectly even putty corners.
The final stage of putty drywall
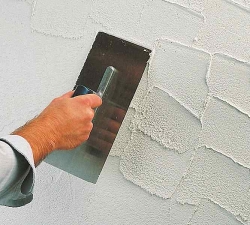
The finished putty of drywall is to carry out certain work, which form the smooth area of \u200b\u200bthe walls and angles in the room. After finishing the corners and seams, it is necessary to hide all uneven places using sandpaper. For work, it is advised to use a respirator. It is very important to wipe all the walls with an sandpaper, which has a thickness: zero. Thus, it will be possible to create an ideal surface for the final covering of the walls with putty. Before that, it should be treated with a primer.
In order to putty a certain surface, you can use a special fiberglass or the mixture that was used at the initial stages of surface grinding. In these works, a wide -shaped spatula is used. The consistency of putty, which is used in finish work, should be thick. This will make it possible to distribute the mixture along the area of \u200b\u200bdrywall. It is worth remembering that the putty layer should not be thick. This will make it easier to treat the surface of the wall or ceiling. To understand the technology, it is recommended to watch a video of putty drywall, which is presented at the end of the article.
Material consumption per 1 m2 of drywall
The amount of putty, which is necessary for wall decoration depends on the processed area. At the same time, if there are some irregularities or damage on the wall, then the consumption of the material increases significantly. For each type of putty, a certain proportion is used:
1. If the surface of the walls is primed, then the approximate putty consumption should be 1.1 x 1 m2. Such a calculation is most suitable for mixtures made on a cement basis.
2. For example, with a gypsum mixture, the proportion is calculated 1: 1, for decoration of any surface.
3. putty, made on the basis of glue is the most economical, because a 1 square meter must be used by a half -kilogram of putty.
To determine the number of putty, it is important to measure the area of \u200b\u200bthe processed surface in the room. To facilitate the work, you can see the dimensions of any sheet of drywall, which are summarized after. For the starting or initial putty of drywall, you need to use the same amount of material. If you did not use all the putty, then the remaining prepared mixture must be disposed of.
If you apply a dried mixture in the works, then this forms an uneven surface with roughness. Further, such a putty will only fall off, why you will have to do repair work again. The finish putty drywall is not the last stage of wall or ceiling decoration. After that, it is important to perform a primer of the surface, and make the final stages for gluing wallpaper or painting walls. When putty, it is quite important to adhere to the features and parameters of work.
![]()
StrPort construction portal 2011-2018. Articles about repair, construction, building materials.
Copying information from the site is possible only with permission of the editorial office Or indicating a direct link to the source. Legal justification