In order for paving slabs to serve you for a long time and efficiently, you need to ...
|
|
House insulation using heat -insulating paint is a great way to save ... |
Own apartment often makes the owners acquire another profession -... |
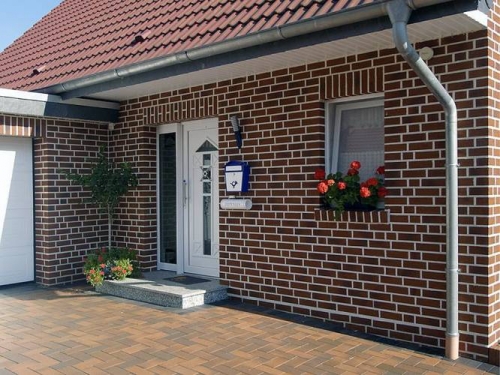
Clinker tiles cladding
Clinker tiles for the facade occupies a special place among building finishing materials. In composition, it is similar to ceramics, but stronger and more stable to the effects of external factors. High operational and aesthetic characteristics led to a wide sphere of use of clinker.
- Advantages and disadvantages of clinker tiles
- Methods of editing clinker
- Clinker tile selection criteria for facade
- Calculation of the required amount of tile
- What glue is suitable for laying clinker tiles
- Recommendations for the decoration of the house with clinker tiles
- Clinker tile laying technology
- Features of the finish of the basement with clinker tiles
- Houses made of clinker tiles: photo
Advantages and disadvantages of clinker tiles
Even the ancient Romans for facing faces used clinker tiles, which was made by firing clay and molding dense monolithic bricks. At the beginning of the 19th century, Dutch masters improved the technology of tile production and created a perfectly smooth, strong finishing material of the clinker.

The main component of the tile is high -quality high -quality shale clay, which is cleaned of salts, lime components and impurities. After clay processing, a finely dispersed promoter, fluxes and shame is added. The mixture is thoroughly mixed, formed and sent to firing. All clay components at a temperature of 1200-1300 s are softened to a monolithic state, providing high strength to the finished product.
The following advantages are inherent in clinker tiles:
- High strength, resistance to abrasion and mechanical damage.
- A layer of melted clay is formed on the surface of the tile, which is even difficult to scratch.
- The surface of the material is resistant to ultraviolet. Clinker tiles are almost ideal for street work, as it does not burn out in the sun.
- Frost resistance allows the use of a clinker in regions with a harsh climate.
- The high density of the material makes clinker tiles with moisture resistant.
- The ease and ease of laying the clinker has a slight weight.
- Environmental purity of material.
- A wide range of texture and colors of tiles.

The fairly high cost of clinker tiles is perhaps the only drawback of the material. The price of the tile varies in the range from 650 to 4000 rubles/m2 (the cost depends on the company's company, form, texture and color of the material).
Methods of editing clinker
The lining of the house with clinker tiles can be performed in a wet and dry way. The first option is considered traditional and is used to install standard tiles, and the second for laying thermal panels with clinker tiles.
Wet method implies the use of adhesive composition. The facade finishes are piecely performed by separate elements. The plates are glued to the prepared surface using special adhesive mixtures.

Important! In the wet method, a heater substrate is used, which is mounted with self -tapping screws to the primed wall. The thermal insulation layer is aligned and reinforced, after which the tile is laid
Pros of a wet method: aesthetic appearance, durability, strength. Cons: more time -consuming relative to the dry method.
Dry way It implies laying panels consisting of insulation of polystyrene foam and plates. Included with the panels, fasteners are delivered, necessary for fixing on the walls.
Installation of thermal panels with clinker tiles can be performed by self -tapping screws or dowels directly on the wall of the house. If the base is uneven, it is better to make a frame of metal or wooden profiles.

Pros of dry laying: Ease of installation (after fastening the panels, additional processing of the seams is not required). Minus the high cost of thermal panels.
Clinker tile selection criteria for facade
In order not to get confused in the whole variety of models presented, you must clearly determine the main parameters of the selection of tiles for the facade:
- Type of cladding: standard tile or heat -insulating panel.
- The color of the facade. The entire color palette of clinker tiles can be divided into four groups: light, yellow, dark and brick. First you need to choose a group of flowers, and after that it will be easier to determine a specific shade.
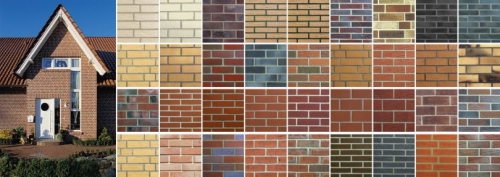
- The texture of the tile. The clinker can be smooth, brilliant, with roughness and with additives. When choosing, you must take into account:
- textured tiles are more expensive, but its relief can only be seen from close range;
- a number of tiles look very different than one tile;
- if the facade of the house and the basement are different, then one of them must be without overflows.
- Grout of tiles. It is the grout that creates a holistic exterior of the room. Usually it is taken in the third color and is released as a frame for tiles. Do not pick up the grout close in color of the tiles, otherwise it will merge and create a feeling of plainness of the facade.
- Manufacturer and material price. The range of offers in the construction market has hundreds of items. The following manufacturers are especially popular:
- StroeherGerman manufacturer producing clinker tiles; The dimensions of the Glanzstukke product of an unusual format 440*52*14 mm. Such a cladding gives a vintage kind to. The price of finishing material is about 3000 rubles/m2.
- Roben More affordable tiles of a German manufacturer, company factories are located in Europe and the USA. The clinker is produced by a standard European size 240*71*15 mm, material consumption per m2 48 tiles. The cost of clinker tiles is about 700-1000 rubles/m2.
- ABC Klincergruppe(Germany) has popular collections, such as Australia - clinker tiles under the old days. The advantage of the availability of the price range is 900-1200 rubles/m2.
- HousonChinese manufacturer producing original clinker tile models. The thickness of the Houson clinker tile differs from standard European sizes and is 7 mm. Consumers often lure the low cost of the material 600-700 rubel/m2.


Calculation of the required amount of tile
To perform the facade clamping with clinker tiles, you need to calculate in advance how much material is required. Separately, the number of basic and angular elements is determined. The main elements are calculated in square meters, and corner in linear.

Rules for calculating the number of tiles:
- Determine the area of \u200b\u200bthe covered surface to multiply the length of the base by the width. From the resulting value, take away the area of \u200b\u200ball non -covered elements (windows, doors, etc.).
- On the packaging of the tiles, the consumption of the material per 1 m2 is indicated. Typically, this value is determined by the calculation that the inter-seams are 10-12 mm. Based on this value, simply calculate the number of clinker packages: divide the total coating area into expense.
- To determine the number of corner elements, the total length of all the existing corners of the facade must be divided into the length of one corner tile. It is important not to forget about 10 mm between the plates.
What glue is suitable for laying clinker tiles
To fasten the clinker, you can use several types of adhesive mixtures:

- Cement compositions have lost their popularity a little, but some masters continue to use cement mixtures today. Plasticizers (elastic properties), water holding components (reduce the mixture) and dispersion additives are added to the classic cement solution (increase the frost resistance and adhesion of the material).
- One -component glue is the finished pasty mass. A significant drawback of the composition for a long period of drying. This mixture is better for smaller tiles and thickness.
- Epoxy two -component or epoxy compounds require additional preparation. As a result of mixing two components, an elastic and strong mixture is obtained. This option is the most reliable, but the cost of glue is an order of magnitude higher.
Important! Adhesive compounds for laying the clinker should have the most important property of elasticity. Therefore, choosing glue for tiles, it is better to give preference to the composition enriched with elastic additives. Such mixtures are not afraid of the shrinkage of the building, high humidity and temperature changes
Recommendations for the decoration of the house with clinker tiles
The lining of the house with clinker tiles is carried out in compliance with a number of conditions:

- Proper preparation of the base. The surface should be even, cleaned of dirt/dust and well -discouraged.
- The correct selection of glue. It is worth choosing frost and moisture resistant compositions. Dry glue Ceresit cm17 and cm117 is suitable for external work.
- Compliance with the technology of alignment of seams. When laying ordinary tiles with a cross -shaped intersection of joints, ordinary crosses are used. To obtain even seams, when laying tiles under a brick, a rod with a diameter of 6-8 mm is used.
- Sealing seams between the plates. Before laying the rod, the seam is filled with grout. After the composition dries the rod can be removed, and the neat seam will turn out automatically.
- Before applying glue to the tile, it must be moistened, and the back side is primed.
Clinker tile laying technology
Preparation of the foundation for styling
The application of the adhesive on the wall of the house requires the leveling of flatness:

- Using the construction level and rail, check the evenness of the wall. Permissible error 4 mm. If there is more unevenness, then you need to apply plaster, and then wipe it to a smooth state.
- The base of the wall must be primed, it is advisable to apply at least two layers.
- You can install the substrate thermal insulation material. This will reduce the formation of condensate and additionally insulate the walls of the room.
Installation of clinker tiles
When starting to styling, you need to prepare the adhesive composition, moisten the tile in water and disgust from the back.
Laying tiles begin with door and window openings. Before work, it is necessary to measure the distance between the openings, determine the boundaries of the installation and apply the marking with a pencil. This is one of the most critical stages that determines the symmetry and accuracy of the cladding.

After the doors and windows of the house are decorated, proceed to the decoration of the corners of the room. The walls of the walls with a clinker are performed over the entire length in even rows. If it is planned to create patterns on the facade, it is more convenient to lay out the tile in areas of 1 m2.
The final stage of laying the cladding of the external window sill. At the end of the cladding, you can start grouting the seams.
Sealing and grouting
To align the tile seams from the master, certain skills will be required. To control evenness, you should adhere to a special technology and use a metal bar:

- A round bar is laid out on a row of stacked tiles (diameter 8 mm).
- After grasping the plates with the surface of the wall, it is necessary to carefully remove the rods from the inter -seams.
- Fill the space of the seams with grout and remove excess.
Facade finishing with clinker tiles: video
Features of the finish of the basement with clinker tiles
The base is most susceptible to moisture and mechanical loads, therefore, the decoration of this part of the facade is paid to special attention. When facing, more dense heater and more massive, thick clinker tiles are used.

Recommendations for the finish of the basement:
- laying tiles begin slightly below the level of soil;
- the wall is reinforced with a metal net, which is attached to the base with self -tapping screws;
- for grouting copper joints, it is better to use polyurethane or acrylic grouting;
- so that the base has one level, a starting bar is laid along the entire perimeter of the facade - it can be a wooden rail, an ordinary board or a steel profile;
- glue is applied to the area of \u200b\u200bthe base that can be covered with tiles; the glue time is about 20-30 minutes;
- the seams are overwhelmed after 2-3 days to lay the tiles.
Advice. It is better to clad the base with a double application of glue. Tile glue is applied to the tile and on the base. In this case, the solution completely fills the space under the clinker
Clinker tiles cladding: video
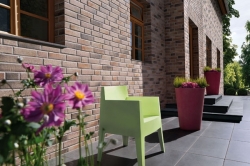
Houses made of clinker tiles: photo


Comments
![]()
StrPort construction portal 2011-2018. Articles about repair, construction, building materials.
Copying information from the site is possible only with permission of the editorial office Or indicating a direct link to the source. Legal justification