Glass blocks are hollow glass bricks that are widely used in ...
|
|
If you want to equip an attractive, durable and inexpensive floor in your house ... |
Mosaic tiles can give sophistication and originality even the most ... |
Installation of roofs from corrugated board. Instructions
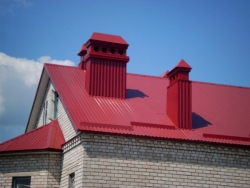
High -quality roofing of your house is a guarantor of reliable protection against leakage and destruction, which will primarily provide comfort and comfort.
Steel is one of the most durable and durable materials, but its only drawback, like a roof material, was weight. The totality of heavy sheets in total gave a huge mass, which negatively influenced the frame of the roofing. The problem that arose was solved by the method of corrupting of a steel sheet, which had a slight weight in a ratio to size, retained its strong and rigid qualities thanks to the trapezoidal structure of the profile and the corrugated board arose.
Over the past few years, he has gained great popularity, thanks to the practicality of use, as well as minimally causing harm to the environment.
Table of contents
- Corrugated fact that it is, its pros and cons of
- Types of corrugated board
- The angle of inclination of the roof
- Preparatory work
- Waterproofing and ventilation
- Rafter strips and crate
- Cadet overhang
- Installation of corrugated board
- We make a pediment
- Installation of the skate and snowfall
- Roof insulation from corrugated board
- Care for the corrugated board
Corrugated fact that it is, its pros and cons of
Profiled flooring is produced by cold skiing from a sheet of hot -valuable steel. In the course of production, it lends itself to several layers of protection to increase strength and durability. At the initial stage, the workpiece is processed by anti -corrosion phosphate and only then primers. The upper part of the sheet is covered with a mixture of polymers, and the lower one with a special varnish.
Thanks to the work done, in the end, the durable material of high quality is obtained, combining much more advantages than negative qualities.

Pros:
- The service life of the material;
- A competing price with other types of roofing materials;
- Weight of the material;
- Simplicity and saving time during installation, as well as dismantling;
- Stability at temperature changes.
The disadvantage of the roof from the corrugated board is a low level of noise pounding, due to which soundproofing is significantly deteriorated.

Types of corrugated board
The widespread use of corrugated board and not only in the roof, divided all its types into three classes:
- N for coatings and ceilings, as well as non -removable formwork (best roofing material). Additional stiffeners, the thickness and height of the corrugation make it the most reliable and strong option.
- C for fencing fences and walls. This option is much cheaper than the previous one. The thickness of the sheet is less, respectively, the service life and reliability are significantly inferior.
- NS combined corrugated board. The brand is also often used in roofing, but in most cases for an unloaded roof. It all depends on the angle of the roof slope, which is a lot of important factor in the winter season. A thin sheet of steel and a more gentle roof structure can lead to fatal consequences under snow pressure.

The angle of inclination of the roof
For proper laying of corrugated board, it is necessary to first take into account the slope of the roof. This will help to calculate the desired part of the overlap with a neighboring sheet.
- When tilted a roof is less than 15 more than 12, the overlap of sheets should be at least 20 cm;
- In cases of angle of inclination 15-30 - from 15 to 20 cm;
- The slope of the roof above 30 allows you to reduce the overlap to 10-15 cm;
- The slope angle, which was less than 12, requires additional sealing for the sealing, using silicone sealant.

Next, we will give you instructions for the installation of roofs from corrugated board, thanks to which you can easily build a reliable roof for your home.
Preparatory work
Before the process of laying, it is worth carefully and correctly calculate the amount of roofing material and its type. You can do this yourself or use the service of the company whose manager will help you.
- During transportation and loading, to avoid strong bends, as well as provide an even surface with the product that will transport the material.
- Manual unloading provides for every 2 m length of one worker. Using lifting equipment, it is necessary to use soft slings.
- The transportation to the roof is carried out using the lag to connect the edge and earth, not exceeding the norm of one sheet.
It will take such an instrument as a roulette, a hammer, a hacksaw for metal, a cord, a rail, a drill and drill.

Waterproofing and ventilation
Under the roof, moisture allocated from the premises of the house is always collected. To prevent this, it is necessary to organize the roof so that the temperature from the outside and under the roof is the same. To fulfill this goal, you need to take care of the correct steam and thermal insulation, as well as the ventilation.
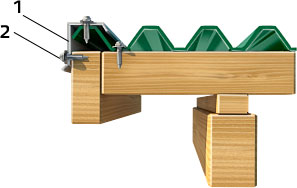
Waterproofing is most often mounted before fastening of the sheets of corrugated board along the crate.

where 1 is a rafter leg; 2- waterproofing; 3- rafter strips (bar of conobruses); 4 - crate.
Advice from professionals: install the waterproofing film so that it hangs a little, about 20 mm, in the position perpendicular to the slope of the roof. You should start installation from the lower edge of the roof to the skate. Its overlap, sealed with adhesive tape, should be 100-150 mm.
Method of laying the film on the rafters:

To ensure the most efficient movement of the air flow from the cornice under the roof crest organize ventilation holes between the ridge bar and roofing sheets. In places where the air enters is difficult, it is necessary to make additional channels for ventilation. However, the easiest way is the placement of wooden rails directly on the waterproofing layer.
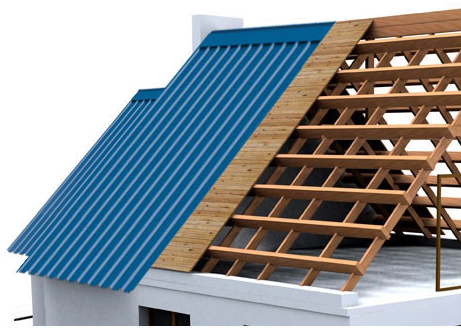
Rafter strips and crate
Rraft strips or steel runs are mounted on top of hydraulic and vapor barrier if the profile height becomes 40 mm. Further, a crate is attached to them in the longitudinal direction, the step of which depends on the type of corrugated board.
The organization of the crate will be required:
- a beam of 50x50 mm in size;
- board 32x10 mm;
- moisture -resistant plywood sheets with a diameter of 10 mm.

The crate is of two types: continuous and thinned. The first type is installed on the ribs, skates and around chimneys. The wrapped step is 50 mm. Lay the boards at the same distance, this will facilitate the entire further process to fasten the sheets of corrugated board.
Be sure to treat all wooden parts with an antiseptic and fire mixture.
Experts advise to lay the so -called diffusion gasket on top of the crate, which will prevent condensation. It is attached with small nails with a wide hat.
The arrangement of the crate should be treated with special responsibility, since the reliability of the entire structure depends on it to a greater extent.
The exact standards of the thickness of the crate also do not exist, it all depends on the same parameters of profiled sheets and the length of the fasteners. The minimum sizes of the cross -section of the crate become 32 /100 mm. The board, which is located along the cornice, should be a little thicker than everyone else. Near the chimney, it is necessary to organize the fastening of additional boards.
Cadet overhang
We lay the lower row of roofing corrugated board on the crate, while forming a cornice overhang. Its dimensions are completely dependent on the height of the profile sheet.
However, it is initially necessary to take care of the cornice bar, which must be organized below the waterproofing layer. This is necessary so that the wastewater and the resulting condensate fall into the cornice bar, according to which they flowed into the water bribe, and then along the drain pipe. In a different version, the water will drain along the walls of the house, which will cause negative consequences.
Installation of corrugated board
It is worth noting immediately that the installation of sheets of corrugated board should be carried out strictly according to the instructions.
Cutting corrugated board
Of course, it is better to purchase corrugated board sheets on the market corresponding to the size of the roof, but often these two parameters do not correspond, so you need to know how to cut and which tool is better to use for this.
The adjustment of the material must be done on a flat plane, for example, on the ground.
For these purposes, you can use a variety of tools, however, it is best to use electrical devices according to the type of drill with a disk nozzle. If you could not get such a tool, you will have to cut manually with a steel -base metal scissors or a hacksaw with small teeth.
It is forbidden to use mechanisms with an abrasive cutting work disk, for example, a grinder for cutting sheets of corrugated board. The reason is that such devices during operation release relatively greater heat, which negatively affects the operational qualities of the material.
During cutting the roofing material, it will not do without damage to the edge, so it must be taken in advance about the paint in the color of the sheets of corrugated board.
Raise the sheets of the corrugated board to the roof
During the raising of the roof of the roofing corrugated board, difficulties very often arise due to the dimensions of the material, therefore, for comfortable work, it is best to perform this stage of work using lag.
They should be installed in such a way that on one side they rest against the ground, and the other directly into the cornice bar of the roof.
Between the strips there should be a little less distance than the width of the sheets of the corrugated board themselves. Thanks to this system, you can easily raise a roofing sheet for further installation. You can replace the lags with a regular staircase without railing.
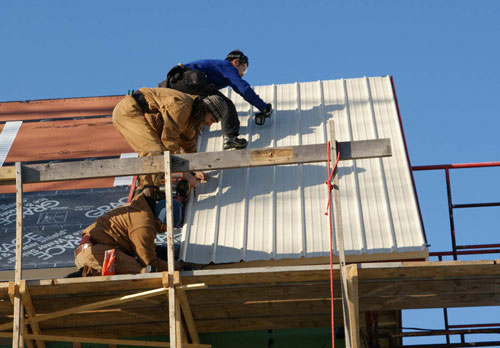
Fastening sheets of corrugated board
The roof by the corrugated board should be made, observing the following technology:
- Sheets should be attached with hexagonal screws with a length of 80 mm and sealing laying. It is worth remembering that it is impossible to tighten the screws too much, as this can lead to excessive density of the gasket, as a result of which the waterproofing layer may suffer.

- The sheets should be fixed in the lower part of the wave, and in the skating elements and in the places of overlap in the upper.
- It is best to start installation from the end of the slope. The side overlap should go to half the wave of the sheet. However, if the slope is gentle (the angle of inclination can vary from 8 to 120 degrees), then to avoid leakage, the overlap should enter 1.5 waves.
- On transverse and longitudinal joints, it is necessary to make an additional seal using a self -adhesive tape or bitumen mastic.
- The front parts of the roof should be equipped with windmills, which will protect the roof from corrugated board from destruction and blowing. They need to be attached with the help of self -tapping screws, the step of which is 200 mm.
- Depending on the height of the wave, the length of the self -tapping screw is selected, which is equal to:
L \u003d l1+h+l2, where
L1, L2, respectively, the profile thread (about 25 30 mm) and the thickness of the washer with a seal (approximately 3-4 mm), h the height of the corrugation.

Approximately 5-8 screws must be used for 1 m2.
Installation of roofs from corrugated board video:
We make a pediment
To prevent break off the sheets of corrugated board during strong gusts of wind, it is necessary to properly equip a pediment cut.
If the allowance of sheets of corrugated board from the front of the house is 50-70 mm, then the wind rack is used with 25x80 mm dimensions, which is attached using screws. If from the front of the house the allowance is insignificant or it is completely not at all, then in addition to the rail, the wind bar is also used. She looks like an ordinary steel corner. It is necessary to fix it with a step of 200-300 mm and with a transverse overlap of 100-150 mm.
To adjoin the slope to the wall, angular strips are used. The strips, regardless of the type of adjoining, longitudinal or transverse, should be mounted using self-tapping screws with a step of 200-300 mm and an overlap between these strips about 100 mm or more.
Transverse adjustment to the wall:

Longitudinal adjustment to the wall:

Installation of the skate and snowfall
Begin installation work associated with the fastening of the ridge follows from the side that is less susceptible to the gusts of wind and leaders. For example, if the West is considered to be the prevailing windy side for your area, then the fastening of the skate is better to start from the east. It can be simple, curly or tiled. The ridge is fixed using screws with a step of 200-300 mm, also do not forget about the sealing gasket and ventilation gap.

The snowfall is especially relevant during the thaw, it prevents an avalanche fall of snow from a metal roof. It must be installed slightly below the edge of the roof across the roof slope. Fastening is carried out in advance mounted bars.
Roof insulation from corrugated board
For insulation of the roof, you will need mineral wool and a steam -barrier. Together, mineral wool can also be taken by a durra insulation, but this one is the most effective.
And so ... we go down from the roof to the attic and you can proceed to the final stage of the arrangement of the roof from the corrugated board.
Mineral insulation can be rolled or leafy, which you choose, does not matter, since one and the other have excellent operational properties. It is mounted in the gap between the rafters, for its fastening it can be used by any method with screws, fixed tightly with a thread or glued. The main thing is that any of them performing their functions, and at the same time unnecessarily compresses the seal, since the cold is kept outside not the cotton wool itself, but the air that is located in it.

2-rush; 3 sealant; 4- Kostes; 5- layer of waterproofing; 6.7 - respectively, the rafter bar and leg; 8 mineral wool; 9- vapor barrier; 10-slats ceiling; 11- lining or some other finishing material; and roof ventilation; B ventilation between waterproofing and mineral insulation.
Then, on top of the mineral wool, the steam -banker should be attached. It is necessary in order to prevent moisture that is in the air, inside the insulation, as this can significantly reduce the operational properties of mineral wool, the more it brings moisture, the more difficult it will be kept by heat.
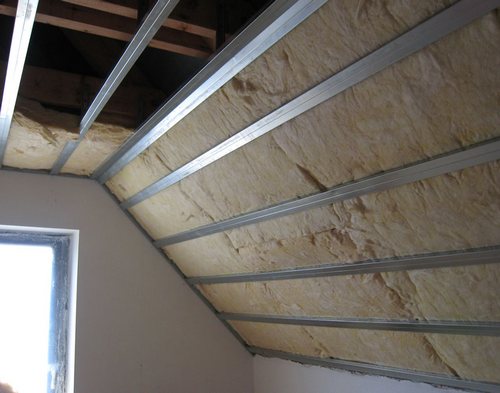
It is worth remembering that the entire roof space does not need to be insulated, but you should take care of the so -called cold triangle. The space located at the top of the roof at a distance of 300-400 mm must be left with unprocessed mineral wool, since this cold triangle will contribute to good air circulation in the attic and in the inside of the roof.
The installation of roof from corrugated board is also allowed to the old roof, which meets all its operational properties, this will increase its thermal insulation properties.
The cost of installing a roof from corrugated board primarily depends on the complexity of the structure, dimensions and, of course, on the roofing material itself.
Care for the corrugated board
In departure, this roofing material is not at all whimsical. However, it should be treated especially carefully, since profile sheets can be easily damaged. Before the installation, do not fold them on the ground, or better use for this a special plank stand, the boards of which have a thickness of about 25 cm and are located in a step of 50 cm. At least once every six months, make a general cleaning of the roof from dirt, sheets and other pests.
In the event of scratches on the sheet, there is nothing wrong with this, since the zinc layer located under the plastic will protect the corrugated board from rust, and the damage site can be treated with paint of the same color.
![]()
StrPort construction portal 2011-2018. Articles about repair, construction, building materials.
Copying information from the site is possible only with permission of the editorial office Or indicating a direct link to the source. Legal justification
correct an error in size
correct an error in the size of the crate board - 32x100
and yet - plywood does not have that
and yet - plywood does not have the size of a diameter
a lot of shortcomings, errors
a lot of shortcomings, errors, etc. Review yourself
Mineral cotton wool or durra
Mineral wool or durra insulation
from the side that is less
on the side that is less susceptible to gusts of wind and leaders. Leaders)))