Since the appearance of plastic windows in the Russian market, everyone is striving to replace them ...
|
|
Roofing iron these are products made of sheet or roll steel that have ... |
The garage is not only a shelter for the car, but also acts as a second home ... |
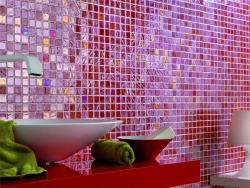
We lay mosaic tiles on the net. Do -it -yourself mosaic instructions
Mosaic tiles can give sophistication and originality even the most inconspicuous and conservative interior. This material has gained popularity among consumers and is in demand along with other facing materials. Mosaic laying work is estimated more expensive and significantly increase the repair budget. With the advent of mini-tiles on the grid, the styling technology has become easier, and it will turn out to implement the conceived design project on its own.
- Mosaic tiles: advantages of styling
- Features of different types of mosaic tiles
- Requirements for the base
- Choosing glue for laying mosaic tiles
- Step -by -step mosaic installation technology
- Carecover tips
- Mosaic tiles in the interior: photo ideas
Mosaic tiles: advantages of styling
The mosaic tile is a popular type of facing material, widely used for the design of bathrooms, saunas, pools, kitchens, living rooms and facades. Mosaic is decorative compositions of many small glass, ceramic, mica elements. All parts are fastened on an elastic grid, forming flexible finishing material.

Installation of mosaic tiles is a modern, original and stylish solution to interior design, which allows you to realize different design ideas. Before making the final choice in favor of the mosaic, you should familiarize yourself with the features of the cladding:
- Small tile is made of materials resistant to high humidity and temperature fluctuations. High wear resistance allows the use of mosaic decor in public places.
- Mosaic decoration has similar characteristics with tile cladding: strength and durability. The aesthetic and attractive type of product is preserved for a long time.
- The possibility of installation on the surface of different configurations: rounded niches and bath screens. The mosaic panel is easy to cut into pieces of the desired shape, this simplifies styling in hard -to -reach places.
- A large assortment of mosaics allows you to create any decorative panel, an interesting pattern or ornament.
Among the disadvantages of mosaic finishes include:
- high cost of material;
- more complex installation compared to laying ordinary ceramic tiles;
- high -quality mosaic laying requires a thorough preparation of the base.

The advantages of lining with mosaic tiles exceed its minuses. Laying a wall or panel of small mosaics is best entrusted to a professional. In order not to overpay for the work of an experienced master, you can highlight a small accent zone and lay out the mosaic strip yourself.
Features of different types of mosaic tiles
Based on the materials of manufacture, the following types of mosaics are distinguished:
- Stone. Tiles are made of quartz, marble, granite, slate or travertine. This material is characterized by high strength, therefore it is used not only for wall decoration, but also of the floor. Stone mosaic has natural aesthetics, gives the room a special style. Some manufacturers offer exclusive collections from malachite or agate.
- Glass. Great lining of surfaces subject to moisture. However, the material is less resistant to impacts and scratches, therefore, it is not recommended for laying on the floor or finishes of countertops. A glass mosaic with a translucent structure should be attached to a special glue.
- Ceramic. Dear, the price suitable for decorating any zone of the house. The mosaic is covered with glossy icing or remains matte. Laying a ceramic mini-tile allows you to get a relief non-slip surface. Ceramics are resistant to mechanical damage and abrasive compounds of detergents.

According to the application method, mosaic is distinguished on paper and on the stack. The first option is the tile on the front side is covered with a paper base. After installation, the paper is removed.
The second option is mosaic elements from the reverse side are connected by a net, which is applied to the adhesive solution. Such a mosaic is easier in styling.
A mesh for mosaic tiles can be of different types. The most durable and convenient polyurethane installation. They are reliably held on a mosaic and are suitable for styling in a humid environment. The cheaper version of the product on the gauze grid. Their use is possible in rooms with low cross -country ability. In zones with intensive movement, the tiles on a cloth base are quickly shattered and can fall off.
Important! Before buying, you need to make sure that the net is firmly fixed on a mini-tile. Even when sagging, the mosaic should not depart from the base. During the laying of a defective product, mosaic problems may not be evenly lying and the pattern may move.
Requirements for the base
The mosaic fits on an even, smooth base. If you neglect this requirement, then the mesh flexible canvas will repeat all the protrusions and the result will turn out to be embossed.

Preparation of the surface before laying involves the following measures:
- Check the evenness of the coating. Minor surface changes can be fixed using the thickness of the glue. However, this method does not always work. Optimally preliminary plaster and surface grout. With significant changes in the base, it is better to align it using sheets of moisture -resistant drywall.
- Clean the surface. Before installing mosaic tiles, it is necessary to remove pollution and dust. The remnants of the plaster after the grout should be assembled with a vacuum cleaner, and wipe the coating with a clean rag.
- Glue the base this will improve the adhesive characteristics of materials and completely save the surface of dust. Deep penetration compounds are optimally suitable for work.
Choosing glue for laying mosaic tiles
To perform installation, you need to choose the right glue for mosaic tiles. Three types of adhesive compositions are acceptable:
- dispersion one -component;
- glue based on cement of hard or elastic composition;
- a reactive cool solution consisting of 2 components (basics and hardener).

When buying glue, it is necessary to take into account the type of mosaic tile, the nature of the surface and room. Recommendations for the choice of adhesive composition based on the material of the manufacture of tiles:
- Ceramic products cement glue are white, gray. To facing a deformative or non -pointing base, an elastic composition must be used; for the decoration of a stable mineral base, any tile is suitable.
- A natural stone. Marble is sensitive to moisture and with prolonged contact can change color, so such a mosaic is fixed on a rapidly hardening cement composition or reactive glue.
- Glass mosaic. A prerequisite of the white color of the adhesive solution. It can be a cement or polyurethane composition. For decoration of the pool, bathroom or shower, you need to add a plasticizer (liquid latex) to the glue. This component will provide the necessary waterproofing of the base. The finish can be performed using epoxy glue.
Important! When facing a pool or bathroom, it is necessary to let the glue stand for at least two weeks after laying the mosaic. After this period, the container can be filled with water. Finishing work should be carried out at an air temperature of at least +5C.
Step -by -step mosaic installation technology
Marking the lined base
Previously, it is necessary to make a dry layout of the mosaic and marking the base. This is necessary in order to accurately determine the location of the elements and make sure of color accord. If the layout stage is missed, then in the process of work it may turn out that a canvas of a different color or format is present in the party.

Having laid out on the surface the proposed pattern, parts of the tile should be fixed with tape and numbered the canvases this will facilitate the further assembly of the ornament. Following the layout performed, a sketch is created. When developing a drawing of mosaic tiles, some nuances must be taken into account:
- It is advisable to make a layout of the picture from the most illuminated site or from the center of the image. The tiles will have to be cut, so particles of tiles should be located at the edges or in the inner corners in inconspicuous parts.
- In the presence of external angles, the layout of the picture begins with them. The priority element for starting work is any decorative element of the room: panel, mirror, niche.
After laying out, numbering and creating a detailed sketch, mosaic sheets must be neatly folded back into the boxes. On the wall or on the floor, it should be noted the boundaries of the mosaic canvas for this, the laser line is optimally suitable.
Preparation of tools and glue kneads
A set of tools for installing mosaic tiles includes:
- moisture -resistant primer with an antifungal effect;
- adhesive composition;
- grout;
- rubberized spatula for leveling and crushing the plates;
- toothed spatula;
- surface primer;
- construction mixer for uniform collapse of glue;
- the capacity for the preparation of glue.

Knight is performed according to the manufacturer's instructions. In this case, it is necessary to adhere to some rules:
- first, the container pour water, and then add a dry mixture;
- the solution mixes twice with an interval of 5 minutes;
- the duration of one kneading with a mixer 1 minute at medium speeds; An increase in the speed and time of kneading can lead to liquefaction of glue.
Laying finishing material
The sequence of laying mosaic tiles:
- Grodings should form on the prepared surface with a gear spatula. At a time, you need to cover the area that will be faced for half an hour.
- Put the mosaic sheet to the base with the net down and press a little. For uniform distribution of glue, the surface can be rolled with a roller. It is necessary to ensure that the distance between the squares remains the same, and the glue does not penetrate the front of the mosaic. To keep the gaps between the elements at the same level, it is necessary to use crosses.
- Gently remove the film and leave the glue for drying for one or two days. Excess adhesive solution must be removed half an hour after fastening the mosaic later it will be difficult to clean the tile.

Important! You can’t walk on freshly laid tiles. The loads are acceptable only after the final drying and fixation of the mosaic.
Grouting mosaic seams
The order of grouting of the seams:
- Prepare the grout mixture, following the instructions on the package.
- For the convenience of cleaning tiles from traces of grout, it is preliminarily desirable to treat with protective sprays. After 20-30 minutes, you can proceed to grind the seams.
- To the spatula, dial the grout and wide movements, moving diagonally, fill the seams. The spatula must be slightly pressed so that the grout is slightly lower than the mosaic level.
- The solution must be a little moisturized so that it is soaked in water and does not crack. You can use a wet sponge or a small spray gun for watering flowers.
- After 20 minutes, when the solution freezes the excess of the mixture a little, drawn on the coating with a damp stiff sponge. The remains of the stuck cement dust will be removed with a 5%solution of sulfuric acid.
- Rinse the mosaic with clean water.

Advice. Marble mosaic requires special accuracy when rubbing the seams. The stone has pores into which the solution can penetrate and change the color of the tile.
Carecover tips
- It is advisable to periodically process the mosaic coating in the bathroom with special fungicidal agents. This is necessarily done if ventilation does not cope with its task. Increased humidity can provoke the appearance of mold and fungus on the walls.
- For cleaning, it is advisable to choose gel -like detergents without abrasive components.
- Polluted areas of the panel can be wiped with a soft sponge moistened in soapy solution. At the end, rinse with water and wipe dry.
- The surface of the mosaic cannot be rubbed with oil substances, means with phosphoric acid and wax.

Mosaic tiles in the interior: photo ideas
Decorating the screen of the fireplace with silver mosaics. The surface flickers and shimmers under the glare of fire, creating the illusion of movement.

Lining the walls and ceiling in the bathroom widespread method of designing a wet area of \u200b\u200bthe apartment and house.

Mosaic was increasingly used to design a working apron in the kitchen. This solution gives sophistication and respectability to the traditional interior.

Mosaic countertop bright accent in the interior of the kitchen, living room or bathroom.

Laying mosaic tiles: video
![]()
StrPort construction portal 2011-2018. Articles about repair, construction, building materials.
Copying information from the site is possible only with permission of the editorial office Or indicating a direct link to the source. Legal justification
Crosses and filler seams
Crosses and filler sutures for laying tiles with good prices and free delivery. http://got.by/2dryz2
Through the service http://bit.ly/2pqd7ca cheaper by 3-8%