Despite the popularity of suspended ceilings or multi -level, complex structures, ...
|
|
Initially, the design of the frame house is demanding on careful pondering the issue ... |
Currently, the most used material for covering the floor is ... |
DIY monolithic overlap

In houses made of brick, concrete or concrete blocks of ceilings are usually made of reinforced concrete. They provide exceptional strength and seismic resistance of the structure, as well as very durable and do not burn, which is important. There are several ways to arrange reinforced concrete floors. The most common and universal laying of factory -made floor slabs. Such plates are ordered at reinforced concrete plants, and then mounted using a crane and a team of workers. In those cases when the use of a lifting crane on the construction site is difficult, or when the house has a non -standard layout and it is difficult to lay out the finished slabs, a monolithic floor slab is equipped. In fact, a monolithic plate can be filled not only when there is evidence for this, but also simply because you think it is more appropriate. In this article, we will tell you how to lay the floor slabs and how to pour a monolithic plate. Not all work can be done independently, but you should still get acquainted with the technology, at least in order to control the process on the construction site.
DIY monolithic slab
A monolithic ceiling has several advantages compared to the overlap from ready -made reinforced concrete plates. Firstly, the design is strong and monolithic without a single seam, which provides uniform load on the walls and foundation. Secondly, monolithic filling allows the layout in the house more free, as it can rely on the columns. Also, the layout can imply any angles and nooks, for which it would be difficult to choose the slabs of the ceiling of standard sizes. Thirdly, you can safely equip a balcony without an additional stove of resting, since the design is monolithic.
You can equip a monolithic floor slab yourself, for this you do not need a lifting crane or a large team of workers. The main thing is to observe the technology and not save on materials.
Monolithic floor slabs installation technology

Like everything related to construction, a monolithic floor begins with the project. It is advisable to order a calculation of a monolithic floor slab in the project bureau and not save on this. Usually it includes the calculation of the transverse section of the plate for the action of the bending moment at maximum load. As a result, you will receive the optimal dimensions for the floor slab specifically in your house, indications of which reinforcement to use and which class of concrete. If you want to try to perform calculations yourself, then an example of calculating the monolithic floor slab can be found on the Internet. We will not focus on this. Consider the option when a regular country house with a span is built no more than 7 m, so we will make a monolithic slab of the floor of the most popular recommended size: with a thickness of 180 to 200 mm.
Materials for the manufacture of a monolithic floor slab:
- Writing.
- Supports to maintain formwork at the rate of 1 support per 1 m2.
- Steel reinforcement with a diameter of 10 mm or 12 mm.
- Concrete of the brand M 350 or separately cement, sand and gravel.
- GIBROOD FABILITY FOR ARMAMATION.
- Plastic stands for reinforcement (fixators).
Monolithic slab filling technology includes such stages:
- Calculation of the floor slab if the flight is more than 7 m, or the project involves the rest of the stove on the column/column.
- Installation of formwork like deck.
- Reinforcing the slab with steel rods.
- Bill with concrete.
- Concrete seal.
So, after the walls are expelled to the required height, and their level is allegedly leveled, you can start arranging a monolithic floor slab.
Installation installation for a monolithic floor slab

The device of a monolithic floor slab suggests that concrete will be poured into a horizontal formwork. Sometimes horizontal formwork is also called deck. There are several options for its arrangement. The first renting ready -made removable formwork made of metal or plastic. Second the manufacture of formwork on the spot using wooden boards or sheets of moisture -resistant plywood. Of course, the first option is simpler and preferable. Firstly, the formwork is collected. Secondly, telescopic supports are offered with it, which are needed to support formwork at the same level.
If you prefer to make the formwork yourself, then keep in mind that the thickness of the plywood sheets should be 20 mm, and the thickness of the cut boards is 25 35 mm. If you knock down the shields from the trimming boards, then they need to be tightly adjusted to each other. If the cracks are visible between the boards, then the formwork surface should be covered with a waterproofing film.
The installation of formwork is carried out in this way:
- Vertical struts-strokes are installed. It can be telescopic metal racks, the height of which can be adjusted. But you can also use wooden logs with a diameter of 8 15 cm. The step between the racks should be 1 m. The racks closest to the wall should be located at least 20 cm from the wall.
- Rigels are laid on the racks (longitudinal beam, which will hold the formwork, an I -beam, a channel).
- A horizontal formwork is laid on the crossbars. If not ready formwork is used, but homemade, then transverse beams are laid on top of the longitudinal beams, on which sheets of moisture -resistant plywood put sheets on top. The dimensions of the horizontal formwork should be fitted perfectly so that its edges rest against the wall without leaving cracks.
- The height of the supports is regulated so that the upper edge of the horizontal formwork coincides with the upper edge of the wall masonry.
- Vertical elements of the formwork are installed. Given the fact that the monolithic floor slab should be such that its edges go to the walls of 150 mm, it is necessary to perform a vertical fence at that distance from the inner edge of the wall.
- The last time the horizontal and even arrangement of the formwork using the leveling is checked.
Sometimes, for the convenience of further work, the surface of the formwork is covered with a waterproofing film or, if it is made of metal, lubricated with machine oil. In this case, the formwork will easily be removed, and the surface of the concrete slab will be perfectly flat. The use of telescopic racks for formwork is preferable to wooden supports, since they are reliable, each of them withstands weight up to 2 tons, microcracks do not form on their surface, as it can happen to a wooden log or a beam. The rental of such racks will cost about 2.5 3 cu. 1 m2 of area.
Reinforcement of a monolithic floor slab

After arranging the formwork, a reinforcing cage of two nets is installed in it. For the manufacture of a reinforcing frame, steel reinforcement A-500C with a diameter of 10 12 mm is used. From these rods, a mesh with a cell size of 200 mm is associated. To connect the longitudinal and transverse rods, a knitting wire of 1.2 1.5 mm is used. Most often, the length of one reinforcing rod is not enough to cover the entire flight, so the rods will have to be interconnected along. In order for the design to be strong, the rods must be connected to an overlap of 40 cm.
The reinforcing mesh should enter the walls at least 150 mm if the walls are made of brick, and 250 mm, if the walls are made of aerated concrete. The ends of the rods should not reach vertical formwork around the perimeter by 25 mm.
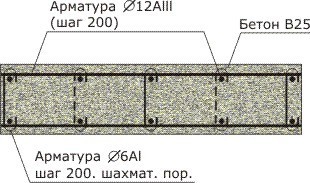
The reinforcement of a monolithic floor slab is carried out using two reinforcing marshes. One of them is the lower one should be located at a height of 20 25 mm from the lower edge of the plate. The second upper should be located 20 25 mm below the upper edge of the plate.

So that the lower mesh is located at the right distance, special plastic locks. They are installed with a step of 1 1.2 m at the places of crossing the rods.
The thickness of the monolithic floor slab is taken at the rate of 1:30, where 1 thickness of the plate, and 30 span length. For example, if the flight is 6 m, then the thickness of the plate will be 200 mm. Considering that the nets should be located at the distance from the edges of the plate, the distance between the nets should be 120 125 mm (from the thickness of the plate of 200 mm, we take away two gaps of 20 mm and take away 4 thicknesses of reinforcing rods).


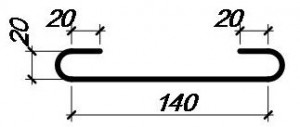
To dilute the nets at a certain distance from each other, from a reinforcing rod 10 mm using a special gyutic tool are made special clamps of standsAs in the photo. The upper and lower shelves of the latch are 350 mm. The vertical size of the lock is 120 mm. The installation step of the vertical clamps of 1 m, the rows should be located in a checkerboard pattern.

The next step end clamp. It is installed with a pitch of 400 mm in the ends of the reinforcing frame. Serves to enhance the support of the stove on the wall.
Another important element upper and lower net. How he looks, you can see in the photo. It is necessary so that the spruce -out nets perceive the load as one. The installation step of this connector is 400 mm, and in the zone of support on the wall, within 700 mm from it, with a step of 200 mm.
Bill with concrete

It is better to order concrete directly at the factory. This greatly facilitates the task. In addition, filling the solution from the mixer with an uniform layer will provide the exceptional strength of the stove. What can not be said about the stove, which was poured manually with breaks to prepare a new portion of the solution. So it is better to fill the concrete immediately with a layer of 200 mm, without breaks. Before pouring concrete into the formwork, it is necessary to install a frame or box for technological holes, for example, a chimney or a ventilation duct. After pouring it, it must be guards with a deep vibrator. Then leave to dry and gain strength for 28 days. The first week the surface must be wetted with water, only moisturized, and not fill it with water. After a month, the formwork can be removed. The monolithic floor slab is ready. For the installation of floor slabs, the price includes the cost of reinforcement, concrete, rental of formwork and ordering a mixer machine, as well as concrete pump. In fact, approximately 50 55 cu. for m2 ceilings. How to fill the floor of the floor with concrete, you can see in the demonstrating installation of video floor slabs.
How to lay overlapping slabs correctly
The use of monolithic reinforced concrete slabs of the factory manufacturing is considered more traditional. PC plates with round voids are more popular. The weight of such plates begins with 1.5 tons, so laying the floor slabs with your own hands is impossible. A lifting valve is required. Despite the apparent simplicity of the task, there are a number of nuances and rules that must be observed when working with floor slabs.
Overlapping laying rules
The factory -manufacturing flooring plate is already reinforced at the factory and does not require additional strengthening or arrangement of formwork. They are simply laid in a span with leaning on the walls, following some rules:
- The span should not be more than 9 m. It is the largest length that is the largest.
- Unloading and lifting the plates is carried out using special equipment provided for by the project. To do this, there are mounting loops in the plates, for which mounting slings are hooked.
- Before laying the floor slab, the surface of the walls on which they will be laid should be leveled. Large changes in heights and distortions are not allowed.
- Plates should be based on walls by 90 150 mm.
- You can not lay the slabs dry, all the cracks and technological seams should be covered with a solution.
- The location of the plates must be constantly monitored relative to the walls and surfaces of the support.
- The plates are laid only on the load -bearing walls, all the piers are equipped only after installing the ceilings.
- If you need to cut the hatch in the floor, then it must be cut at the junction of two plates, and not in one plate.
- Plates should be located as close to each other as possible, but with a gap of 2 3 cm. This will provide seismic resistance.
If the floor slabs are not enough to block the entire flight, and for example, 500 mm remains, then there are different ways to lay the floor slabs in this case. The first to lay the slabs backward, and leave the gaps along the edges of the room, then fill the gaps with concrete or slag concrete blocks. The second laying of plates with uniform gaps, which are then sealed with concrete solution. So that the solution does not fall down, the formwork is installed under the gap (the board is tied).
Overlapping technology
In the process of laying the floor slabs, there should be a clear coordination of actions between the crane operator and the brigade taking the plate. To avoid injuries on the construction site, as well as observe the entire technological process and the rules described in SNiPs, the foreman should have a technological map of the floor slabs. It indicates the sequence of work, the number and location of technology, special equipment and tools.
It is necessary to start laying the floor slabs from the flight of stairs. After laying the plates, their location is checked. The plates are well laid if:
- The difference between the lower surfaces of the plates does not exceed 2 mm.
- The height difference between the upper surfaces of the plates does not exceed 4 mm.
- The difference in heights within the site should not exceed 10 mm.
As the installation of the floor slabs demonstrates the circuit, after laying the plate, it is necessary to connect with each other and the walls using metal connecting parts. Work on the connection of embedded and connecting parts is performed by welding.
Scheme of laying slabs

Do not forget that you need to observe safety precautions. It is not allowed to carry out work with a lifting crane in an open area in the wind of 15 m/s, as well as with ice, thunderstorm and fog. During the movement of the slab using the tap, the team of installers should be away from the path along which the plate will move, with the opposite supply of the side. Despite the fact that the use of the services of a professional foreman and the team of installers significantly rise in cost the cost of installing the floor slabs, this is still not the case when you can save. The team leader must provide a project.
Before ordering plates at the factory, it is necessary to perform preparatory work. It is better to coordinate the time of feeding a car with slabs and a lifting crane for one time so as not to overpay for simple special equipment. In this case, the installation of plates can be performed without unloading, directly from the vehicle.
Preparatory work before putting the floor slabs
First a flat surface of support. The horizon should be almost perfect, a height difference of 4 5 cm is unacceptable. First of all, check the surface of the walls, then, if necessary, align with a concrete solution. Subsequent work can only be done after concrete acquires maximum strength.

Second ensure the strength of the based zone. If the walls are erected from brick, concrete or concrete blocks, then no additional events need to be taken. If the walls are erected from foam blocks or gas blocks, then before laying the plates it is necessary to fill in armo -piles. Proper laying of the floor slabs suggests that the surface of the support should be strong enough to withstand the weight of the plate and not deform along the adjacency line. Neither aerated concrete nor foam concrete has the necessary strength. Therefore, the formwork is installed along the entire perimeter of the structure, the reinforcing cage from the rod is 8 12 mm, and then everything is poured with concrete with a layer of 15 20 mm. Further work can be continued only after the concrete dries.
Third install the mounting towers. Telescopic supports, as described in the section on the installation of a monolithic floor slab, are installed in a pitch of 1.5 m. They are designed to take on the weight of the stove, if suddenly it slides from its place. After installation, these towers are removed.
Installation of hollow floor slabs using a crane
After freshly -poured concrete has accepted sufficient strength and dry, you can start directly installing the floor slabs. To do this, a lifting valve is used, the carrying capacity of which depends on the size and weight of the plate, most often the taps of 3 7 tons are useful.
Stages of work:
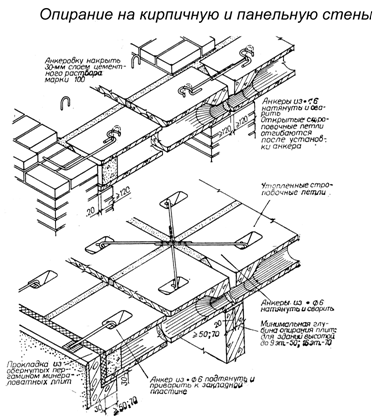
- A concrete solution is applied to the surface of the support with a layer of 2 3 cm. The depth of the solution of the solution is equal to the depth of the stove, i.e. 150 mm. If the plate is based on two opposite walls, then the solution is applied only to two walls. If the plate is based on three walls, then on the surface of three walls. Direct laying of the plates can be started when the solution gains 50% of its strength.

- While the solution dries, the crane operator can hook the slings for the fasteners of the plate.
- When a signal is given to the crane operator that you can give the plate, the workers' team should move from the place where the plate moves. When the plate is already very close, the workers hook it with the beaks and unfold, while oscillatory movements are extinguished.

- The plate is directed to the right place, one person should stand on one wall, and the other on the opposite. The plate is laid so that its edges are rested on the wall by at least 120 mm, it is better by 150 mm. After installation, the plate will squeeze an excess solution and evenly distribute the load.

- If there is a need to move the plate, you can use scrap. You can align its location only along the styling zone, you can’t move the plate across the walls, otherwise the walls can fall over. Then the slings are removed, and the signal is given to the crane operator to pick them up.
- The procedure is repeated for all plates without exception. The installation rules of the floor slabs suggest that the alignment of the plates should be performed along the lower edge, since it is the lower surface that will be the ceiling in the room. Therefore, the plate is laid down the widest side down, and a narrower upward.
You can find the recommendation that in the zone of supporting the plate it is necessary to lay the reinforcement. Supporters of this method say that it is more convenient and easier to move the stove. In fact, to lay something except a solution of concrete under the stove is prohibited by a technical card. Otherwise, the plate can be easily moved off the support zone, as it will slide along the reinforcement. In addition, the load will be distributed unevenly.
The laying of the floor slabs on the foundation is practically no different from laying the inter -story floors. The technology is exactly the same. Only the surface of the foundation must be carefully waterproof before laying the slabs. If the project provides for non -standard overlapping slabs, then special steel elements are used for this. Such work should not be done without a specialist.
Overlapping survey
The survey of the plates binding can be performed in two ways depending on the project.

The first binding the plates with reinforcement. Reinforcing rods with a diameter of 12 mm are welded to the fastener embedded elements on the stove. In plates from different manufacturers, the location of these elements may be different: in the longitudinal end of the plate or on its surface. The most durable connection is considered to be diagonally when the slabs are associated with each other with a displacement.
Also, the plate must be tied to the wall. Why is the reinforcement is being equipped in the wall.

The second method ring Anchor. In fact, he looks like an Armopome. The formwork is equipped along the perimeter of the plate, reinforcement is installed in it and concrete is poured. This method slightly increases the cost of laying floor slabs. But it costs the slabs that are clamped from all sides.
Seaming between the floor slabs
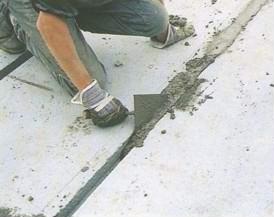

After the survey, you can proceed to sealing the cracks. The cracks between the floor slabs are called Rustami. They are filled with concrete of the M150 brand. If the cracks are large, then the board is tied from below, which serves as formwork. If the cracks are small, then the floor slab will be able to withstand the maximum load the very next day. Otherwise, you must wait a week.
Sealing voids in the ends of the floor slabs

All modern plates with round voids are made with already filled ends. If you purchase plates with open holes, then they must be filled with something by 25,30 cm deep. Otherwise, the plate will freeze. You can fill the voids with mineral wool, concrete traffic jams or simply fill with concrete solution. A similar procedure must be performed not only on those ends that go out onto the street, but also on those that rest on the internal walls.
The price depends on the laying of floor slabs depends on the volume of work, the area of \u200b\u200bthe house and the cost of materials. For example, the cost of only PC floors is approximately 27 30 cu for m2. The rest is related materials, renting a crane and hiring workers, as well as the cost of delivering plates. In professional brigades for the installation of floor slabs, the prices are very different from 10 to 25 cu For M2, there may be more depending on the region. As a result, the cost will be the same as on filling the monolithic floor slab.
Clasping of floor slabs: Video example
Comments
![]()
StrPort construction portal 2011-2018. Articles about repair, construction, building materials.
Copying information from the site is possible only with permission of the editorial office Or indicating a direct link to the source. Legal justification
huynya
huynya
with a garbage
with a garbage
http: //stroy-in.rf
http: //stroy-in.rf
Fuck!
Fuck!
We are building the houses of Kaliningrad
We build houses Kaliningrad 903608
Norm
Norm