A reliable roof is one of the main elements of a private house that protects ...
|
|
So that a private house or cottage has an improved, attractive design to everyone ... |
Bayer original architecture solution, a rounded ledge in the end part ... |
DIY frame cottage
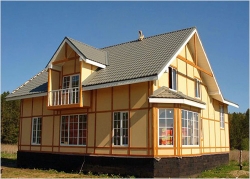
With independent construction, a number of problems always arise: there is little time that could be devoted to the construction, because you still need to earn money, few hands, since you do everything yourself or with a partner, few money and much more. But I so want to have a cozy house in the country. So you think, make the cottage frame, brick, log or monolithic cottage. Of course, the cheapest, rapidly far and easy is a frame cottage. It can be built at any time of the year, spending as much time as there is an opportunity. You can build a frame in 2 4 months. Frame for frame construction captures the CIS countries with a violent speed, and in the USA and Canada up to 90 % of private buildings are frame. That is why many choose this technology simply, quickly, warmly, reliably and, most importantly, cheaply.
Technologies for building frame cottages
In total, there are two main technologies according to which frame houses are built, frame-shack and frame-frame.
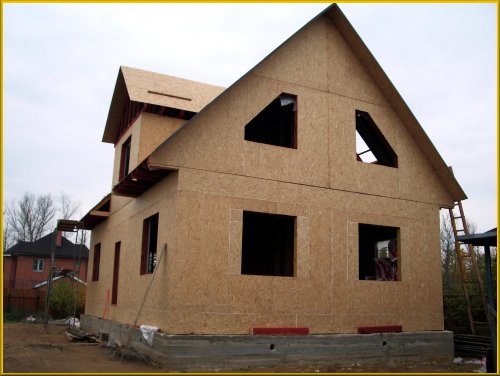
Shield shield cottage, it is also called panel, is built from finished shields/panels on a pre -equipped foundation. Shields are made in the factory and delivered to the place of construction on freight transport, where they are installed and fastened together by a spike-puzzle system. The foundation for the shield house is usually used tape, and wooden farms as the lower binding.
As you know, it will not work to build a frame-chip cottage on your own. But you can contact the construction companies, where there are already ready -made projects of frame cottages, choose or order individual, then all elements will be made on it. At this time, it is necessary to equip the foundation and let it stand for a month. Only when the concrete gains maximum strength, can you bring the panels to the construction and invite a team of workers. The construction of the shield house will take about 2 3 months.
Kramasno-frame cottage It is being built completely at the construction site. First, the foundation is equipped, then the lower strapping of the beam, on which the frame of bars is installed. The frame consists of racks fixed to the lower and upper strapping, for greater strength of the design between the racks, ugsins and horizontal jumpers are installed. After installing the frame, a roof is placed. The frame is sheathed on both sides with durable materials: boards, OSP or other plates, a heater is laid between the skin.
The indisputable advantages of frame-rack technology are that all work can be done independently at the place of development, without the use of heavy equipment, at any time of the year, on any project and control the entire process. Given all the advantages and cheapness, it is precisely the frame-frame cottages that are built with their own hands.
Wood for frame cottages
Before you build a frame cottage, it is necessary to purchase high -quality wood for arranging the frame, floor, ceilings and roofs. The strength of the structure and the durability of the construction will depend on this.
For the frame, they usually take coniferous wood pine, spruce, fir, since they are the least prone to decay and are resistant to high humidity. Little rocks are stronger, but more difficult to process due to a large number of knots. Therefore, deciduous wood is used only for connecting details of the bumps, dumps, and wedges.
Due to the fact that the wood of natural humidity and the heavier over time gives a serious shrinkage and can lead itself unpredictably, it is better to take only dried wood with a humidity of 7 to 15 %for frame construction. If there is no such possibility, then the frame made of dried wood must be sheathed immediately after installation, otherwise it will lead it.
It is necessary to order materials on a sawmill or logging, knowing all sizes. After the delivery of wood, it should be stored on a high -rise, in a well -ventilated underwear, covered with a film from the rain. If the rain is not predicted, then it is better not to cover with a film so that condensate does not accumulate.
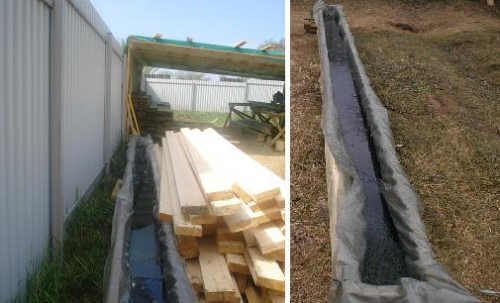
Before use, all wood is recommended treat with an antiseptic Against rotting and lesions of the fungus. To do this, the trough is lost, as the longest bass used long, an antiseptic with water is poured, after which each wooden element is soaked for at least a minute. The processed tree dries for at least a day. The processing of wood from the spray gun will not bring such a result as impregnation, in the latter case the antiseptic penetrates the structure of a tree by at least 1 cm.
Important! If you do not want to treat absolutely all of the wood with an antiseptic, you can treat only the most necessary beam of the lower strapping, lags and rolls.
DIY frame cottage
Having decided to build a frame cottage with your own hands, you should not start any work without a project, guided by the opinion that a frame is easy and simple. At least a simple project drawn by hand should be. It should be noted on it the footage of the cottage, the location and purpose of the premises, windows, doors, height, roof type, apply all sizes. All this will help correctly calculate the parameters of the required foundation, as well as materials and consumables.
Foundation for a frame cottage
The construction of cottages using frame technology is carried out on such types of foundation:
- Columnar.
- Pile.
- The strip small -sized.
- The strip monolithic.
- Block strip.
- Monolithic slab.
- Pillars of the TISE technology.
To choose the right type of foundation, you need to know the type of soil on the site, the level of groundwater, climatic conditions, terrain and the total weight of the house. So you can’t do without geological analysis.
A more or less universal option is the foundation on TISE technology. Pillars must be deepened below the level of freezing of the soil, and their number should be calculated using at least approximate data of the cottage weight. On average, with all additional loads, roof, sheathing, finishing, a payload of 1 meter, the linear frame cottage weighs about 1.7 tons. Having multiplied the chasing of the building for this weight, we get the weight of the whole house, or rather one floor. If the cottage is planned to be performed two -story or with the attic, then we multiply also by two.
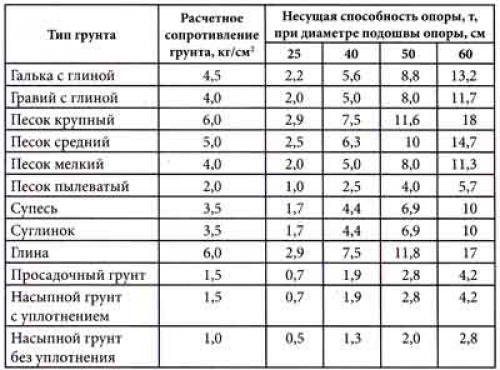
On the plan-project of the frame cottage, we note where we will install the foundation pillars. They must be necessarily in the corners, in the places of adjacence of the internal walls and at a distance of 1.5 m from each other. Having taken the values \u200b\u200bfrom the table, we determine the bearing capacity of one pillar for a particular soil. We multiply it by the number of pillars. If you get a number, more by 20 % of the total weight of the cottage, then the foundation is selected correctly. Otherwise, add the number of poles, evenly distributing them, until the bearing capacity of the foundation is 20 % more than the load of the house.
We start arranging the foundation for the frame cottage:
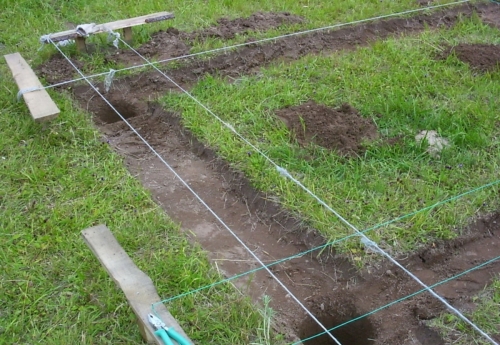
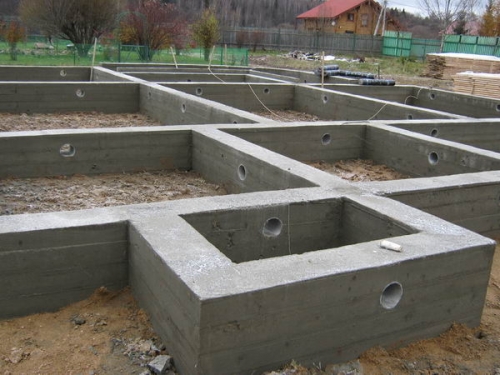
- We mark the site for the foundation, we must get the external and internal circuit of the grillage. The width of the grillage is taken wider than the beam of the lower strapping by at least 10 cm. For example, if the beam is 250 mm, then the grillage is 350 mm.
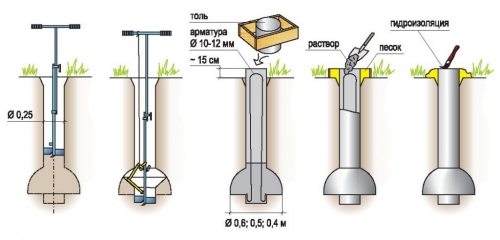
- Burim even vertical wells for poles to the depth of freezing of the soil. Most often, this is 1.5 m, more accurate data must be clarified for a specific situation. The diameter of the poles should be more than 250 mm. Do not use asbestos -cement pipes 150 mm in diameter as formwork. This is not enough.
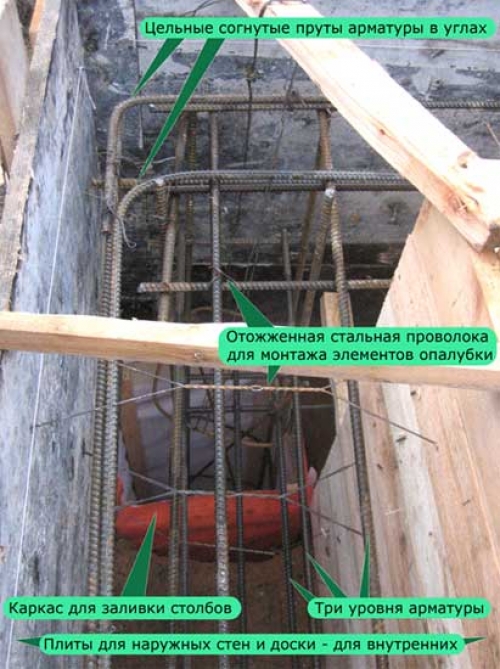
- Inside the well we insert a reinforcing cage associated with 4 rods with a cross-section of 18 mm using a knitting wire.
- If the grillage is low, then remove the upper part of the soil to a depth of 20 cm around the perimeter. We seal the soil and make a spiver: 10 cm of river sand and 10 cm crushed stone with a fraction of 30 50 mm.
- We make the formwork for the grillage, knocking down the boards tightly.
Important! If a mixer with concrete, i.e. to fill the foundation, i.e. Pouring will be carried out in one stage, then the formwork for the upper part of the pillars included in the grillage is not needed, otherwise we must formwork for the pillars. Also, when pouring in one stage, a reinforcing frame for grillage is also immediately mounted, also associated with reinforcing rods. With an independent phased pouring of each pillar separately, and then a grillage, reinforcement of the latter is installed after pouring the pillars.
- After installing the reinforcing frame in the grillage, it is associated with the pillars of the pillars so that the design is as monolithic as possible.
- In the formwork of the grillage, we immediately carry out the embedded for purges and communications, if necessary. We also install the studs for attaching the beam of the lower binding. They should play for the top of the grillage for 150 200 mm.
- We prepare the solution (as an example, we take a recipe for a solution, which is poured at a temperature above +5 C). We take 2 3 parts of crushed stone with a fraction of 5 10 mm, 3 parts of sand and 1 part of the cement, add the water gradually, knead so that a thick sour cream -like consistency is obtained.
- Pour the pole with a solution, making a layer no more than 15,100 cm at a time, and carefully compact with the help of deep vibrators. Gradually fill all the pillars and grillage concrete.
- We let the foundation stand at least 7 14 days and remove the formwork.
While the foundation is gaining strength, we carry out the laying of all communications: water supply, sewage, etc.
In order for the surface of the grillage to be perfectly even, it is performed by a leveling screed of 5 7 cm. We must make sure that the surface is strictly horizontal.
Lowering a lower breeze for a frame cottage
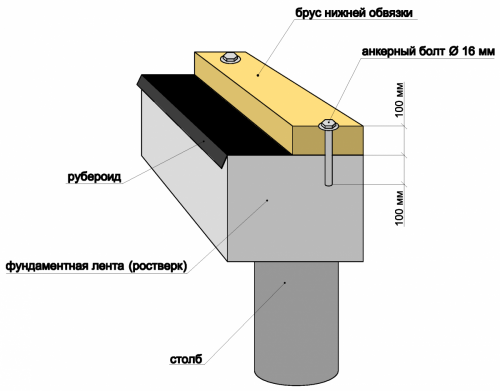
Immediately before laying the beam of the lower strapping, the surface of the foundation must be waterproofed. To do this, smear it with molten bitumen and lay it on top of the roofing material without sprinkling. We roll a roller on the roofing material so that it sticks.
Important! Do not perform waterproofing in advance, since the rooferoid will quickly become unusable if it is left without protection. If there is a desire to protect the foundation in the interval between its filling and installation of the frame, it is better to cover it with plastic film.
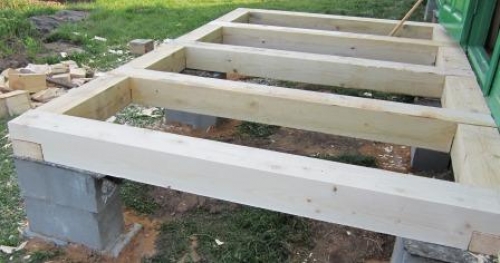
The beam of the lower strapping should be equal in width or more than the thickness of the insulation layer, which is planned to be placed in the walls. For example, if the insulation layer is 100 mm, then the cross section should be 100x100 mm. If a layer is 150 mm, then the cross section is 150x100 mm. The best option, if the beam of the required cross section is whole, but if this is not, then it can be knocked out of two. The length of the beam of the lower strapping is easy to calculate or estimate in the place, as it is laid in the middle of the grillage.
Fixing the beam of the lower strapping:
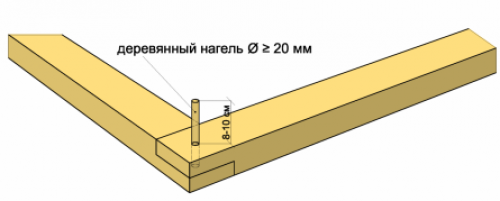
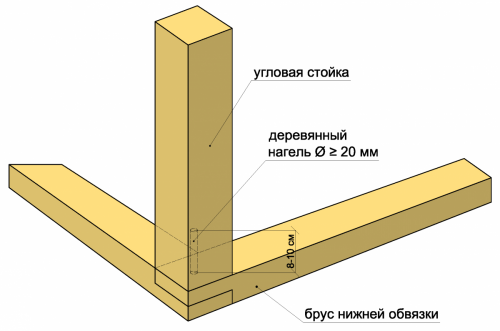
- We connect the bars with each other using a handicrafts in the floor of a tree or in a paw. Also, they can be stuck together with wooden bumps, drilling holes for the length of the bumber + 1 cm 20 mm wide and driving it into the hole. Nagel should protrude from the upper beam by 8 10 cm.
- There are two ways to attach the beam to the foundation: anchors and studs, which should be laid in the foundation in advance. Anchors are taken with a diameter of 16 mm, 200 mm long. The holes for the anchor are first sparkled in concrete, and then in a tree. Then an anchor is inserted into them, which should go into the foundation by at least 100 mm. The mounts should be in the corners and at a distance of 1 1.2 m from each other.
Important! If in the corners the beams are connected by dangers or nails of 150 mm long, then the beam is mounted to the foundation with anchors with an indent from the corner by 10 15 cm, each beam separately, i.e. Two fastening points near each corner.
If the studs are peeled out of the foundation, then on the beam we plan their location, drill holes and put the beam on the studs.
After the beam of the lower strapping is fixed, we check its horizontal level.
Flooring on the lags in a frame cottage
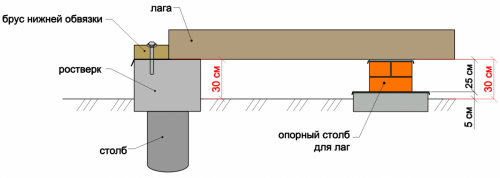
A beam is used as a floor lag, the width of which is 1.5 2 times more than the thickness. The exact width (it is height) is calculated taking into account the layer of insulation, which is planned to be laid between the lags. At the same time, do not forget that there should also be a ventilation gap of 2 3 cm above the insulation, and under it a roll of boards with a thickness of 25 mm.
As a result, if the insulation layer is 100 mm, then the height of the lag should be 160 180 mm.
Optimal cross -sections of the lag: 150x80 mm, 180x100 mm, 200x150 mm.
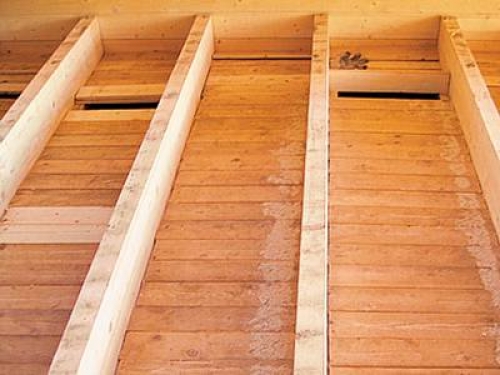
Step Lag Depends on the final flooring. The wider the board, the more a step can be. If it is planned to lay a board 24 mm thick, the step of the lag is 4 40 cm.
If the foundation is not enough for strong fixing the lag, then it is necessary to perform several support columns for the lags and waterproofing their surface.
We perform the floor on the lags:
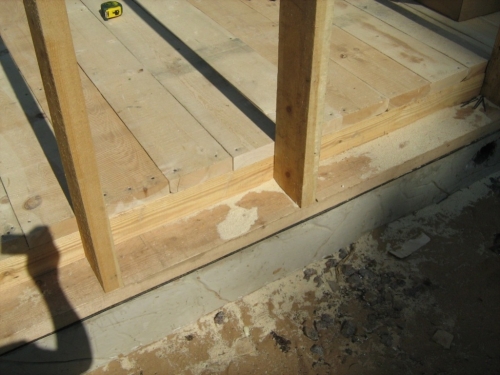
- We fix the lighthouse lags (with a step of 2 m), installing them on the foundation and supporting columns, having previously placed soundproof lining. Check the horizontal, fix with anchors using steel corners.
- We install all the other lags with the required step and fix them.
Important! In addition to installation on the foundation of the lag, you can install on the beam of the lower binding, performing cutting in it. But at the same time it should be remembered that this method significantly weakens the beam's beam.
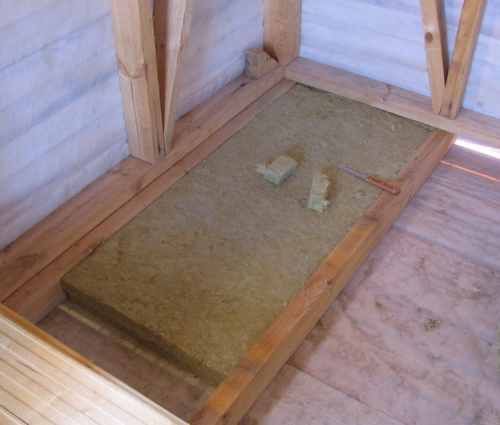
- At the bottom of the lag we fasten the skull bars so that it is convenient to lay the roll.
- We lay a roll of 25 mm boards.
- We lay a waterproofing membrane with a vapor peripation of more than 800 g/m2.
- On top we lay the insulation (mineral wool in the plates with a density of 35 55 kg/m3).
Important! Be sure to leave a ventilation gap between the insulation and the board.
- We fasten the floor boards, inserting the spike into the groove. From the walls, we make the indentation for a deformation seam of 1 2 cm. The first row of boards we fasten with a spike to the wall.
At this stage, it is enough to create a reliable support under your feet. Processing of the finished floor with varnish or other means is performed after the ending of the ceiling and walls is completed.
Construction of the cottage frame
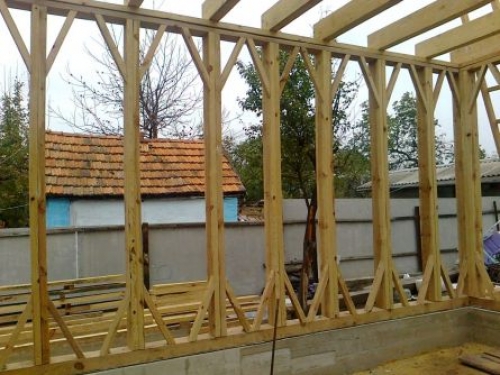
The size of the frame of the frame is selected depending on the thickness of the insulation layer in the walls and on the number of storey of the cottage. For example, if we are going to insulate a one -story cottage with a layer of 150 mm, then vertical racks can be taken with a section of 150x50 mm. If the cottage is two -story or with an attic, then take a beam of 150x100 mm.
Corner racks must necessarily have a square section, i.e. Either 150x150 for insulation with a layer of 150 mm, or 100x100 mm for insulation with a layer of 100 mm.
The length of vertical racks It is calculated taking into account the fact that the optimal height of the room is 2.5 m, plus we add the floor pie and the material of the ceiling. As a result, it will turn out 2.8 3.1 m.
Step between the racks It is recommended to make no more than 60 cm. In this case, the step is calculated between the axes of the racks, and not the edges of the beam.
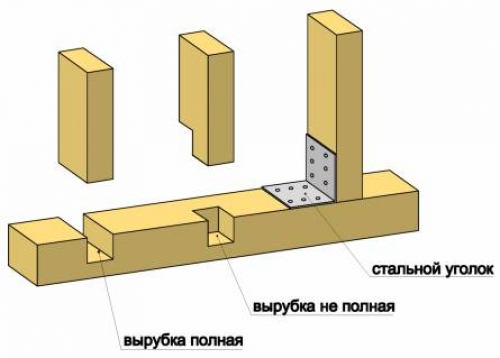
The fixation of vertical racks to the beam of the lower binding is carried out in several ways: with the help of steel corners and using a cut -off, full and incomplete. The fastening with galvanized self -tapping screws on steel corners is the easiest way, but it will require a large number of fasteners. Cups are made at 30 50 % of the height of the strapping beam.
Important! If you use the handicap method to fix the racks, their length must be selected taking into account the depth of the cut.
Regardless of the method of attaching vertical racks, we fasten them with temporary ugsins, 4 per rack.
The beam of the upper strapping is attached in the same way as we fixed vertical racks to the beam of the lower binder, i.e. Either corners, or with crooks. After the installation of the vertical part of the frame is completed, it is necessary to check the verticality of each rack and the horizontality of the upper strapping.
Then we mount constant bloomers, they are needed for greater spatial stiffness of the structure. We fix them with nails.
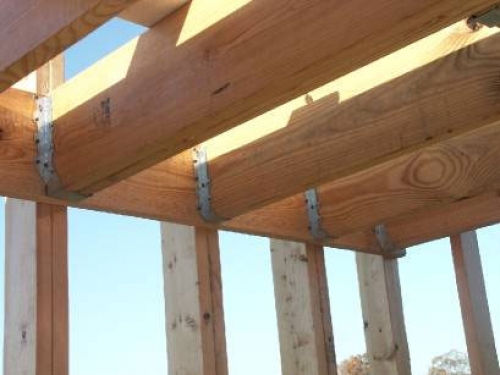
We lay the beams of the overlap on the beam of the upper strapping. They are fixed with cutting, on steel corners or perforated brackets.
Frame sheathing and insulation of the walls of the cottage
The construction of frame cottages necessarily suggests that the frame will be sheathed on both sides with strong sheets or plates. Most often for these purposes, OSP (oriented-stove), CSP (cement-brown plate), SML (glass-frognesite sheets) and boards are used for these purposes.
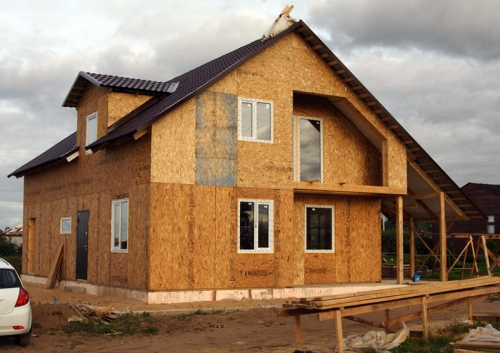
The most common material of the lining of the OSP frame, fasten such plates with a gap of 3 5 mm. The beam of the lower strapping should be completely covered with the stove. The window opening should also be cut out of a solid piece of the OSP plate, without the formation of joints.
OSP are fixed with 4.5 mm with a length of 50 mm in steps: along the outer edges of the plates of 10 cm, in the places of the joint of the plates 15 cm, in the intermediate areas 30 cm. From the edge of the plate, 8 10 mm is made.
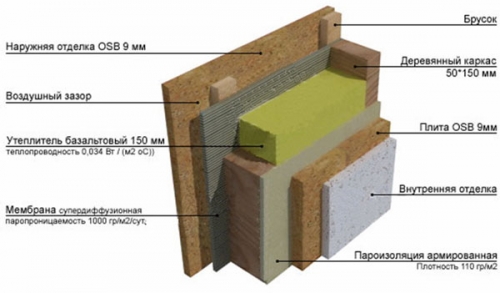
The correct pie of the walls of the frame cottage (from the inside):
- OSP plate.
- Vapor barrier membrane.
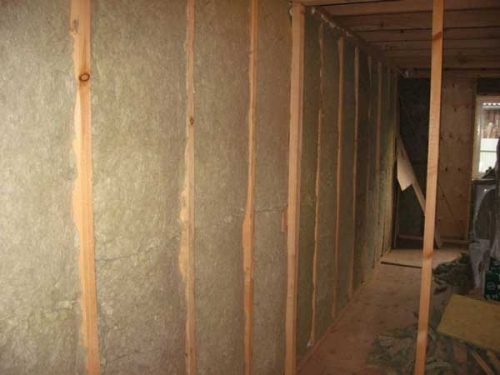
- Insulation (mineral or basalt wool).
- The superdiffusion membrane, which is waterproofing and wind protection, but passes steam. It is attached directly over the insulation.
- Colelite for the ventilation gap.
- On top of the crate of the OSP plate.
Important! Why do not fasten the OSP plate directly to the frame on top of the insulation outside? Because the OSP has too low vapor permeability, moisture will not be accumulated in the material of the insulation, which cannot be removed. And the ventilation gap allows the insulation to be constantly ventilated. But it is also worth recognizing that this design is less durable and stable compared to the OSP were attached directly to the frame. In this case, they would add stiffness.
If instead of OSP plates use another material, with vapor permissive power, close mineral wool, then ventilation gap is not required.
When installing the insulation in the frame, it is cut to the required size. It is advisable to lay in several layers in a run to avoid cold bridges. For example, a layer of 150 mm should be laid in three layers of 50 mm.
In the future, you can perform any finish on the walls outside the cottage: plaster, siding, block house, painting, etc.
Arrangement of the roof of the frame cottage
As can be seen on the photo -shock cottage, the roof in such cottages is always performed with overhangs of 30 55 cm so that water does not flow into the walls of the walls. Usually it can be two -way or valmova, but we will consider only the easiest option for a gable roof.
The section of the rafters For the roof, it is selected depending on the severity of the roof and a layer of insulation, if you plan to make a warm attic. The optimal section is 100x50 mm, 150x70 mm. Step of rafters It is necessary 70 80 cm. They will rely on the Mauerlat, which will be the beam of the upper strapping.
To fix the rafters to the Mauerlat, cuts are made in the bars of the rafters in the form of a triangle of 5x5 or 5x6 cm. In addition to attaching the rafters to each other and to the Mauerlat, it is necessary to perform a crossbar for greater strength. It is necessary to place them as low as possible, but so that in the attic (if planned) the ceiling is normal.
The cake of the insulated roof should look like this (from the room out):
- Interior decoration.
- Vapor barrier film.
- Insulation between the rafters.
- Waterproofing film, or rather vapor permitting a membrane.
- Crate.
- Contractor.
- Roofing material.
It is possible to fix the crate and the counterpart, the crossbar can be with nails or self -tapping screws.
When equipping the frame cottage with your own hands, you need to remember the most important rule: when erecting insulated walls, each subsequent layer should have a greater vapor peripation. The durability of the insulation in the walls depends on this. A wet insulation does not perform its functions and requires a complete replacement.

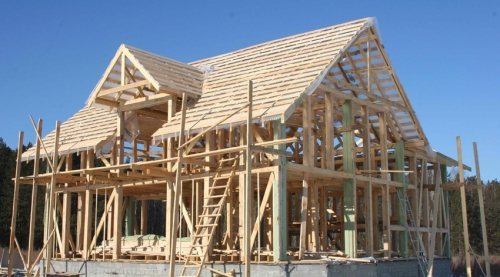


Last picture in the section
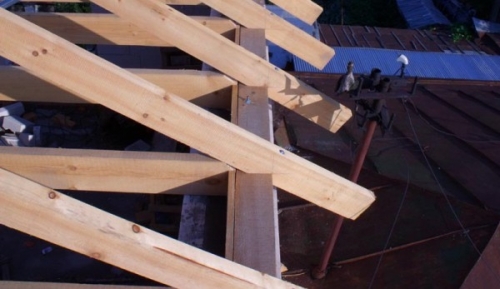
The last picture in the section "Construction of the cottage frame" is some kind of horror. Judging by the photo, is the whole second floor hanging on the nails?
I drove with my family this year
This year I entered with my family here to such a new frame house http://www.home-projects.ru/proekty_domov/karkasnye/kano-3/. True, he did not build it independently, but turned to the company. Built very quickly, in just 2 months.