In the last decade, window and door structures are especially popular ...
|
|
In order for the paving slabs to serve you for a long time and efficiently, you need to ... |
The presence of a veranda in your home allows you to turn an ordinary house into an original and ... |
How to block the roof with a metal tile

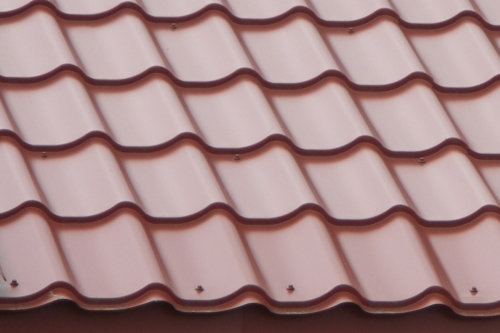
Each of us has seen a metal tile more than once. Every year, not one hundred square meters of this roofing material is mounted on various roofs. Due to the widespread use of metal tiles, I would like to say a few words about the competent choice of material, proper storage, as well as how to block the roof with a metal tile and install all the additional elements that go to it in the kit.
Content:
- The advantages of metal tiles
- Calculation of sheets of metal tiles
- The construction of the rafter system
- Arrangement of waterproofing and ventilation
- Breeding a crate for metal tiles
- Fastening sheets of metal tiles
- End and skate bar
- Upper Endova and the planks of the adjoining
- Hut and snow holders fastening
- Lightning rod and grounding of the roof
The advantages of metal tiles
For the first time, this roofing material on sale appeared in Finland in the second half of the last century and has since been successfully leading among all coatings of this kind. Today, metal tiles are made of alumocylic steel, which has a protective polymer coating that protects the metal from corrosion and is painted in different colors.
In the manufacture of this material, several coatings are used, which differ in their properties, cost and thickness. Galled profiled sheets have a more complex internal structure than it seems initially: usually a cold-rolled hot-valked sheet is used for the base, which has a thickness of 0.4-0.5 millimeters.
The metal tile has a list of key qualities, which determined its popularity: low weight, ease of installation, long -term useful life, increased wear resistance and reasonable price. The material does not burn, does not deform and does not melt. Sometimes consumers sin for increased noise during strong wind or rain, but this is observed with improper installation of the roof, sound insulation and drainage.
This roofing material has a stylish appearance, often imitating traditional ceramic tiles, but a clay analogue in ergonomic qualities has much surpassed. Use metal tiles to reconstruct buildings or new construction. In any case, it is able to last 50 years, or even more, without losing its original appearance throughout the entire time of operation.
The process of laying sheets of metal tiles refers to such works, when performing which it is necessary to strictly adhere to the requirements specified by the manufacturer in the instructions. A deviation from these recommendations can lead to a significant reduction in the time of the service of the material, and manufacturers in such cases refuse liability in view of the violation of warranty obligations.
Calculation of sheets of metal tiles
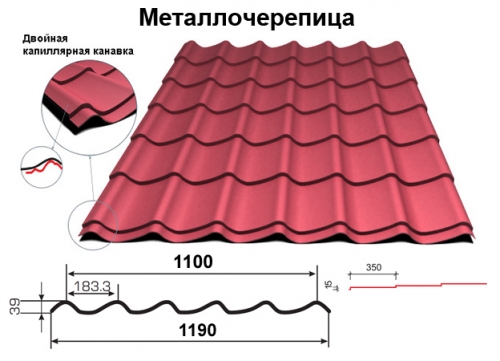
To buy the right number of sheets of metal tiles, pay attention to any residential building in which such a roof is equipped. A waves are placed across the roof slope, and rows are located along. A pitch of metal tiles is called the distance between the rows. And a sheet, which consists of 6 waves and has a step of 350 millimeters, is called the module. On sale are one-, three-, six- and ten-month warehouse sheets.
But you can also order sheets for yourself according to your own measured sizes. Of course, the prices for special orders will be higher. However, when covering a complex roof, with sheets of standard sizes, many waste is obtained, which also affects the price of overlapping the roof with a metal tile. But the possibility of individual cutting of roofing material for each customer allows these waste to reduce much. Therefore, you need to choose warehouse sheets or their cutting, based on a certain option.
A sheet of metal tile has 2 widths: general and useful. As for the length of the manufactured sheets, the minimum length is 450 millimeters, and the maximum reaches 7 meters. The lower 50 millimeters of the sheet from the cutting line to the crest of the wave are called the lower car, the size of which is the same for the cut and warehouse sheets. The upper cut from the crest of the wave to the edge is 50 millimeters for standard sheets of metal and up to 300 millimeters for sheets in special order.
To calculate the number of rows of sheets horizontally, you need to divide the maximum length of the slope along the skate or cornice into a useful sheet width. Turn the resulting number to the greater value. You can calculate the length of the sheets in the laying row, summing up several values.
The first of them is the length of the slope measured from the cornice to the skate, that is, from the lower to the upper point of the slope. The second is the length of the cornice overhang of 0.05 meters, which is calculated to prevent moisture from falling under roofing sheets. The third is the length of the vertical overlap of sheets of 0.15 meters. If there are two or more sheets in the row, then each subsequent sheet will be imposed on the lower one, clutching each other in the place of the castle and forming a strong, sealed and even connection.
When choosing sheets of metal tiles, remember that it is not recommended to take sheets, that they have a length of more than 4-4.5 meters, because it is costly and quite laborious, inconvenience occurs during loading, unloading and lifting the material on the roof, because a long sheet can get scratch, mock And deform. When using very long sheets of metal tiles, it is better to cut them into pieces that need to be laid with an overlap of 150 millimeters.
The metal tile, according to construction standards, should be stored in an unheated room, which supports protection against weather factors of rain and direct sunlight. The profiles that have factory packaging should be laid on an even platform using the bars as a stand, which have a thickness of 20 centimeters, with a step of 50 centimeters. If you plan to store the material longer than 1 month, unpack the metal tile and lay in stacks up to 70 centimeters high.
The construction of the rafter system
The calculation of the elements of the rafter system must be performed at the stage of designing the roof. The features of the shape of the roof, wind and snow loads for the region should be taken into account. In case of errors in the miscalculation by step and cross section of the rafters, the roof can sore over time, cracks also appear. A step of rafters for metal tiles should be 600-900 millimeters. If this indicator is increased, it is recommended to use large cross -sectional transverse boards (crate). As a rule, it is customary to use the rafters with a cross section of 100 or 150 by 50 millimeters.
If you plan to insulate the roof, it is advisable to equip additional horizontal ventilation between the rafters. Namely, in the lateral part of the rafters, drill the holes near the upper part of the roof, which have a diameter of 2-2.5 centimeters, with a step of 30 centimeters. After that, it is necessary to treat wood materials with fire and antiseptic impregnations.
It is recommended to check the length of all slopes on the diagonal before blocking the roof with a metal tile with your own hands, since the roof should have the correct rectangular shape. Then check the cornice, horse, plane and fractures of slopes for horizontal. In the presence of errors, it is necessary to align the surface.
When choosing a metal tile as a roofing, the minimum angle of inclination of the roof should reach 14 degrees, which provides the permissible flow of water, the roof will not accumulate moisture and leak in the future. Be sure to install the cornice in the grooves cut in the rafter legs to add the structures greater stiffness for the installation of hooks for drainage gutters.
In many instructions for installing sheets of metal tiles, it is also recommended to install a frontal bar. The frontal board is attached to the end part of the rafters for additional protection. Bearing of cornice overhangs is performed using corrugated board, siding or sophists, producing a special crate. If sofits without perforation are used as a binder, it is necessary to leave ventilation gaps to ensure free air flow into the space under the roof.
Hooks for gutters are installed immediately before fastening of the metal tile. It is best to use long hooks that provide greater design strength. Install the holders of the gutters on the cornice bar by cutting grooves for the legs of the hook. Fasten the hooks with self -tapping screws. The step of installing the holders of the gutter usually coincides with the steps of the rafters. For mounted roofs of metal tile, it is customary to use short hooks.
Arrangement of waterproofing and ventilation
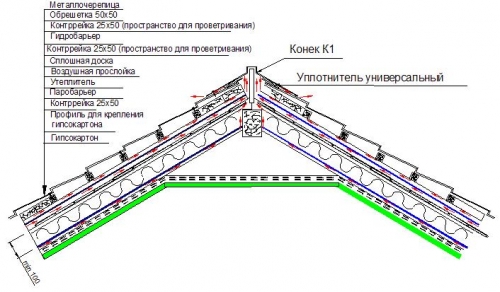
Moisture is contraindicated for any roofing pies and its minimum ingress in the subcutaneous space, since it leads to rotting and cracking of the rafter system and corrosion of the sheets of metal tiles. It will be possible to avoid such negative factors if you select a heater for a sufficient thickness for the roof, protect it from condensation by waterproofing film and moisture through vapor barrier, and also arrange natural ventilation of the space.
To organize the correct ventilation of the roof of metal tiles, you need to calculate the area of \u200b\u200bventilation gaps, according to the ratio of the total space of the gaps for ventilation to the total area of \u200b\u200bthe roof 1 to 100. Remember that ventilation gaps must be placed between waterproofing and roofs, heat and waterproofing for the through air duct, in The skate is also in the binder of the cornice for the air flow.
For waterproofing the roof from metal tiles, it is customary to use waterproofing and anti -condensate films, as well as superdiffusion membranes. Categorically, you should not lay bitumen waterproofing under the metal -tank roof! The waterproofing material is laid in such a way that air flows pass from the cornice without obstacles to the roof hobble and exit through the ventilation holes, which are installed in the highest place.
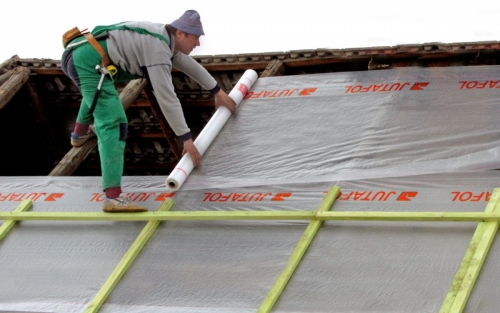
The waterproofing layer is laid in the horizontal direction between the ridge and the cornice with an overlap of 15 centimeters, on top of the rafter system. You should start from the cornices. Lay the material with a slight sag between the legs of the rafters of 20-25 millimeters to avoid the rupture of the film in the cold season. The fasteners of this material can be carried out using wooden rails installed along the rafter farms. Put a vapor barrier on the insulation, connecting its pieces with adhesive tape.
Breeding a crate for metal tiles
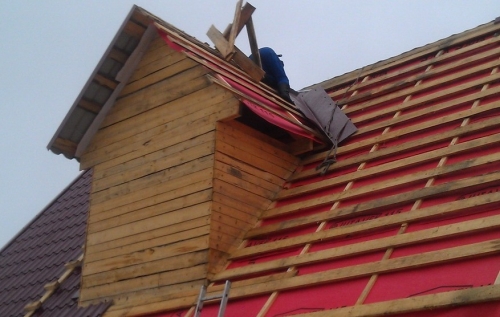
Metal tape requires the creation of a crate. For this, bars are used, which have a section of 5 by 5 centimeters, and boards in size 3.2 by 10 centimeters. First of all, put from the skate to the cornice to the rafters on the waterproofing film, falling bars. In the horizontal direction, the label boards are attached to them. The first of them from the cornice should be 1-1.5 centimeters thicker than the remaining 5 by 10 centimeters.
The boards need to be attached in compliance with such distances: from the beginning of the first board to the middle of the next should be 28 centimeters, between the middle of the remaining boards of 35 centimeters. It is recommended to check the crate's step every 5 rows from the first board. Self -laying of metal tiles is not easy. And if you are mistaken with the horizontal of the cornice board, you will have to interrupt the entire crate.
Near the attic windows, chimney channels, and in the valleys you need to perform a continuous crate, nailing an additional two -size adjacent planks to the sides of the skate bar for 25 millimeters for 300 millimeters. If the angle is almost flat, it is worth laying an additional layer of waterproofing material. Endova is attached using self -tapping screws to the crate with a step of 300 millimeters. The lower edge of the yendov should be laid on top of the cornice of the bar. The overlap should be at least 100 millimeters at a horizontal junction.
In the chimney pipe, it is necessary to perform a stroke (it is strictly forbidden to stroke in the seams of masonry) with a depth of at least 15 millimeters and waterproofing on the pipe by 50 millimeters, fixing the cut with adhesive tape. The external processes of the adjoining will be applied to the pipe, the upper part is elaborating in the strob. This place must be seized with a quality heat -resistant sealant. Also, at this stage, it is necessary to provide places for the arrangement of the passage elements of the roof - ventilation and antenna outputs.
Fastening sheets of metal tiles
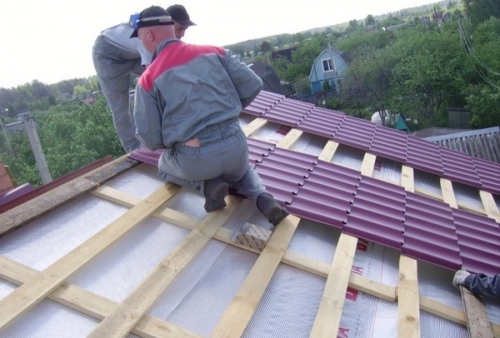
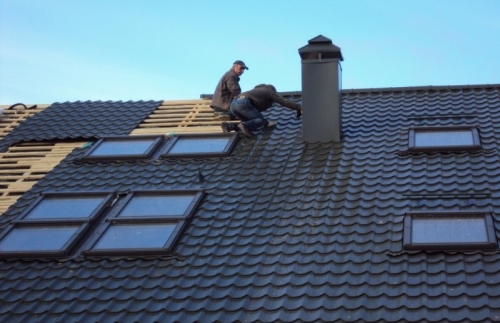
So we approached the main question of how to correctly block the roof with a metal tile. Regardless of the fact that the metal tile is a strong material, when working with it, it is worth observing some rules. The process of indicating the metal tile begins on the ground, it is necessary to unpack and put the sheets into piles intended for each slope. You can’t take sheets with your bare hands, put on protective mittens.
The technology for arranging a roof from metal tiles allows the execution of sheets to complex areas at the facility. However, it is impossible to cut the sheets with a grinder, as the protective polymer layer may be damaged. Use electric cutting or metal scissors for cutting. Before you do it, we will train in a separate piece, since it is more difficult to cut a metal tile than an ordinary steel sheet.
When lifting a metal tile to the roof, it is important not to scratch it. Take a sheet of material when moving over the edge of the stamping line and lift it to the roof with guides from the boards. Long sheets are not recommended to be lifted by the edges, because the sheet can bend. Also, do not load several sheets at the same time. Remember that to move along the sheets you need to choose shoes with a soft sole. Do not step on the crest of the waves, but only on socks. Put your leg parallel to the slope.
The direction of laying sheets is not tied to nothing, therefore it can be carried out from left to right or right to the left. When choosing the installation of a metal tile from left to right, you will have to raise the edge of the sheet, and place the edge of the next. As a result, the extreme sheet will rely on the previous, or rather, on its transverse wave, which helps to prevent the sliding of the sheets. On gable roofs, the installation of sheets begins from the end, and on the dwarf - they are laid from the roller. Align the sheets relative to the cornices. If you start laying the coating from long sheets, it will be much easier to level them.
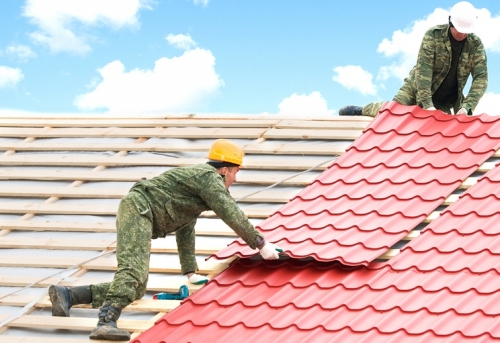
When laying the material in a row, the first sheet is placed on the crate, temporarily attaching with one self -tapping screw. Then put the next sheet, leaving relative to the first, and fasten the sheets together. Make sure that all sheets are tightly and correctly from a geometric position to join each other. Install the metal tile, moving from the cornice to the ridge. After that, attach all sheets to the crate, and the latter in the row is attached to the crate only after aligning the next block.
When laying sheets of metal tiles from right to left in several rows, lay the first sheet, leaving it along the end and cornice, then put it on top of the first second sheet, temporarily secure it with one screw in the center of the sheet at the ridge, level the sheets and fasten them together with self -tapping screws. Then you need to lay the third sheet on the left side of the first, fasten the sheets with each other and lay over the third fourth sheet. Level the entire block along the end and cornice, and then finally attach the sheets of the metal tile to the crate.
When laying the material on a triangular slope, it is necessary to mark the center of the slope before the start of the installation and through this center to conduct the axis. Then the same axis should be noted on the sheet and combine the features of the axes drawn on the sheet and the slope. Fasten the sheet at the skate with one screw. On both sides of it, continue the installation according to the principles that were described in previous versions.
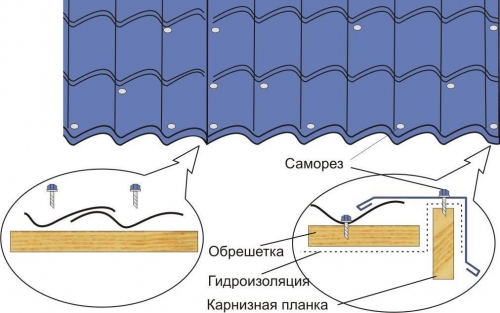
Sheets of metal tiles are attached to each other, cornices, ends and a crate. First, three or four sheets are attached to each other at the joints, then they are fixed in their place with one screw, equalize strictly according to the cornice and only then the sheets are finally attached to the crate. Sheets of roofing material are attached to the crate with two screws near the skate and at the cornice. Continue the installation of the coating according to the same scheme. Bipe the chips from drilling with a soft brush after the installation of the metal tile and tint the surface if necessary.
End and skate bar
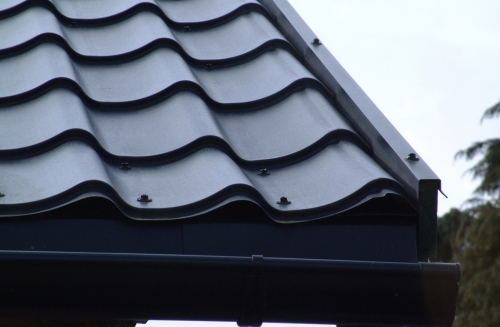
To protect the metal tile from the lifting force of the wind and the process of raising its fastening, a end bar is required. It also acts as a protective element for moisture design. The end bar is installed in the direction of the skate from the cornice, the praises of the excess is cut at the skate. Fix this bar to the end board with self-tapping screws every 500-600 millimeters
Due to the difference in heights, the end bar is tightly pressed against the sheets of the metal tile, this allows you to eliminate the rattles and noise with gusts of wind. The overlap of end planks should reach up to 100 millimeters. The waterproofing layer must be put on top of the end bar, which will close the edge of the waterproofing material. Also, such a bar should block the upper crest of the wave, to protect the metal tile from water.
For the device of proper ventilation of the space under the roof, the air must freely pass to the skate from the cornice and go through the holes in the skating seal out. Put waterproofing on a continuous crate so that it blocks the lower layer of waterproofing material along the edges by at least 150 millimeters.
The horse is attached into the crate using ridge screws in the upper comb of the wave of metal tiles on both sides. The seal is attached to the skate before the latter is installed on the roof, having previously removed the protective film from it.
Upper Endova and the planks of the adjoining
The upper yend bar is needed to remove moisture from the inner corner of the roof located at the junction of two slopes. Endov is attached with self -tapping screws so that they do not pass through and do not damage the waterproofing. Remember that between the sheets of the tiles and the upper end, a self -expanding seal should be laid.
Between the valves of the yendov, it is also necessary to leave ventilation gaps, about 20 millimeters in size, and do 200 millimeters at the joints when laying the strips. The corner sheet of the yendova must overwhelm the roofing sheet of at least 250 millimeters.
Special strips should be installed on the fractures of the roof and when the roofing is adjacent to the wall. Root breaks are reverse and straight. In places of fractures, it is recommended to observe continuous waterproofing. Boards of the crate with a direct fracture of the slope to each other should be approximate as much as possible. A sheet of metal tile, covering the breaks of the slopes, should protrude a little above the fracture of the roof and close it thereby.
In the case of the reverse fracture of the roof slope, you can use the adjacency to the wall as a mating element by placing it on the lower slope with the side with a blockage. The adjoining of the roof to the wall is arranged according to a similar principle, as the procedure for adjacent to the pipe. Waterproofing is removed and lifted to the wall, at least 50 millimeters to the strobe. Depending on the adjacency - to the end or side of the wall, use a universal or profile seal.
Hut and snow holders fastening
The installation of long hooks is carried out on a cornice board or rafters before blocking the old roof with a metal tile. For better water flow, the angle of tilt of the gutter should be provided at least 5 millimeters per linear meter. It is customary to install hooks with a vertical displacement. To insert the gutter into the hook, you need to start its nose into the gutter in such a way that the nose is inside the curl.
Then, the other edge of the gutter should be fixed using a rug plate lock. The external edge of the gutter should be lower than the internal one by 6 millimeters in order to prevent the facade of water during a strong rain. The continuation of the edge of the metal tile should hang 50 millimeters above the gutter. The connection of the gutter with the angle of another gutter or with the next gutter is produced by the VSTOK using a special connector.
The gutter connector is equipped with a special rubber gasket that provides airtight connection of two gutters, as well as compensating temperature expansion. The drain pipe should have such a length that the drain knee is located at a distance of about 200 millimeters to the ground or a moisture -resistant base, since at too much height the water is sprayed. To organize water output, a storm sewer must be equipped.
It should be installed on a roof of metal tiles, because thanks to these products, the snow will not fall on your head and does not scratch the roofing material at its gathering. Snow holders are attached to the second transverse step of the metal tile parallel to the cornice. They are installed under the crest of the waves in the bars that were pre -attached. The lower edge of the snowman is attached from above on every second wave. With long slopes, it is recommended to install snow retainers in several rows.
Lightning rod and grounding of the roof
To install lightning rod and a weather vane, prepare a metal bracket, compass, metal screws, as well as a wrench. Wallows can be mounted on a horse, a roof end or a spire. For safety reasons, the metal roof must be grounded. This is done in order to protect the roofing material from damage and protect the inhabitants of the house when the zipper enters the roof. A similar system consists of current -wiring, grounding electrode and lightning receiver.
The lightning receiver is installed at the highest point of the roof with wooden subcores. The current wir is attached to lightning and lowered under the crate under the sheets of tiles. He is welded to the lightning receiver, and where he is in contact with the sheets of metal tiles, a protective coating or a layer of varnish is removed. For a greater contact of points, it is worth branching such a wire into several sheets so that the zipper will find the path of minimum resistance faster.
Then a current -wiring is carried out along the wall of a residential building and connect it to the grounding ground. It is recommended to conduct a current -wrap along the wall, which is the opposite to the entrance. To equip ground grounding, you need to dig a hole 1.5 meters deep, fill with a layer of sand 10 centimeters, pour water, lower the grounding ground, fill the hole with soil and water with water.
Now you have learned how much it costs to block the roof with a metal tile, and how to do it correctly. But that's not all! Each ventilation or antenna output includes additional elements. First, the template of the passage element or ventilation output should be applied to the metal roof and circle along the contour. Then it is necessary to cut the hole along the resulting line. Exits and passage elements are fixed to the metal profile with special self -tapping screws.

Roof for the roof in the first
The roof for the roof first of all needs to be chosen in a good organization. Pay attention to the manufacturer of materials for the roof and their cost. It is better to buy high-quality materials for the roof in companies, such as fin-ra.ru, in order to save on the repair and maintenance of the roof.