Crossing special designs that share floors. They can...
|
|
Today it is very difficult to imagine a modern bath without such a decorative and ... |
When decorating the bedrooms, important attention is paid to the ceiling, which should ... |
How to build a basement in the garage. How to make a cellar in a garage
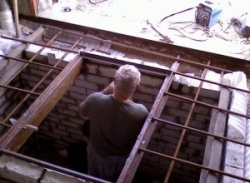
The basement is an additional room, the construction of which is always justified. It is used as a storage for vegetables and canning or equipped with a workshop. If the basement allows, then even a relaxation area, for example, a bar, can be placed in it. In the article, we consider how to properly build a basement in the garage.
Content:
- The feasibility of building a basement in the garage
- How to build a basement in a garage
- Selection and calculation of materials for the construction of the basement in the garage
- Slate for the construction of a cellar in the garage. Calculation of the amount of material
- Concrete for the construction of the walls of the basement under the garage. Calculation of the amount of material
- Brick for the construction of a basement under the garage. Calculation of the amount of material
- Extruded polystyrene foam (foamplex). Calculation of the number of sheets
- How to make a cellar in the garage with your own hands. Step-by-step instruction
- How to finish the walls in the basement?
- DIY garage staircase
- How to prevent water and mold in the basement under the garage
The feasibility of building a basement in the garage
First of all, it performs the function of the pantry. When warming the walls, vegetables do not spoil there all year round. In addition, the presence of a cellar in the garage will significantly increase its cost, which will allow it to sell it with the benefit.
But all this will be possible only if a number of rules are observed in the construction of the basement in the garage:
- waterproofing. The main problem of basements is high humidity and the appearance of mold. In advance, it is necessary to determine the level of groundwater and based on this, to choose a method of waterproofing;
- drainage system. With a high level of groundwater, waterproofing is ineffective. Therefore, drainage trenches are made around the garage;
- ventilation. This is one of the most important stages of construction. It is calculated based on the area of \u200b\u200bthe garage basement. Without an influx of fresh air and its circulation, a high risk of fungus is high, which will lead to corruption of products and interior decoration;
- insulation. This is important if the basement is supposed to be used as a dwelling. Thermal insulation should be chosen non -combustible, environmentally friendly and one that rodents will not damage.
How to build a basement in a garage
- Before making a scheme of the future garage cellar, you need to make sure that gas pipeline or water pipes do not run under the construction. Since the depth is made at least 2.5 m, you can accidentally damage communications.
- The depth of the pit for the basement is calculated taking into account the fact that a concrete floor will be equipped, which will take at least 20-30 cm in height.
- The next stage is the choice of building materials. To do this, at the preparatory stage, the level of groundwater is determined.
- Also, when calculating the size of the pit, it is taken into account that its walls retreat at least 40 cm from the supporting walls of the garage. If you neglect this, then soon the garage may begin to collapse.
Selection and calculation of materials for the construction of the basement in the garage
Depending on the characteristics of the soil and financial capabilities, several basic materials are selected:
- Concrete plates;
- Bricks;
- Slate;
- Plate thermal insulation material.
Tip: If high groundwater is detected, then reinforced concrete slabs will be required to build walls.
Slate for the construction of a cellar in the garage. Calculation of the amount of material
It is suitable for light, sandy soils that are not exposed to strong seasonal fusion. For reliability, during the construction of the support walls of the basement, it is installed in 2-4 layers with a rack crate between the sheets. The wooden frame is coated with liquid mastic, which protects the material from moisture and acts as a gluing component.
Sold with flat or wave -like sheets of standard sizes. The marking on the packaging is indicated about their size and characteristics, for example: LP-NP-2.5x1.2x6. This is deciphered as a flat sheet not pressed 2.5 m long, 1.2 m wide and 6 mm thick.
Consider the calculation of the amount of material on the example of the basement in size: length 400 cm, width 300 cm, height 250 cm. Stages of calculation:
- The length and width of the total perimeter of the basement is folded: 400+300+400+300 \u003d 1400 cm, which means 14 linear meters (PM);
- For strength, the walls will consist of 4 layers, which means 143 \u003d 42 PM;
- The height of the sheet is 1.5 m, and the height of the basement is 2.5 m. Therefore, 2 sheets will have to be laid in height. Therefore, 422 \u003d 84 PM;
- Having divided the resulting value into the length of one sheet, it turns out: 84: 3.6 \u003d 23.3 sheets.
Concrete for the construction of the walls of the basement under the garage. Calculation of the amount of material
The thickness of the supporting concrete walls should be at least 15 cm. The construction requires formwork, reinforcement and a mixture of concrete.
To evaluate the cost, you need to calculate the amount of concrete mix. To do this, the formula V \u003d A (wall length) H (wall height) B (wall width) is used. It is easier to calculate each wall separately and then add the results obtained.
- First, we calculate longer walls. In this case, the value of the wall width will take 20 cm. It turns out 42.50.20 \u003d 2m. Walls of this size 2, so double the value of 22 \u003d 4 m.
- Similarly, we calculate the remaining 2 walls: (32.50.20) 2 \u003d 3 m.
- Next, the volume of the concrete floor is calculated: 430.20 \u003d 2.4 m.
- Having folded all the obtained values, we obtain the required volume of the solution: 4+3+2.4 \u003d 9.4 m.
- For strength, concrete walls reinforce. To do this, use metal or fiberglass rods with a diameter of 0.8 mm. In the future, they knit a grid with a cell of 10x10 cm. To calculate the number of required reinforcement, you need to calculate how many rods will fit in the length and height of the wall with a step of 10 cm.
- Divide the wall with a length of 400 cm by 10, it turns out 400: 10 \u003d 40 pcs. Walls 2, so double the value of 402 \u003d 80 pcs.
- To calculate the linear meters of reinforcement, the resulting number of pieces is multiplied by the height of the basement: 802.5 \u003d 200 PM. So much material will be required for 2 walls 400 m long.
- Similarly, we calculate the material for walls 300 cm long: (300: 10) 2 \u003d 60 pcs. To calculate the linear meters 602.5 \u003d 150 PM.
- Fold: 200+150 \u003d 350 PM reinforcement for 4 walls of the basement.
According to the same principle, the reinforcement for the floor is calculated.
Brick for the construction of a basement under the garage. Calculation of the amount of material
The best material for the construction of walls in the basement is red, full -bodied brick. It is more moisture resistant, unlike silicate. Its standard dimensions are 25x12x6.5 cm. Different methods of masonry are used for the load -bearing walls of the cellar, for example, for walls 250 cm high, the masonry is chosen in one brick, and if the walls are above 3 m, then one and a half brick.
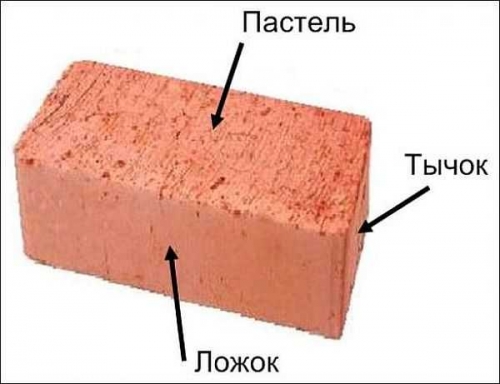
We will calculate the material for walls with masonry in one brick. This will require knowledge of the names of the parties to the brick.
- First, you should calculate the number of rows in height. Divide the height of the basement walls to the height of the pumpkin side: 250: 6.5 \u003d 38.46 rows.
- Now they calculate how many bricks are included in the width of the wall. First, we calculate for walls 300 cm wide: 300: 12 \u003d 25 pcs. We multiply this value by the number of rows: 2538.46 \u003d 961.5 pcs. There are 2 such walls, so we multiply in half: 961.52 \u003d 1923 pcs.
- Similarly, 400 cm wide for walls are considered: 400: 12 \u003d 33.3. We multiply by the number of rows: (33,338,46) 2 \u003d 2562 pcs.
- It turns out that for the construction of a basement under a garage of 400x300x250 cm in size, you will need: 1923+2562 \u003d 4485 pcs.
Extruded polystyrene foam (foamplex). Calculation of the number of sheets
This is a great material for insulation of the basement walls:
- It is moisture resistant;
- Environmentally friendly;
- It has high thermal insulation properties, so 5 cm of material is equal to 50 cm of concrete wall;
- Unlike cheaper polystyrene foam, mice will not bite it.
They insulate them the walls and ceiling of the basement. To calculate the number of sheets, a formula for calculating the area S \u003d A (wall length) B (wall height) is required.
- For a wall of 400 cm long, the calculation will be as follows: 42.5 \u003d 10 m. Multiply by 2 walls: 102 \u003d 20 m.
- We calculate 2 walls of 300 cm: (32.5) 2 \u003d 15 m.
- Ceiling area: 34 \u003d 12 m.
- Having learned the area of \u200b\u200ball individual elements, the obtained values \u200b\u200bare folded and the total number of square meters of material for insulation of the walls and ceiling of the cellar in the garage is obtained: 20+15+12 \u003d 47 m.
How to make a cellar in the garage with your own hands. Step-by-step instruction
Work tools:
- Bayonet and soviet shovel;
- Roulette from 3 m;
- Level;
- Plumb line;
- Buckets, rope for lifting the earth;
- Concrete mixer;
- Wide metal spatula;
- Screwdriver;
- Perforator.
Additionally, you can add a pump in case you need to pump out water.
Stages of work
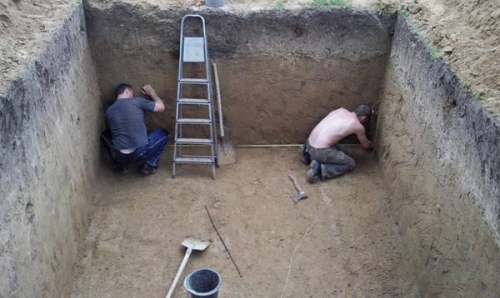
- All construction work begins with markings on the ground. In place of the garage floor, a rectangle is marked with pegs. In our case, 300x400 cm between the stakes, close to the ground, pull the twine.
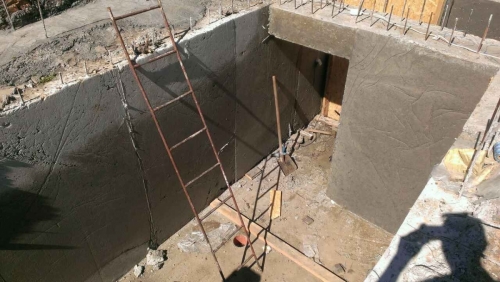
- The upper layer of the soil is removed with a bayonet with a shovel. The width and length of the pit is recommended to be made more than 20-25 cm to apply a waterproofing layer on the outside of the walls. The depth is also dripped with a margin, given the thickness of the floor. The walls of the pit are aligned on a vertical plumb of a bayonet with a bayonet.
- Immediately lay waterproofing for walls. Any roll waterproofing material is suitable for this. He protect the walls from groundwater.
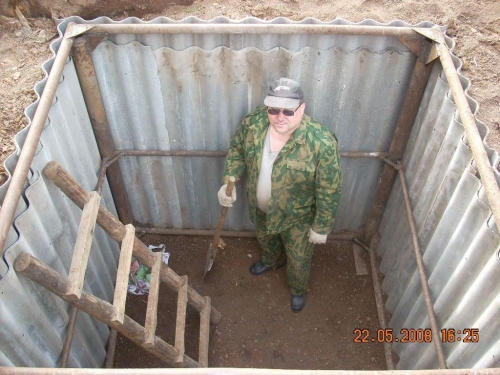
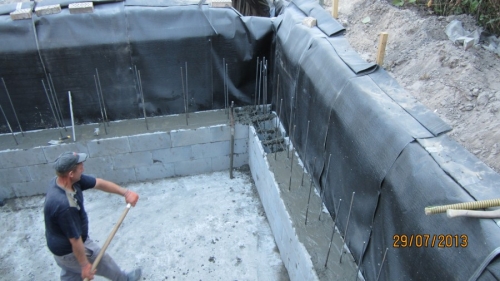
- Then they begin to build walls of brick, concrete or slate. At the end of the work, they are covered with waterproofing material.
Tip: to strengthen the walls of brick, when laying each row, a reinforcing mesh is used. During construction from sheets of slate, it is made at least 3 layers, between which, for the gap, the rails are installed and the space is poured with bitumen. And the gap between the pit and the wall is filled with sand and tamped.
- The floor in the basement under the garage is often left earthly, but with more thorough construction, it is poured with concrete.
- To do this, the pit is deepened by another 40 cm, aligning the bottom. Pour sand with a layer of 15 cm and spilled, for rammed. A gravel layer is covered with the same thickness. It turns out a good drainage layer.
- On top, waterproofing with an overlap of 10-15 cm at the joints is placed.
- For the floor, make a reinforcing grate of rods 10-12 mm. They are connected to make cells of 15 cm. It is placed on a certain hill from the floor.
- The concrete solution is poured evenly, while with a trowel or kelma piercing it and vibrating to release air bubbles. For uniform hardening, it is closed with a film. In the future, it is covered with a primer.
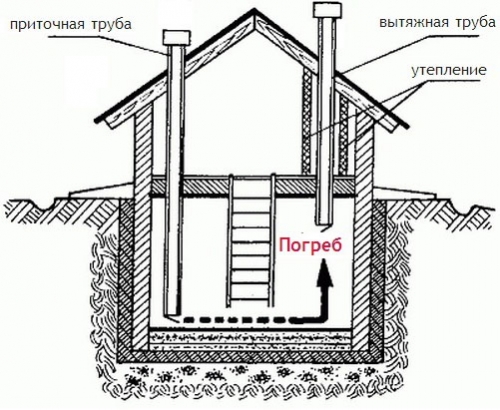
- How to do ventilation in the basement. The most commonly used 2 pipes. This is a supply pipe, through it, fresh air will come from the street. It is installed at a height of 10 cm from the floor of the cellar. The second pipe is exhausted, through it the air from the basement will go outside. It is buried no more than 15 cm from the ceiling of the cellar. The pipes are closed with a mosquito net on top.
- It is important to warm the basement from the inside. So that even in winter there was a stable plus temperature there.
- When using polystyrene, it cannot be attached to the wall on glue. This can only be done with external insulation. If you do not leave the insulation between the sheets of the ventilated gap, condensation will form on the walls.
- Therefore, first a crate is made, a membrane vapor barrier is attached on top and on top of it, between the crate, foam slabs are inserted. The thickness of the material should be at least 50 mm.
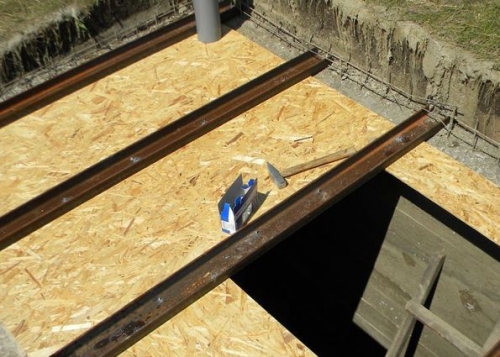
- The final stage is made of the basement ceiling. As a rule, the roof of the cellar in the garage is made of concrete. The formwork is made of wooden beams or metal beams. Sheets of OSP or moisture -resistant plywood 20 mm are attached to them. At the pouring stage, the beam is properly propped with supports.
- A reinforcing mesh of fiberglass or metal rods is knitted 10-12 mm. The first network is placed at a distance of 3-5 cm from the formwork, the second is located slightly higher. Pouring is carried out evenly at one appointment.
- To reduce the cost of construction, the ceiling is made from a captive board of 100x50 mm. From the side of the basement, it must be treated with waterproofing. Foam is placed on top, filling all the cracks with mounting foam.
- The hatch, which performs the function of the door to the basement, can be done with your own hands. To do this, you will need a sheet metal at least 5 mm thick, a grinder, a welder, insulation, metal corners, mounting foam, screwdriver, door loops, rubber seal, roulette.
- A rectangle is cut by the size of the metal opening. A corner is welded to it on all sides. Below is glued to tile glue or mounting foam plate insulation. In this case, metal corners should additionally hardly fix it. If thermal insulation was made of several pieces, then all the joints and gaps are delighted. Welded door loops and pen. The hatch is ready, it remains only to install in place.
How to finish the walls in the basement?
- If the walls are brick or from concrete, then they are often simply plastered. But, given the more humid air of the basement, such a coating in a few years begins to crack and collapse.
- No less popular is the cladding of internal walls with ceramic tiles. The finished surface is easily washed and moisture resistant. In addition, a layer of tile glue and tile itself will serve as additional waterproofing.
- If the basement under the garage is used as a recreation area, then the walls are aligned with a moisture -resistant drywall and make lining with artificial stone or any other finishing material. It is allowed to cite the walls of the walls with drywall or imitation of the beam. But at the same time, with mandatory wood processing, to close all the pores of natural material and increase its moisture resistance.
- Plastic panels are suitable as a finishing material for the cellar. Modern models have a quality design and look noble. The castle connection system guarantees high tightness.
How to make a cellar in the garage video
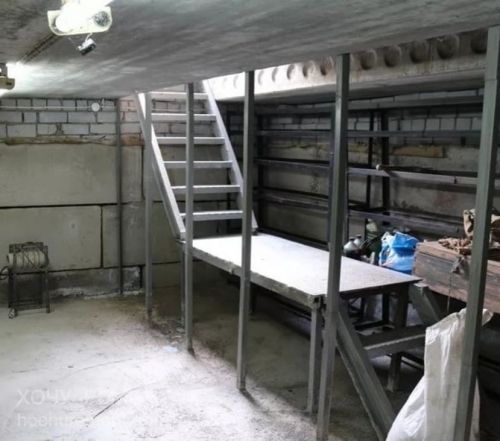
DIY garage staircase
When choosing a model and material, from which it will be made, you need to make sure that it meets the two main criterion:
- Safety. When using wood, it is necessary to cover it with protection against decay. When welding a metal structure, cover with an anti -corrosion composition.
- Ease of use. Most often, basements under the garage are small. Therefore, compact stairs are installed on a light metal frame. It should be equipped with railing at least on the one hand.
Consider the construction of the stairs on the example of a wooden structure.
Tip: When calculating the structure, not only the size of the room is taken into account, but also the technical requirements. So, the optimal angle is 45 degrees. For a comfortable rise and descent, the width of the steps should not be less than 80 cm. The width of the dungeon is at least 30 cm, and the height of the steps is within 20
cm.
Stages of work
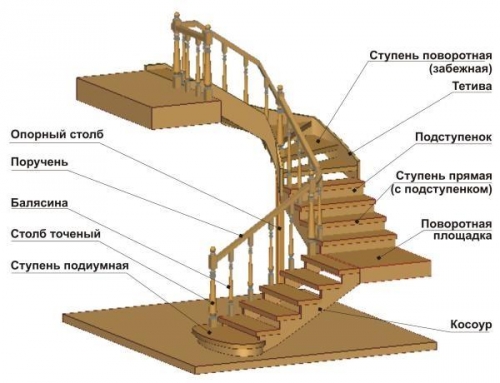
- The easiest way is to make a single -march staircase. For its fastening, supporting pillars are installed in the upper part.
- Then 2 or 3 braids are made, depending on the width of the stairs. Steps should not bend when walking.
- Steps are laid on them. For the basement, you can buy an economy version of the variety in or C or do it yourself, from 2-3 boards. They will need to be polished. If there are knots or irregularities, they are putty with a composition for wood.
- Install the handrails and everything is covered with parquet varnish.
How to prevent water and mold in the basement under the garage
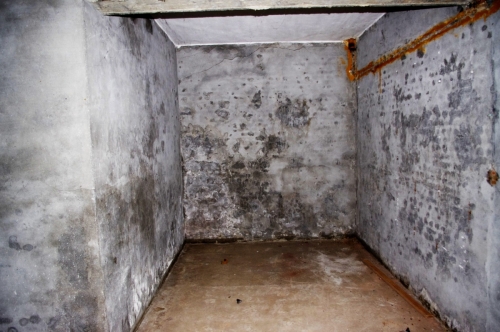
The main reason for flooding the basement or high humidity in it is a violation at certain stages of the construction of external walls. Or an incorrect miscalculation of groundwater level. If this has already happened, which often happens during the spring flood, then the actions will be as follows:
- With the help of the pump, pump out all the water;
- The floor level is lowered by 40 cm and tightly compacted;
- A sand pillow is poured on top of 15 cm and a gravel layer of any fraction of 15 cm. This drainage layer will allow water to go down;
- Then the concrete floor is built using the technology described above.
- When moisture appears on the walls, one of the reasons can be a crack in the bearing wall. In this case, this place is cleaned, treated with an antifungal agent and filled with bitumen.
If moisture appeared on all walls, then not to cope with it without a forced ventilation system or periodic drying of the room, for example, a heat gun.

www.vorota.tt34.ru garage
www.vorota.tt34.ru garage gates in the city of Moscow 8 (903) 715-91-15.
Installation of garage gates in Moscow.
Steel gates for GSK in Moscow.
Metal gates with finishing for lining in Moscow 8 (903) 715-91-15.
www.vorota.tt34.ru steel gates city Moscow.
LLC Stalmaster - production of garage gates in Moscow.
www.stal-vorota.tt34.ru Metal gates.
89037159115 City Moscow Production and installation of garage gates in Moscow 89037159115.
Steel garage gates in Moscow Gate with finishing for lining and OSB.
Metal garage gates in Moscow Gate with insulation - URSA/PENSE.
Production of garage gates in Moscow Gate with castles of Gardian.
89037159115 City Moscow Garage Gate of various configurations and purpose.
Steel gates - industrial, technical, utility, garage, garden.
89037159115 Moscow Gate to the garage www.stal-vorota.tt34.ru gate to the garage in Moscow.