Homemade brick Saman made of straw and clay the oldest of ...
|
|
During construction work, the covering grid is widely used. The product serves ... |
Whatever reliable operational qualities, building materials may have, ... |
DIY house of glued beam
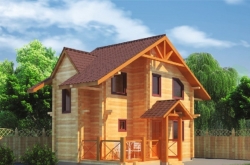
The wood is the most ancient, used for the construction of the material, and its area of \u200b\u200bapplication is huge. Unfortunately, ordinary logs are not suitable for some architectural solutions, and they began to replace them with other materials. But with the advent of the glued beams on the building materials market, it became possible to erect complex buildings entirely from wood. The main advantages of glued beams are its high strength, simplicity and speed when erecting a house. But, despite all its advantages, building a house from glued beams is quite responsible. Therefore, when planning to build a house from glued beams with your own hands, it is necessary to carefully prepare and, if necessary, invite the master to help in this matter.
- House project from glued beams
- Blogging a house
- How to build a house from glued beams video tutorial
House project from glued beams
The beginning of any construction begins with the creation of the project, and the construction of houses from glued beams is no exception. You can make a project of a house from glued beams yourself in a specialized program, such as Archicad. This will require certain skills and knowledge, but this is only a matter of time and desire. Those who have only recently began to study this design tool will be somewhat difficult to independently make a full -fledged project in compliance with all norms and rules. But having taken up the design of houses from glued beams, you will have to make the following documentation:
- foundation plan. With this element, everything is quite simple. It will take a drawing of the foundation indicating its type, depth of the occurrence, materials used, and so on;
- paul beam plan. Depending on the type of foundation, a detailed drawing of the support beams will be required, on which the floor will be equipped in the future;

- the floor plan of the house. In the design documentation, the floor plan is perhaps one of the most difficult to manufacture. At the drawings, you will have to indicate the location of windows, doors, internal partitions and walls with their sizes and other structural elements of the house. It will not be superfluous to indicate in the drawings the location of fireplaces, furnaces, communications;
- break off with cuts of the walls of the house. This is necessary for the manufacture of a beam. The process itself is quite laborious and requires increased attention and responsibility during design. For the scraping plan, you will have to draw the walls of the future house in the cut along the axes, indicate all the elements of the walls and places of the walls of the wall with neighboring walls. Then perform the numbering of each element by assigning a unique number that carries a certain meaning for the convenience of further identification. At the end of the breakdown, a drawing of each element of the wall with instructions of all sizes, cutouts, holes and cups is performed;

- the specification of all elements of a house with geometric dimensions is another drawing that requires painstaking work. But thanks to modern computer technologies, the implementation of all work is quite easily;
- the plan of the rafter structure and the roof. Perhaps this is the second most complex and thoroughness of the study drawing. It indicates materials for the rafter structure with all sizes and related fasteners. A separate drawing must be distinguished by a multi -layer roof pie and the thermal insulation cake of the entire roof;
- the image of the house is in the future.
Performing the design of the house from glued beams, you should pay special attention to the beam itself. After all, it is he who is the main building material and on what thickness and which wood breed will be from, the microclimate in the house depends.
Today on the market you can find glued beam with a thickness of 90 mm to 275 mm. Manufacturers also produce glued beams with standard dimensions of 100x150 mm, 100x200 mm, 150x200 mm, 180x200 mm and a long up to 12 m. If necessary, especially if the project has large spans up to 18 m long, the beam section can be increased to 215x1305 mm.

When creating a project, it is important to take into account the following. For external and load -bearing walls, you should choose a beam with a thickness of 180 mm to 275 mm. For internal partitions, a beam with a thickness of 90 170 mm is used. But often in order to save material, partitions are made frame and sheathed with wooden panels with imitation for the beam.
Those who have a financial opportunity and there is no desire to mess with the computer program can order a ready -made project. To date, there are many organizations specializing in the manufacture and sale of house projects. And when you see the announcement of the type, we build houses from glued beams, you can be sure that they can also purchase completely ready and certified in all instances. Often such organizations themselves make projects of houses from glued beams with all accompanying documentation, and you just have to choose the type of wood and, if desired, make some changes to the typical project. The cost of the project itself will be 10 12 cu/m2. It should be noted that in most companies offering their services for the construction of houses from glued beams, when ordering a house for them, the project will be a free addition. In general, the price depends on the difficulty of work, the thickness of the beam, the total meter and number of storeys, as well as the type of wood used to the house of glued beams. The cost of a house from glued beam starts at 20,000 cu And is limited to your wishes and financial capabilities.
Blogging a house
Getting a project at home, you can start building a house from glued beams. First you will have to purchase all the necessary materials. Fortunately, there are no particular difficulties with the choice and purchase, since all the necessary information is contained in the design documentation. Then you can start building a house.
Important! Before building a house from glued beams, one important point should be noted. Creating a project, we made a plan for breaking up. This plan can be conveyed to the bar to the manufacturer, and it will make all the necessary cutouts directly in production. Of course, in order to avoid additional expenses, the breakdown is done independently, directly on the site. But at the same time, it is necessary to take into account the fact that when building a house from glued beams, the technology of factory breakdown will perfectly adjust all the elements of the house.
The foundation of a house made of glued beams

Having delivered all the necessary materials, you can proceed to the construction of the house. And the first thing we start is the foundation. It is worth noting right away that, due to wooden houses, due to their relatively small weight, you can equip brownizer pile or finely trousered strip and slab foundations. Let us stop your choice on a fine -pounded tape foundation, since this type of foundation is most common and easy to arrange. To create with your own hands, a strip foundation for a house made of glued timber, you must do the following:
- we mark the trench of the foundation. To do this, drive a wooden stake into one of the corners and with the help of a rectangular triangle we determine the direction in which we will pull the two threads, noting the sides of the foundation. Having measured the desired distance with the thread, we drive another pegs. We return to the first peg and pull on another thread that marks another side of the foundation. We outline the rest of the sides in this way. To check the geometry, we pull the two diagonals and compare the length of the threads. If they are equal, then the geometry is perfect. Now, near each of the pegs on the inside, we set a square with sides, for example, 50x50 cm. We drive another peg in the corner of the resulting square for each of the corners of the foundation and pull the thread between them. So we made the internal contour of the foundation;
Important! The above marking method is suitable for creating foundations with any number of straight angles.
- having made a marking, we proceed to the excavation of the earth for the trench. Having deepened it by approximately 50 cm around the entire perimeter, we check the uniformity of the trench deepening and, if necessary, compare all the differences. We strive to achieve an even surface of the floor in one plane;
Important! If the site has large changes in heights, it is necessary to make a trench very carefully, following the level of the bottom. In such cases, start digging a trench under the foundation from the most thorough angle.
- next, at the bottom of the trench, pour a layer of sand at 10 15 cm, level it and compact it;
- now we make a reinforcing frame from the reinforcement and lower it into the trench. In the corners and in the middle of the trench we install lining of broken brick under the reinforcing frame;
- after the frame has been installed, we make shields for the base of the building. For these purposes, you can use 25x150 mm boards or laminated moisture -resistant plywood. When creating the formwork for the foundation, it is necessary to monitor its stability and a durable connection. Therefore, it is extremely desirable to make a bunch of shields in several places at the top and on the bottom;

Important! In order for the underground at home to be always dry, it is necessary to equip ventilation purges in the walls of the foundation. To do this, you can take a trim of the beam and insert it between the shields, having previously wrapped it with roofing material. After pouring and solidifying concrete, the beam is knocked out, and in its place the hole remains.
- having checked the reliability of fixing the shields, you can begin to fill with concrete. We make concrete in place on our own or order a complete mixer. We pour the foundation gradually, in layers, following the integrity of the shields. After each flooded layer we compact concrete with a vibrator;
- bay the foundation with concrete, leave it for 28 30 days for a set of strength.
Blutters of the crowns of glued beams
Having created a strong foundation, we proceed to laying the mortgage crowns of the future house. This can be done without any difficulties, the main thing is to observe the technology and follow certain rules.
The first thing to do is to reliably waterproof the lower binder from the foundation. To do this, we lay several layers of roofing material on the entire surface of the foundation or coat the surface with bitumen mastic with the subsequent laying of the waterproof. In addition to the beam of the lower strapping, we impregnate with special protective agents from rot, fungi and mold.

Now we lay the strapping beams in place as indicated in the drawing of the house. The beams themselves can be interconnected in several ways. On demonstrating crowns of a house from glued beams, a photo shows each of the mounting methods.
Round spike

Connecting

Swording at half -term

The first crowns are connected to the foundation using metal crutches or studs through wooden plugs. To do this, plunge at least two through holes in a beam with a diameter of 10 mm and deepen into the foundation by 5 10 cm. We remove the beam and drive a wooden cork inside the hole, then return the beams, drive a hairpin or crutch. On top of the first row we lay a layer of thermal insulation from jute, pacli or stump and then lay the second row of beams on top.
Formation of the beam with the help of the bastards:
To reliably and steadily connect the beams of the crowns among themselves, we use wooden bumps. To do this, directly at the site of the conjugation or next to it, plunge holes with a diameter of 35 40 mm and a depth of one and a half beam. We make the wax itself a couple of millimeters more than the diameter of the hole and 4 5 cm long less than the depth of the hole. This is done so that Nagel firmly enters the beam and fasten it. Then we simply drive the wax inside and achieve it on top to deepen it. Sometimes for additional fastening the beam is connected using metal brackets.
Important! Internal beams must be laid with a gap between them and external beams. This is done to ensure ventilation of the entire underground entirely.
House from glued beams

In a house made of glued beams, a wooden floor on the lags is usually equipped. There are two ways for this. First: additional beams connected to the crowns of the house are laid, and lags are already laid on them. The second method provides for the arrangement of brick retaining columns, on which beams and lags are subsequently laid. Consider the most popular option on support columns, as it allows you to make floors for rooms with a large area.
We begin to equip the floor from the excavation of soil to the support columns. We dig a pit 50 cm deep with sides of 40 50 cm. We try to take about 70 80 cm between the columns. After that, we fill up 10 cm of sand, 10 cm of gravel and thoroughly compact. We make a reinforcing frame for the base of the column, lower it inside and fill it with concrete.
Important! If you plan to make brick columns, the base of concrete will have to be lifted by 5 cm above the ground level.
When the concrete froze and gain strength, we make a brick masonry. It should be noted the following: if the height of the column is more than 25 cm, we do the masonry in two bricks, if less, then one and a half. We lay a layer of waterproofing to the top of the columns.
We lay the beams and on the support columns and on the lag. This option entails an increased consumption of lumber, but as a result, the floor will be able to withstand heavy loads. We connect the lags and beams with each other using self -tapping screws. Inside between the lags we put black rolling, which we fix it to the lags with the help of metal corners. We make the roll itself from waterproof plywood. In the space between the lags on top of the roll and the lag, we lay a layer of waterproofing. The edges of the material around the perimeter are removed upstairs, and we lament and glue with tape together. Now we lay the insulation inside and make a black floor on top. We take mineral wool, foam or any other material as a heater with a density of up to 60 kg/m3. After laying the draft floor, the finish flooring will be done at the stage of finishing the house.
Elections of the walls of a house from glued beams

Thanks to the previously prepared breakdown, as well as the presence of spikes and grooves on glued beams, the construction of walls is an assembly of elements of a children's designer. But this ease is achieved by many years of experience. Nevertheless, creating walls from glued beams with your own hands is much easier than from a looped log. To perform work, you will need 4 people who will have to do the following:
- having laid the insulation on top of the crowns, we install the first row of bars in place. We make sure that the marking of each beam corresponds to its location according to the drawing;
- temporarily fix each beam with several nails driven on both sides into the ends. Next, with the help of a drill, drill holes under the heated;
- it remains only to drive the nagel into place and go to the next row.
Important! Despite the high -quality factory drying of glued beams after the first year, an additional hemp of the walls may be required. To increase the strength and reliability of the walls, next to the window and doorways of the nagel, they are driven almost to the entire height of the opening. To do this, sprinkle the hole for the wax with a special elongated drill.
In the process of building walls, it is necessary to constantly monitor the level of their horizontal and vertical. The oversights and errors at this stage can entail a complete alteration of the walls with the order of new materials and work on the breakdown. Upon completion of the construction of the wall box, we block it with beams for the inter -story floor. First, the beams themselves are temporarily installed on top, then we plan the installation sites. Then we remove to the side and in the intended place we make a cutout into the floor of the beam, into which we lower the beams of the ceiling. At the same time, we constantly monitor the horizon of the beams themselves. If the house is on several floors, then we continue the construction of the walls as described above. Upon completion of the construction of the walls and the installation of floors, you can begin to make a rafter structure for the roof.
Important! The floor of the upper floors has an identical design with a floor of the first, made on soil.
Creating a roof for a house made of glued beams

Having completed the construction of the walls and laying the beam beams, you can start arranging the rafter system, laying the roof and warming the roof. All work on creating a roof at home requires special caution and is as follows:
- first we raise up, lay and fix the Mauerlatians. As an Mauerlat, we use the oil block and securely fix it to the wall of the house;
- now we make a template for the rafters. To do this, take two boards, raise upstairs and install them in place of the rafters. Adjusting the angle of inclination, we fix the boards with each other and cut out in the lower part of the depressions under the support;
- further, having lowered them to the ground, you can cut and adjust the rafters on them. By connecting the rafters on the ground into a single design, we raise them up;
- first we make only two similar farms. We install one at the beginning of the house, the other at the end and pull the cord between them. This is done in order to set a single horizontal level of the entire rafter structure. If there is a skew when checking the level, it can be removed by lowering the protruding farm;
- it remains to make, raise and install the rest of the farms in places, focusing on a stretched cord;
- on the rafters we fill the labels and lay a hydro-protection film on top of it;
- it remains to lay the roofing material, and on this the roof will be ready.
By providing protection against precipitation, you can start insulation of the undercarbon space. To do this, we first make and insulate the floor of the attic according to the usual floor scheme on the lags. The difference is that instead of the final floor we leave the black boards. Then we proceed to warming the roof:
- we put the thermal insulation material into the space between the lags;
- on top of thermal insulation, lay a layer of vapor barrier and fix this entire pie from the inside with a crate.
How to build a house from glued beams video tutorial
The construction of a house from glued beams will be completed after completing finishing internal and external works, the arrangement of electrical wiring and plumbing. Then the house will be ready for operation. All work on the construction of a house from glued beams will take about two to three months, and even newcomers in construction can cope with this.
![]()
StrPort construction portal 2011-2018. Articles about repair, construction, building materials.
Copying information from the site is possible only with permission of the editorial office Or indicating a direct link to the source. Legal justification
Build a house from a bar
It will be cheaper to build a house from the beam yourself, but much longer. In addition, you need to have experience in construction, and I am far from this. Therefore, I ordered the construction of our house in one construction company. Literally 2 months and our house http://www.home-projects.ru/proekty_domov/karkasnye/arad-2/ was ready))