During the construction of a bath, whether it be a Russian steam room, a Finnish sauna or hammam, a developer ...
|
|
In the era of maximum development and construction development, many dream of their own ... |
Concrete surfaces, including gender, prefer not to paint, but leave in their ... |
DIY bituminous tiles

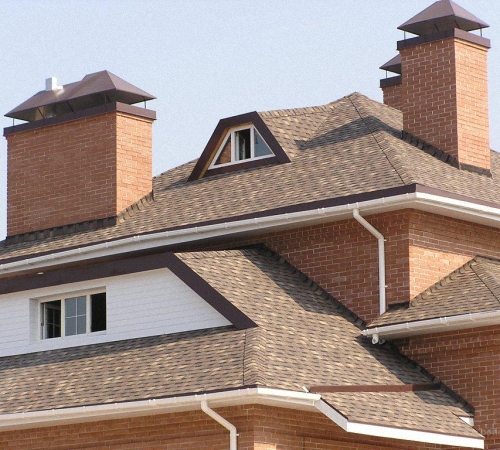
Of great importance in the construction or decoration of the house is the choice of external coating. One of the popular methods of roof decoration is bitumen tiles. But to obtain a qualitative result of the work, it is necessary to find out the technology of manufacturing and laying bitumen tiles. If you carefully study this issue, then it is quite possible to do this. In this article, we will get acquainted with the features and basic techniques for laying bitumen tiles with your own hands.
Table of contents:
General information about bitumen tiles
The bitumen tile received the name due to the use of bitumen in the manufacture of a material that has the properties of resin or asphalt. The bitumen tile is also called soft or flexible. This tile is characterized by a zero water -press, which leads to a lack of corrosion and decay on the roof.

The composition of flexible bitumen tiles, in addition to bitumen, includes fiberglass and stone sprinkling.
The glass panel or glass chuck is made of glass threads. The material is characterized by high strength, but also very easy to work.
For the production of tiles, bitumen is used, which is enriched with oxygen. When using piece bitumen, the tile becomes more frost -resistant and elastic.
Granulate is a material made on the basis of stone powder. For manufacture, use shale or basalt stone. Distinguishing a tile made from the basalt stone from the tiles from the shale is very simple. The basalt powder has a round shape, and the shale - oblong. The basalt powder is better, as it does not crumble during operation.
The fiberglass is enveloped on both sides with a special bitumen -based resin, and then sprinkled with stone pouring on one side. The other side is an adhesive primer, which ensures the adhesion of the tiles and roofs.
In stores, bitumen tiles are sold with packs of 2*3m. One square meter of such a tile weighs eight to twelve kilograms.
The warranty period of bitumen tiles is quite long from 10 to 30 years. The higher the quality of the bitumen resin, the more expensive the price of tiles, and the higher the service life.
Cutting bitumen tiles is carried out in different shapes. These are forms:
- beaver tail,
- Dragon tooth,
- fights,
- brick,
- Romb,
- hexagon.

Advantages of installing bitumen tiles:
- Roof protection from mechanical damage, due to wear resistance;
- ease of installation process;
- excellent aesthetic qualities;
- low weight, which facilitates the process of installing and transportation;
- The roof of bitumen tiles has a long service life;
- A wide herald cuts from -50 to + 100 degrees;
- Lack of noise during rain or hail.
The main drawback of bitumen tiles is a high cost.
Main manufacturers of bitumen tiles
1. GAF (America) is the world's largest producer of bitumen tiles.
Features of bitumen tiles GAF:
- Size: 3.05 m;
- A variety of colors and design solutions, three series of bitumen tiles: luxury, standard and premium
- high quality of the material;
- it does not fade over time;
- The use of organic materials in the manufacture of tiles.
Price: from $ 31 per 1 pc.

2. IKO is a huge company for the production of bitumen tiles, which has plants in the USA, Canada, Belgium and Slovakia.
Peculiarities:
- the use of basalt, as a powder;
- processing bitumen with hot air;
- excellent aesthetic appearance;
- affordable price.
Price: from $ 15 per 1 c.
3. Katepal - Finnish company for the production of bitumen tiles.
Peculiarities:
- the use of non -discharge glassolt in the production of bitumen tiles;
- Mineral granules act as powder;
- Excellent protection against water, ultraviolet radiation and temperature difference.
Price: from $ 10 per 1 c.
4. Shinglas - bitumen tiles that are produced at the Russian factory of Technonikol.
Peculiarities:
- many colors and slicing options;
- combination of several shades in the roof decoration;
- economy - the presence of minimum waste;
- The basis of the tile is glass chloride;
- The basis of the lining carpet is polyester.
Price: from $ 11 per 1 c.

5. Owens Corning - manufactured in the USA. Has a number of features:
- antifungal coating;
- A huge number of color solutions;
- high fire safety;
- The technology of basal adding is provided by a long operational period.
Price: from $ 16 per 1 c.
6. Ruflex - Russian Bitumen Tiles.
Peculiarities:
- environmental Safety;
- the use of advanced bitumen;
- frost resistance;
- elasticity.
Price: from $ 11 per 1 c.
7. ONDUVILLA - Italian -made bitumen tile.

Peculiarities:
- Size: 110x40 cm;
- ease of operation;
- the use of the patented High Resistance technology, which involves impregnating the basics of tiles with bitumen resins;
- guarantee 15 years;
- Resistant to chemical and biological substances.
Price: from $ 26 per 1 c.
Bitumen tile video:
8. Tegola - Italian bitumen tile.
Characteristics:
- more than 1000 color solutions;
- Sprinking, made from basalt;
- good sound insulation;
- flexibility and plasticity;
- A layer of polyurotane varnish perfectly protects the roof from atmospheric precipitation.
Price: from $ 15 per 1 c.

Bitumen tile
Conventionally, the installation of bitumen tiles is divided into such stages:
1. The device of the lining carpet for bitumen tiles.
2. Installation of vapor barrier.
3. Laying bitumen tiles: technology and methods.
Bitumen tile storage conditions:
- temperature not lower than +5C;
- in hot weather, storage is carried out only in the shade;
- Do not install bituminous tiles during rain or snow;
- When installing bitumen tiles in the cold season, it is recommended to place packaging of bitumen tiles in a warm room for two to three days before installation.

The roof of bitumen tiles is quite moisture resistant, but some manufacturers recommend covering the base of the roofing material before laying the tiles.
Ruberoid will give tiles tightness and additional strength.
Ruberoid should be used if the building is located in a harsh climatic zone where constant winds blow. Also, with a small slope of the roof, the lining of roofing material should be applied.
To ensure the correct air ventilation, it is necessary to leave the ventilation channels. The channels on the lower and top of the roof will provide proper air circulation over thermal insulation. Types of manufacturing channels: hood, ridge aerator or grille on the roof. The size of the ventilation hole is calculated according to the angle of the roof inclination. The lower the angle, the greater the ventilation hole. For example, when tilted a roof of 30 degrees, the size of the hole is 4 cm, and when tilted by 15 degrees - 8 cm.
Tips for the installation of bitumen tiles:
1. The base for laying bitumen tiles should have such characteristics as strength, unbending and evenness.
2. The material for the base is a trimming board. Recommended wood moisture 15 %. The distance between the boards is 15*15 cm.

3. After preparing the base from the tree, we carry out vapor barrier. A film is laid over the entire surface of the roof, which is fixed with wooden strips, a stapler and nails. Put the insulation on top of the film: polystyrene or special plates. After laying the insulation, proceed to the installation of a windproof film.
4. The next stage is the installation of a continuous flooring of plywood, a dry downshole board or chipboard. Be sure to treat the wooden parts of the roof with antiseptic or antiperin to prevent the development of mold and fungus.
5. After the preparatory work on the roof, the lining carpet is laid. The carpet is a bitumen-polymer rolled material. Laying is carried out from the lower right angle, laying the layers with each other is 10 cm in a horizontal direction and 15 cm in vertical. Using special galvanized nails, attach the lining carpet to the surface.
6. Then we learn about the bitumen tile how to lay down and what tips will help increase the life of the bitumen tile.

7. To start installing bitumen tiles should be installed with the installation of the cornice with flanges, which gives the roof a finished look. The minimum thickness of the cornice is 15 cm. Nails are used to attach the flange cornice. The mount interval is 10 cm. The nails are filled with zigzag.
8. The laying of the tile itself is carried out from the lower row. Before laying from the tile, the protective film is removed and attached to the base of Krsha. The distance between the cornice and the first row is 2-3 cm. The tile is attached to the base using nails and glue .. The nails are clogged at a distance of 3 cm from the edge of the tile in the corners. The consumption of nails per tile is 4 pcs. The thickness of the gap between the gunts is 2-3 mm.
9. If the roof has a large angle of inclination or the terrain is characterized by windiness, then it is better to fix the tile with 8-10 nails.
10. Special sheets are used to finish the skate area. The installation of the ridge sheet is carried out so that the last row of tiles is half closed. The overlap of ridge sheets is 10-12 cm.
11. A special apple carpet is provided for apples. The carpet is mounted using special glue and nails.
12. In order to avoid a heterogeneous color, the tile should be mixed from different packages.
13. If on the roof there is an adjoining to vertical surfaces, then before laying the tiles, a special triangular ruler should be beaten. Put the upper part of the tile to this line, and then close the metal apron.
14. When laying the tiles near the chimney, it is necessary to thermist thermox.
Installation of bitumen tiles video:
