Until the 19th century, residential buildings and household blocks were built without the use of nails using ...
|
|
Windows made of aluminum profile is an actual direction ... |
The long -awaited summer came, and many citizens hurry to summer cottages, gardens and sites to ... |
DIY mirror ceiling
It is not as difficult to perform a mirror ceiling with your own hands as it might seem. If you have decided to independently install a mirror ceiling or only think about such an opportunity, we bring to your attention this article.
In our article: choice in favor of a mirror ceiling, types of mirror ceilings, surface preparation, installation of a mirror ceiling, mirror ceilings photo.
Content
- When it is worth making a choice in favor of a mirror ceiling
- Types of mirror ceilings
- Installation of mirror ceiling from polystyrene plates
- Installation of a glass mirror ceiling
When it is worth making a choice in favor of a mirror ceiling
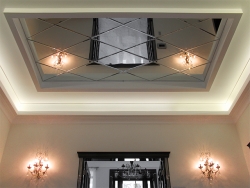
Mirror ceiling is always an interesting design solution. Such a ceiling is able to give the premises some sophistication and a special atmosphere, and can also bear the function of visual expansion of space (which is very relevant if there is little this space). Mirror ceilings are also well suited for dark rooms, as they can create an illusion of more light. It will transform the mirror ceiling and a room with a small height, the ceiling will seem higher than it really is.

Often, not the entire ceiling is made mirror, but only part of it in the form of a mirror insert. In this case, the mirror surface mainly performs a decorative function.

Types of mirror ceilings
There are several types of mirror ceilings:
1. Mirror stretch ceilings
To obtain a mirror effect in this type of ceilings, a special polyvinyl chloride film is used. It has a good reflective effect, but still this effect differs from the effect that real mirrors produce. The mirror stretch ceiling also expands the space, but the reflection in it is not so clear, slightly blurry, as if blown.

A great advantage of mirror stretch ceilings is that they are suitable for absolutely any rooms, including wet; And also for any ceiling configuration (including complex multi -level).
How such a ceiling looks in a particular room you can see by introducing a mirror stretch ceiling photo into the search engine.
2. Mirror polystyrene plates on an adhesive basis
Such plates are produced by rolls. When choosing a mirror canvas of this type, it is necessary to take into account whether it is intended for wet rooms (if you plan to install it in a bathroom or other wet room).
3. Classic glass mirror ceiling.
Such a ceiling, of course, is the best reflector, so the function of visual expansion of space is best performed.
The installation of mirror stretch ceilings is most often carried out by employees of the company in which this very ceiling was ordered.
Therefore, let us dwell on independent installation of glass mirror ceilings and on how to make a mirror ceiling itself from polystyrene plates.
Installation of mirror ceiling from polystyrene plates
Before proceeding with the installation of a mirror ceiling of this type, it is necessary to level the slabs. This is best done under the load, so leveling will happen much faster.
On the back of the plates there is a special adhesive layer, so gluing the plates on the ceiling is quite simple. You can glue the plates both on drywall and directly on the plaster.
So that there are no air bubbles under the plates, it is recommended to use a special rubber roller that can be eliminated.
Please note that in the case of installation of such a ceiling, halogen or too powerful lamps should not be used in built -in lamps, since then the coating can be subjected to some deformation.
Polystyrene mirror ceiling The price of which is lower than on a ceiling made of mirror glass plates is becoming increasingly popular.
Installation of a glass mirror ceiling

The mirror ceiling is most often made of separate square or rectangular tiles. Mirror tiles on the ceiling are both a traditional color, and is made in other colors (pink, blue, golden mirrors).
Initially, the right number of tiles should be calculated, having previously determined their size. Cutting tiles is better, of course, to entrust professionals, because it needs a special tool and good skills.
It is also necessary to prepare places for lamps in the tile.
Surface preparation
Theoretically, mirror tiles can be installed directly on the concrete ceiling. But, as a rule, such a ceiling is not perfectly even, and the surface for a mirror ceiling should be even, otherwise the improper reflections reflections and, as a result, a spoiled overall impression of the ceiling and nullify its advantages.
Therefore, it is recommended to pre -level the ceiling with moisture -resistant plywood or moisture -resistant drywall.
Installation of mirror tiles
There are two ways to install mirror tiles: gluing and fastening with screws.
Glueing is carried out with special glue, which is applied around the perimeter and diagonals of each tile. The tile with glue applied to it should be pressed to the surface and hold for some time; It should only be taken away from her, making sure that she had already stuck and will not fall.

In the case of fastening on the screws, it is necessary to gently drill the hole under the screw in each corner of the tile. Next, a rubber washer is put on each screw (in order to avoid damage to the surface of the glass) and the dowel is mounted. Special chrome caps are then installed in the places where the screws are mounted to give the common surface more aesthetics.

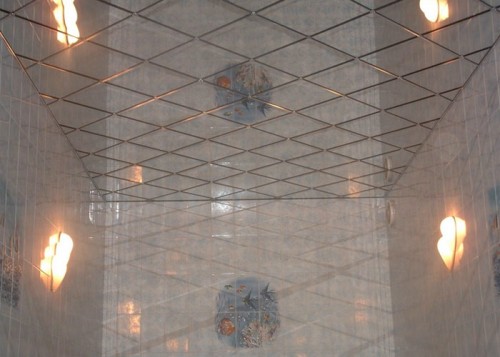
Suspended mirror ceiling
There is also a more complex version of the suspended mirror ceiling. In this case, a special suspension design is made, consisting of a metal frame with guides. Then mirrors of the selected size are laid in this design. The design should be very durable and reliably attached to withstand considerable weight of the mirrors.
We bring to your attention a video in which the process of installing a suspended mirror ceiling is clearly presented.
When installing mirror ceilings, we should not forget that the mirror tile is rather fragile material and you need to handle it carefully to avoid the trouble followed by the purchase of additional tiles.
![]()
StrPort construction portal 2011-2018. Articles about repair, construction, building materials.
Copying information from the site is possible only with permission of the editorial office Or indicating a direct link to the source. Legal justification