How often in construction stores you have to literally get lost against the background of endless ...
|
|
Every year exponentially, the number of owners of apartments increases, ... |
Sarai is a very important element of any land plot, because it is in this building ... |
Grillato ceilings: device, technology and installation scheme. Materials for the manufacture of the ceiling Grillo

Nowadays, the field of building materials develops very quickly and gives the world more and more new technologies. One of them is the ceiling of Grillo. For the first time, this type of suspended ceilings was invented and designed in Italy. Today, the practicality and aesthetically beautiful appearance of the ceilings of Grillatho helped them become famous and in demand throughout Europe.
Table of contents:
- Technical characteristics of the ceiling
- The pros and cons of the ceilings Grillo
- Types of ceilings Grillatho
- Preparatory work
- Calculation of the required design
- The marking of the base
- Installation of Grillo ceilings
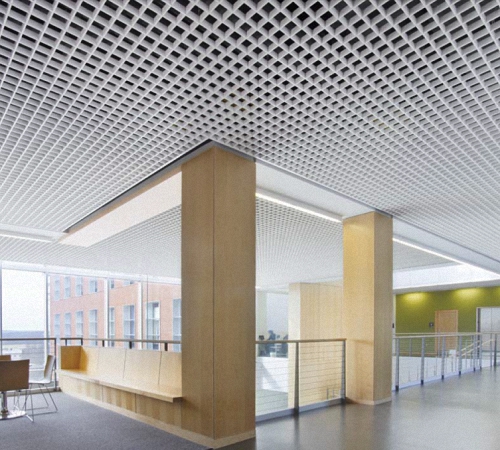
- Rooms in which it is worth installing the ceilings of Grillo
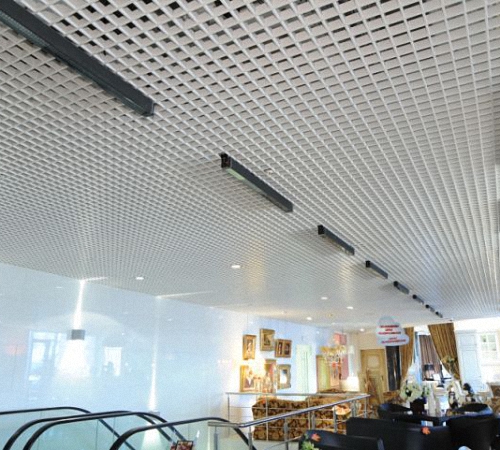
Technical characteristics of the ceiling
This ceiling is a system of components. The whole device of the Grillo suspended ceiling includes guide frame rails with lengths from 60 to 240 cm, inserts for connection, decoration profiles from which gratings, preferences and suspensions with regulation are collected, which hold the entire structure.
Even after creating, Grilato ceilings lend themselves to improvement. For example, recently, a large number of new colors and formats have appeared in the assortment, as well as the technical characteristics of the materials used in production were improved.
Basically, when creating, aluminum and its various alloys are used. It has a number of positive properties, they have their products made from it:
- Lightness of design. Aluminum is considered light metal, which is why the mass of the structure for 1 m. equals from 1 to 5 kg. Weight varies depending on the values \u200b\u200bof profiles and cells;
- Environmental purity. During the operation of the metal, toxic substances are not released into the air;
- Fire safety. Due to the presence of aluminum, the fire on the ceilings of Grillatho does not spread;
- High level of plasticity of metal. The presence of this characteristics allows you to make high -quality profiles with various strata and configurations;
- Resistance to corrosion. Aluminum alloys are not subjected to corrosion, which helps to extend the time of operation of the ceiling structures.
Grillato ceilings can be made of zinc, but we will consider aluminum, since they are cheaper and have more advantages.

The pros and cons of the ceilings Grillo
The main advantages of the ceiling of Grillo are as follows:
- The design is universal, since it can be used in a wide variety of types of buildings;
- The structure using cells and the use of special membranes provide additional soundproofing of the room;
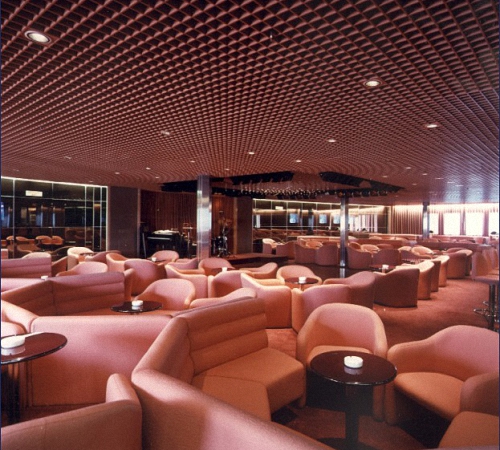
- Using Grilato ceilings in the room, you can visually change its volumes. They help to visually reduce the volume of the room, but at the same time look elegant and easy;
- If there are various types of communications or planned or planned, Grilato ceilings will be the best option. They easily hide them without using additional equipment. The ceiling designs will allow us to regularly work communications, even such as climate control and fire extinguishing devices. In this case, the appearance of the room will remain attractive;
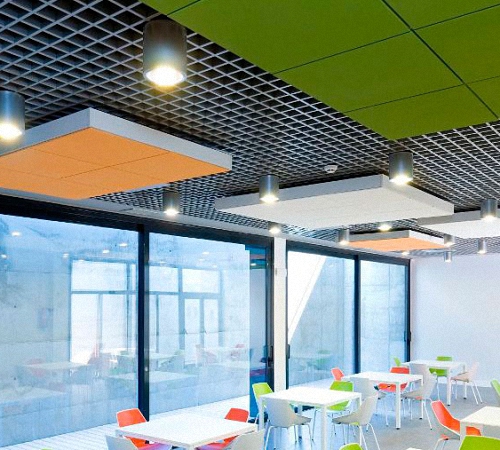
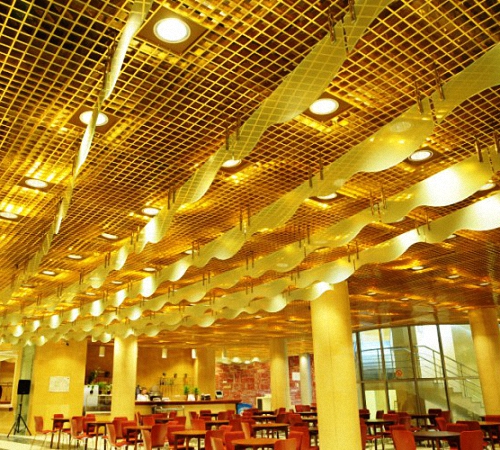
- Grillatho ceilings are very practical, with their use there is the opportunity to create an extraordinary ceiling design. The most popular are single -level structures, but multi -level ceilings in which you can use modules of various shades of colors and various types of lighting, can help significantly improve the interior;
- can be combined with other types of sections;
- Using Grillo ceilings, there is the opportunity to choose from a large number of options for the lighting device. For example: it becomes possible to use built -in or lamps;
- The design will not form a fungus or mold, thanks to the processing of the metal with a special powder material. It also helps to prevent dust accumulation;
- If there is a grillo ceiling design, air ventilation works properly, which helps prevent the accumulation of humidity in the room;
- Simple care for structures, which consists in ordinary wet cleaning, without using special tools.
Like any building materials have grillo ceilings and disadvantages:
- The most important disadvantage is their high cost compared to other types of ceilings, but the cost of buying will pay off, thanks to the long service life, simple care and attractive aesthetic appearance;
- When installing the ceilings of Grillo, it must be borne in mind that they steal 10-15 cm of the height of the room. Therefore, the owners of the already low rooms are not recommended this type of ceiling.
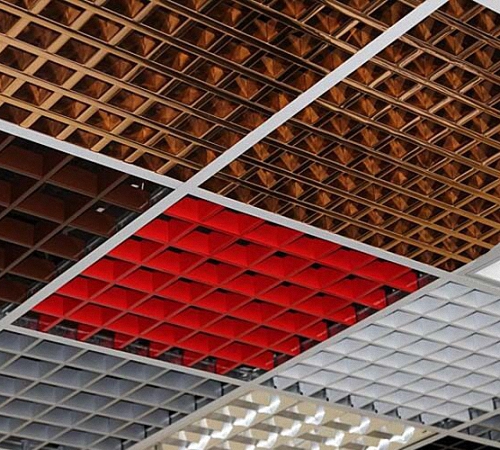
Types of ceilings Grillatho
The choice of the ceiling of Grillatho depends not only on the color scheme, but also on the device of inserted gratings. Behind the second criterion, the ceilings were divided into the following types:
1. Standard. This type is represented by a suspension system, which is mounted parallel to the floor. Her cells are made in the correct shape of the square. Of all the existing types of grillo ceilings, the cost of this option is the lowest.
2. Pyramid. Its difference is a non -standard shape of cells. Also, in the assembly of pyramidal ceilings, the P-shaped profiles are replaced by U-shaped. With their help, you can visually increase the height of the room.
3. blinds. This type is used to simplify access to the communications. Installation of such a ceiling is made from various profiles in height. Some sections are made in the shape of a rectangle.
4. A lattice with a non -standard type of cell. Helps add diversity to the interior.
5. multi -level lattices. As well as blinds, mounted by different profiles at the height. As a result, an attractive design effect is created.

Preparatory work
Grillato ceilings are installed only on pre -prepared ceiling floors. When preparatory work, the following actions must be done:
1. Delete the old finish.
2. Clean the ceiling from dirt.
3. repair the gap (if available).
4. Lock the joints.
5. Lease the surface.
6. Color the area of \u200b\u200bthe ceiling with whitewashing or special paint.
7. Prepare communications for installation.
8. Excuse the ceiling over the entire area of \u200b\u200bthe room.
Also, before the start of work, it is necessary to decide on the number of profiles, which means that you need to calculate the ceiling of the Grillo.
Calculation of the required design
First of all, let's figure out what sizes there are grillo ceiling profiles:
1. The thickness of the metal, which is used in the manufacture of P-shaped profiles, ranges from 0.33 to 0.49 mm.
2. The width of the rails can vary from 5 mm to 24 mm, and their height is from 30 to 50 mm.
3. The size of the cell has a large number of options and depends solely on the personal desires of the buyer. The most popular building materials in the market is 10 cm. The largest size can reach up to 20 cm, the smallest is 4 cm.
Having decided on the desired cell size and metal thickness, you will need to measure the following points:
- the surface of the ceiling;
- ceiling height in m;
- the perimeter of the corner in m;
- corner thickness;
- the size of the corner.
Armed with the numbers obtained, find a special calculator on the Internet, which independently calculates the number of necessary pieces of each type of profile, their length and width.
The marking of the base
As already mentioned, before the installation of the ceiling, Grillatho will need to mark the surface of the base:
- First of all, the dimensions of the width and length of the room are measured. We alternately divide the obtained values \u200b\u200binto the length of the guide profiles. We determine the number of racks, both for length and width, in order to save on components. Frame profiles must be attached parallel to the wall, on which the remains came out the smallest.
- Next, draw in a notebook how frame profiles and planned lamps will be located. Then we transfer this drawing to the base. On these contours there will be suspensions that hold the entire structure, and fasteners for lamps.
- For one profile with a length of 60 cm, it will require 2-3 suspensions, and with each next increased length we add 1-2 suspensions.
- We determine the level of design when taking into account all existing communications and lamps. Using the construction level, we apply marking along the entire area of \u200b\u200bthe perimeter.
- After the marking is ready, we drill holes that are needed for fastening and lamp fasteners on the base of the ceiling.
- In cases where a secondary load also accounts for certain places of the ceiling, it is necessary to strengthen the frame rails located next to each other using additional suspensions.
If tips are indicated on the factory packaging about the methods of placing suspensions, be sure to follow them. This will help you create an uniform load throughout the structure and thereby prevent damage to some parts.
Installation of Grillo ceilings
In the ideal version, you will need a scheme for installing the ceiling of the Grillo to check with it when working. Below is such a scheme, but when accounting that the frame has a section of 60*60 cm.
Installation includes the creation of the main frame and the attachment of decorative gratings to it. During the work, we do not need special tools for installing the ceiling, and the waste waste will be minimal.
For installation to pass without problems, it is necessary:
1. Using the previously applied marking, we install a wall corner, it will be needed to support the required level of the structure. For consolidation, we use dowel-grooves;
2. We fix all the suspensions with the help of umbrella dowels and screws, while the step is more than 1 m. If necessary, we adjust their height so that the hook is 5-6 cm higher than the parietal corner;
3. Paque rails are inserted into the hooks of suspensions. First of all, we attach long supporting profiles, then proceed to shorter ones. In order for the ceiling to be a single whole and strong design, we use connecting parts. In no case do not fix the frame close to the wall! This will entail mechanical damage to the ceiling of the Grillo.
4. To shorten the aluminum profile, just use the scissors for the metal;
5. We display the desired wiring outside the ceiling.
The assembly of decorative grilles is carried out separately, this is a fairly simple activity that can even a person who does not have special building skills. On each of the strips, the so -called mom and dad, there are grooves, behind which designs are collected at right angles. Next, we fix the collected lattices in the frame sections. We do it extremely neatly.
The final step is to adjust the ceiling level using a suspension and installation of lamps. As you can see, the instructions for the installation of the Grilato ceiling are very simple, and can be performed independently.
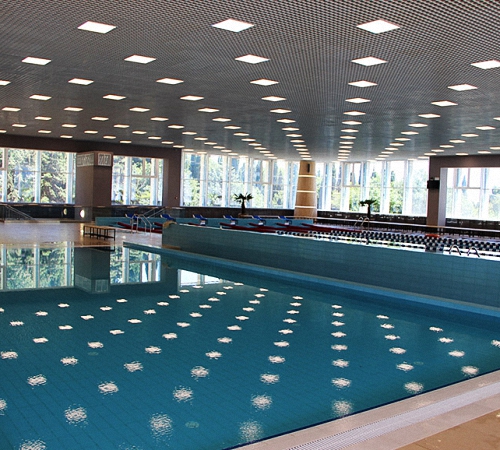
Rooms in which it is worth installing the ceilings of Grillo
Quite often, reading about the ceilings of Grillo, people have an opinion that they can be used exclusively in public buildings with high ceilings. But this is not so at all, and in residential premises there are rooms in which the installation of Grillo will only benefit.
Firstly, this is the hallway. Evasions from wet clothes and shoes often accumulate in the inter -stolch space, thereby contribute to the formation of fungus and mold. Having set the ceilings of Grillatho, you will not only solve this problem, but also perfectly embellish your dull hallway.
Secondly, these are rooms of the sanitary zone. Here, Grilato ceilings will also be required due to a high percentage humidity. But, despite the fact that the design is moisture -resistant, like on any metal, condensate will accumulate, which will entail the appearance of white spots. Therefore, in these rooms, ceilings require more careful care. In addition, if the sewer of the second floor passes in the bathroom or in the toilet, these ceilings will provide access free to it.

With aesthetic considerations, grillo ceilings can be used in any room.
The only place where they are not recommended to install a kitchen. The kitchen child settles on the elements of the structure and is not subject to cleansing without a violation of the protective coating.
Grillatho ceilings allow your imagination to walk to the full. 190 shades of colors, various forms of cells and gratings, creating a variety of design effects .. In this case, the installation is very simple and possible with your own hands. Follow the above rules, and also see how to correctly install the Grillato video ceiling at the end of the article, and your repair will pass quickly, without problems, and the result will delight your eyes for many more years.
![]()
StrPort construction portal 2011-2018. Articles about repair, construction, building materials.
Copying information from the site is possible only with permission of the editorial office Or indicating a direct link to the source. Legal justification