Aerated concrete blocks are quite popular, so it allows you to build buildings ...
|
|
The cellar is an obligatory extension at the cottage or near a private house. In that... |
Warming with foam of residential premises has gained popularity thanks to many ... |
DIY LED stretch ceilings
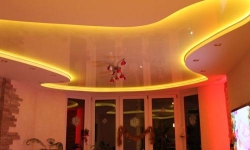
In its structure, the stretch ceiling has many advantages: no dust, disguise of irregularities, the presence of small mirror properties and easy care. Such designs are perfect for the office and at home. Having combined the stretch ceiling with the LED ribbon, it turns out a fairly good visual effect of dispersing light, which makes it possible to save light and at the same time allows you to recreate a fairly good lighting of the room. Now let's talk about stretch ceilings with LED backlight.
Content:
- The lighting ceiling illumination
- The essence of the LED tape
- Selection of LED lighting tape
- Conducting calculations before installation
- Methods for installing LED tape to the ceiling
- Installation procedure of LED tape
The lighting ceiling illumination
The appearance of suspended and suspended ceilings was the impetus for the development of completely new varieties of lighting of ceiling space, such as contour backlight. The essence of such illumination is in incomplete lighting of the room, but only in the backlight of its some part, and to be precise, then the ceiling.
Typically, the contour lighting of the ceiling rarely performs the function of the main lighting of the room and is mainly used for decorative purposes. For example, if the light falls on the glossy surface of the ceiling, this can visually increase the space of the room. In the same way, you can change the color of the lighting of the room, adjusting it under the desired mood.

For illumination, one of the most inexpensive solutions is daylight lamps (fluorescent lamps). They differ from others, they differ quite intense lighting in brightness. But still, they have a big minus - at the joints of the lamps there is a rupture of lighting. It follows from this that it will not work to achieve a bright same glow around the perimeter of the room.
To date, the most common is the Duralight cord. This is a plastic tube, in the design of which there are LEDs, which is durable in operation, shines evenly, but a little dull than the fluorescent lamp. The cord is cut only 2 meters, and you can connect up to 50 meters of such a cord on one set. To provide network power, you need to purchase a rectifier and a special cord. To date, the LED tape is considered popular.
The essence of the LED tape
For backlighting, it is best to use modern equipment, because we live in the age of rapid development of science and technology. At the moment, the most innovative is the LED lighting of suspended ceilings. Semiconductor LEDs have quite many advantages:
- Durability. The operating time of LEDs can reach up to 10 years.
- A variety of colors. Extensive decorative capabilities make such sources an almost perfect solution for a stretch panel.
- Low voltage. The low level of supply voltage is a rather relevant point when performing work by a newcomer. LEDs very rarely burn out.
- Lack of heating. LED ribbons do not heat up, unlike ordinary incandescent lamps, which means that they are very suitable for suspended ceilings, for which the lack of heating is a key requirement.

The LED strip is a small ribbon, which at the same distance from each other is small LEDs and resistors, which play the role of resistance. The thickness of the tape is usually 2-3 millimeters with a width of 8-10 millimeters. The tape is cut into pieces of 5 meters for packaging and wound on a coil. On the back there is an adhesive base, which is necessary for installation on any surface.
The tape is light and flexible and, accordingly, takes any shape. The greater the brightness of the glow of the product, the more LEDs falls on one meter of tape. Such tapes are usually used as the backlighting of glass stands, installed on cornices and equipped with an LED stretch ceiling.
The LED tape shines much brighter than the Duralight cord, and is very easy to fasten. To fasten such a tape, it is enough to tear off the protective layer and fix the diode tape, where necessary. And for the best effect, foil can be used as a reflector. For the LED tape, you need to install a lowering transformer, as it works from 12 volts. Its main drawback is the price. She is expensive, but the effect is better from her.

An excellent technique will be the use of LED tapes for a hinged cornice of a stretch ceiling. According to your curtains, the light will go smoothly and descend the light! On a stretch ceiling, designers usually use all sorts of sea waves. The whole room is illuminated by a large amount of light, which means that there is no other source of light. Another rather simple figure is also known, which is equipped on the ceiling: they retreat from the walls of ten centimeters and the LED ribbons are mounted in the shape of the ceiling. It is called designers with a rectangular ribbon.
Selection of LED lighting tape
Of course, in the variety of LED tapes to a beginner, it is quite difficult to understand. Such products differ in the following criteria:
- Type of the LED. The most common types of LED are SMD 5050 and SMD 3525. These two types of diodes differ in size (twice as much as 5050), as well as SMD 5050 contains three single -color crystals, and SMD 3528 one crystal.
- The density of diodes per meter. Such a parameter affects the brightness of the glow, that is, the larger the density of the diodes, the stronger the brightness of the glow. The ribbons are with a density of 60, 30 and 120 and quite rarely 240 diodes per meter. SMD 5050 ribbons with 30 diodes and SMD 3528 with 60 diodes are used for decorative ceiling lighting. But tapes with a high density of diodes can partially perform the lighting function.
- Degree of protection. LED ribbons are not moisture -proof and moisture -proof. And to be more accurate, the protection level is indicated by the IP parameter.
- The number of colors. There are both one -color and RGB tape. With any colors, RGB tape can glow, but at the same time you need a controller to control the device.
- Supply voltage. This indicator may depend on the totality of various parameters, so the tapes may still differ depending on the power consumption.

There are the following varieties of LED strips - these are RSB and ordinary tapes. Conventional tapes have one light, and they are used as replacing incandescent lamps. Lands such as RGB are already much more interesting than ordinary tapes and they are controlled using remote control. That is, you can make the light darker and, conversely, brighter, and if desired, turn off at all, while, without getting up from the sofa. And the most important feature of them is the change of light. For example, light can change from red to blue, then from blue to green, and then from green to yellow.
Conducting calculations before installation
After you have chosen the LED tape under the stretch ceiling, we proceed to the calculations. If you use LED ribbons for the main lighting, you need to know how many LEDs should be per meter. For such purposes, a tape with 60 diodes per meter 60 is ideal, and for additional lighting, one meter and 30 pieces are enough.
To begin with, determine the total power consumed by the entire LED tape. For such a purpose, we measure the perimeter of the site, which needs to be highlighted, and then multiply the resulting value by the power consumption of 1 meter of LED tape. But there is still one nuance here. The whole thing lies in the fact that these tapes are supplied with pieces of five meters, and it is not recommended to consistently connect more than 1-2 sites.

This is poured into practice in the following:
- One -color ribbons. Each five -meter section in them is connected to the power supply in parallel.
- RGB ribbons. For each fifty -meter section, they need to use the signal amplifier.
The power of the power supply itself should be slightly higher than the total power consumption of LED tapes.
Methods for installing LED tape to the ceiling
Now let's talk in more detail about how to illuminate the stretch ceiling with LED ribbon with your own hands. If we talk about the ceilings with LED backlight, you need to remember that just sticking the tape on the surface of the ceiling will not work. Of course, this is technically possible, but the point here is different. The tape itself is not a lighting device that has a decorative look. Such a tape with LEDs, unlike other lamps, needs to be hidden, and you should only look at the reflected background light.
Box with niche for backlighting
In practice, the greatest application was found by the ceiling system in the form of a gypsum plasterboard box with a niche, which protrudes from it, and the backlight, which is directed to the center of the room. All equipment that is responsible for the operation of the LED backlight is located in a special niche. And this, neither less, nor more, a power supply, the tape itself, as well as the control unit, if we are talking about multi -color LED ribbons.
In this case, the stretch ceiling with backlight will have such a design: a plasterboard box with a niche is mounted around the perimeter of the room. Regarding the ceiling ceiling, as well as depending on the level of installation of the stretch fabric, the height of the box will be 15-20 centimeters. And its width very rarely exceeds 0.5 meters.

Unlike the usual, the lower line of the box is put forward, that is, to the center of the room, approximately 8 centimeters. At the end of the box there is a perpendicular branch upwards about 6 centimeters high, which forms the niche itself. At least 11 centimeters should remain from the upper rib to the main ceiling so that the installation of the LED stretch ceiling with your own hands takes place comfortably.
To the vertical part of the box, the vertical of the stretch ceiling is mounted at the level of the upper third, and after which the canvas itself is installed. The lighting ceiling in the form of LEDs or fluorescent lamps is placed on the bottom of the niche and then must be connected to electricity.
Box with hidden niche for backlighting
There are times when the owners choose a glossy canvas of a stretch ceiling, which is often actually mirror. Then the described ceiling system may not be suitable due to the fact that the inside of the niche, as well as the ceiling lighting, will simply be displayed on the ceiling. The niche, which will be hidden, will make the LED lighting of the stretch ceiling more uniform.

For such stretch ceilings, the box is arranged with a hidden niche. Such a design looks like a simple box with a small hole, but it will, of course, make it more complicated than the system that was described in the previous example. In fact, here the same niche will be within the dimensions of the frame, which is sheathed with drywall, that is, the backlight will be from the inside of the box. From a small hole, only bright light will be heard to the ceiling plane, which will be invisible when the mirror glossy surface of the ceiling canvas is reflected.
Backlight without drywall box
In addition to the usual standard ceiling systems that use a drywall box, with a niche along the perimeter of a room with further embedding lighting sources in it, there are also various other methods for illuminating suspended ceilings. Now we will consider them.
Various types of backlight can be placed in the space between the tension ceiling film and existing floors. It turns out ultimately the canvas illuminated from the inside, it can be called a lamp that creates a calm muffled lighting. A significant disadvantage of this installation of the LED tape is that without preliminary installation it cannot be replaced.
With a backlight of this type, stretch ceilings look no less original than when using niches. To assemble such a system, LEDs are installed in the corners between the adjacent walls and the ceiling, under which a baguette with further installation of the tension coating is attached at a distance of at least 5 centimeters.
The canvas of the stretch ceiling cannot be installed in close proximity to lighting devices, because they radiate heat to a lesser or greater extent, which can affect the material from which the stretch ceiling is made. When installing, you need to take into account certain restrictions for each individual lighting device.
Very often, LED backlighting is installed under the stretch ceiling for highlighting the curtains. In this case, the tape and its equipment are either behind high ceiling skirting boards, or in a specially prepared niche, which performs a double purpose (at the same time it hides the tape and cornice for curtains). Both options are quite acceptable, only the difference is that it is much easier to hide the backlight behind the baguette.
Installation procedure of LED tape
As a rule, installation on the ceiling of the LED tape is performed before installing stretch polyvinyl chloride ceilings. The first thing to do when you have decided on the place where the LED tape will be installed is to carry out electricity supply cables there, as well as equip this line with a separate circuit breaker. In the circuit breakers, the need forces disappears when it comes to the installation of a multi -colored tape with diodes, since in this type of backlight it provides a control unit, which is controlled using the remote control. It has a function of turning on and off this device.
After you have figured out the supply of electricity, it's time to install heavy equipment - that is, control units and power supply. Typically, these both devices are installed in small plastic cases, they have holes for their fastening. Everything is quite simple: a place that is not visible is chosen, and there we fasten with dowels or self -tapping screws. There are masters who generally glue, but this should not be done, since due to further replacement when they fail, the surface of the finish will be damaged.

We move on and proceed to the installation of LED tape in the stretch ceiling. In all cases, such a tape has a self -adhesive base, which is protected by a thin layer of film or paper. You should not shoot it all at once, and in general you do not need to rush with this. First you need to, the place where you will glue the tape, clean from dust, that is, degrease, and also wipe the surface with a damp cloth. After it dries, we proceed to gluing.
Next, we release the first half a meter of self -adhesive tape from the protective layer and glue it to the right place. After that, we unwind the coil with such a lighting device, slowly removing the protection by gluing the tape. When you reach the end of the niche or ceiling, there may be excess tape that you should not be cut off due to the fact that all LED tapes are divided into fragments, which include from 3 to 5 LEDs.

If you cut in the middle of the fragment, the remaining diodes will be disabled. The tape must be cut in places of specially designated, which are indicated by a perpendicular strip. After you find it, take the scissors and cut off the excess tapes, pass again along it in order to press the tape with your fingers to the base, that is, finally glue it.
After that, go to the connection. If the tape is never used or new, that is, it is not trimming from a large bobbin, then the connection itself will not be difficult. The manufacturer himself took care of the simplicity of the assembly, while she supplied all the devices with detachable connections. And you only need to insert several plugs into the appropriate nests, which are usually signed.

In such a situation, you will have to tinker with the connection of the power supply. There are two connection options. In one case, you need to mount a special outlet, which takes up a lot of space and quite bulky, and in another case you just need to cut the fork on the power supply and connect the wire with twisting. When you chose the second option (and it will be most likely), then, of course, you need to break the twisted wires, it is reliable and safe.
In the case when the factory connectors are absent, consider the connection diagram of the LED tape (in this case, you will have to master the soldering iron). The LED tape at the end of each fragment has places of connection of wires. All these places are marked - and +, that is, it is impossible to confuse places when connecting the LED tape to the power supply.

Such not attentiveness and negligence is fraught not with the inclusion of the tape and the failure with a long -term voltage supply. With this connection of LED backlight, the best option would be to buy the corresponding connectors on the market and solder in accordance with the flowers of the cable to the tape, that is, red K +, and the other, respectively, K -. After that, all elements of the stretch ceiling with LED backlight should be connected in the above method.
And finally, we decided to give you another little advice. If the ceiling LED lighting is improperly mounted, then this can lead to a rather unpleasant situation and deplorable consequences, so the power supply and the module should not be hidden tightly beyond the surface of the ceiling. Typically, the Chinese People’s Republic is engaged in the production of such products, their quality often leaves much to be desired. In any case, you do not need to take risks, since subsequently it will simply be impossible to replace the burned assembly without injury without injury.
![]()
StrPort construction portal 2011-2018. Articles about repair, construction, building materials.
Copying information from the site is possible only with permission of the editorial office Or indicating a direct link to the source. Legal justification