The front door is a business card of any house. Interior doors, also ...
|
|
Not many of us know today, how to use a gun for ... |
The usual bleached or covered with a water -based ceiling is already considered yesterday ... |
DIY suspension ceiling

One of the most difficult works in the repair of housing, according to the recognition of both masters and amateurs, is to bring the ceiling into proper form. The uneven tile floors, the inconsistency of the corners, a different level of ceiling ceiling, etc. It is sometimes very difficult to eliminate all these defects. And not only difficult, but also expensive, for example, using the technology of suspended ceilings.
In this article, we will consider the technology of suspended gypsum plasters. Its advantages are obvious: the low cost of a suspended ceiling made of drywall, ease of installation and relatively small time expenses for its arrangement. At the same time, the technology is quite simple, and you can do installation yourself. Let's look at how?
Content
- Tools and materials
- Installation of the frame
- Drywall sheathing sheets and putty
- Possible decoration methods
Tools and materials

Having decided to make a pendant ceiling from drywall with your own hands, it is necessary to carry out preparatory work, namely: stock up on the necessary tool and purchase all the necessary building materials. Let's look at the order.
To install a hanging ceiling made of drywall, we need the following tool:
- a water level, it is necessary for us to accurately mark the installation site of the guide profile (due to its low cost, our choice fell on it, if financial capabilities allow you to acquire a household laser level, its price is an average of 50 cu);
- a two -meter level for determining the evenness of the installation of drywall sheets;
- perforator for drilling holes for the dowel of the profile fastening;
- drill or screwdriver mounting profile and GKL;
- a five -meter roulette, a monterial knife with a set of blades, a pencil for marking;
- Bulgarian with a circle for metal or manual hacksaw, good scissors for metal.
Having collected the necessary tool, let's look at what building materials we need to assemble the design of a suspended ceiling made of drywall:
- Profile. Out of two types: guide (attached around the perimeter of the area, its function is reflected in the name itself) and ceiling (with figurative). The company and form do not have much importance, it is only necessary that both profiles are one manufacturer. How much is it necessary? The guide profile is calculated around the perimeter of the room. For example, the total area is 20 m2, the length of the walls is 5 and 4 meters, respectively. The length of the profile is 3 and 4 m, respectively, the three -meter we need 7 pieces + 1 reserve, just in case, if you spoil it. For this example, you can take 4 meter, we need 5 pieces, i.e. The perimeter is divided into the length of the profile. If the ceiling is two level or has an intricate design, then add the length of the additional design to the above numbers. Calculation C - the figurative profile is carried out as follows, since the drywall sheet has a 1250 mm width, ideally its mount is carried out with a step of 600mm. Thus, for our example, it is better to take 4 meter (there will be less waste), divide the five -meter wall by 60cm and we get 8 ceiling profiles. We have given the calculation principle, for each room and the complex design of the suspended ceiling, it is identical, it is only important to add an additional length of the structure.

- Drywall. There are three types: ordinary, moisture resistant and refractory. In an ordinary apartment, if this is not a bathroom, an ordinary sheet is suitable, it makes no sense to overpay. To install the ceiling, there is also no need to take drywall above 8 10 mm thick. The weight of the structure will increase, but there is no practical benefit for the ceiling. And during installation, this increases the complexity of the work, since the weight of the sheets increases. The calculation of the amount of drywall can be made in the following formula: the ceiling area is divided into the area of \u200b\u200bone GKL and we get the amount we need. The area of \u200b\u200bthe standard sheet is, if rounded, 3m2. If the area of \u200b\u200bthe room from our example is divided into 3, then we get 6.6 sheets, i.e. 7. We recommend taking a small stock just in case, one sheet of reserve will be enough.

- Fastening. We need a straight suspension, it is not expensive, so you can not calculate the exact number of pieces, for an area of \u200b\u200b20 m2 with a simple single -level design we will need, somewhere about 40 50. If the design of the suspended ceiling is complex, and you are going to use sheets with a large thickness , you need a larger number of suspension. Depending on the design, you will have to calculate the quantity yourself, given the distance between them of 600 700 mm. If your design does not provide a large number of ceiling connections can be dispensed with without crabs, such compounds can be mounted with direct suspensions. If you do not like this idea, you can purchase longitudinal connectors in the amount equal to the alleged profile connections. You will need dowels for fastening the guide profile and suspension, usually there are enough dowels with sizes of 8x10. You will also need a pack of screws for connecting the profile. In addition, stock up with self -tapping screws 25 mm long for attaching drywall sheets to the profile.

When everything is collected, you can start installing the frame.
Installation of the frame
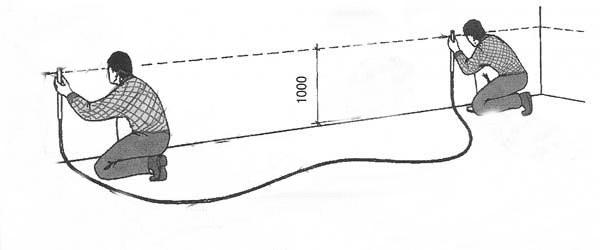
To mark the installation site of the guide profile, we use a water level. Having achieved one water level in containers on opposite walls, apply marks. How much to retreat from the ceiling you decide, but for the convenience of installing the entire structure, especially when laying the heat -insulating cotton and/or spotlights, retreat at least 10 cm. Having launched on all four walls, proceed to drill holes for the dowel using a punch. We fasten the guide profile to the wall with an interval of 30 40 cm, in the corners at a distance of 10 15 cm.
After installing the guide profile around the perimeter, using a roulette, we make marks on the wall with an interval of 60cm. Thus, we mark the installation sites of the ceiling profile. For an uncomplicated single -level structure, we do not need installation from figurative profiles in two directions, i.e. Marking is carried out on two opposite walls.
After that, we proceed to the mounting of the suspension to the surface of the ceiling ceiling. For convenience, focus on the distance between them of 60 70 cm, for example, it will be easier to lay thermal insulation wool. But if there is a dispersion of a couple of centimeters of the tragedy.
After installing all straight suspensions, we begin to install the ceiling profile itself.

In our example, this is very simple, since the length of the wall is 4m and the length of the profile is 4m, we will not have to join it. If this is not suitable in your version, then in the places of connection of the profile, set two additional suspensions to the ceiling, and with the help of the suspension or longitudinal connector, as you like, we twist with self -tapping screws together. Using a drill or screwdriver, connect all the joints of the ceiling profile with the guide, as well as suspensions with a figurative profile.

One important nuance when twisting the suspension with ceiling profiles: using the 2nd meter level, make sure that the profile is attached evenly, without deflection and sagging. If you do not follow this, then after the installation of the GCL, you can find that the newly arranged surface of the ceiling has a wavy nature.
After connecting all the metal elements of the frame, make sure using the level in the smooth surface of the profile, put the level in different directions along the ceiling profile. If there are deviations, correct.
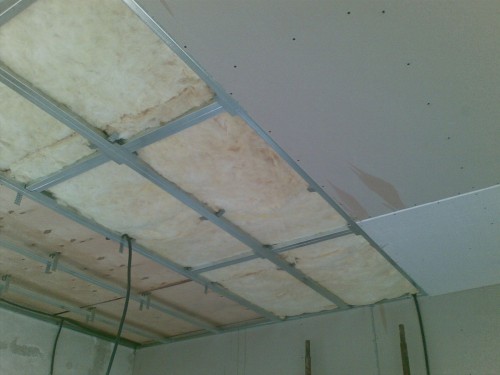
So, the frame of the suspended ceiling made of drywall is ready, then we carry out the wiring to the places of the lamp/Kov and, if desired, we lay the heat -insulating cotton wool. After that, our design is ready to take sheets of drywall
Drywall sheathing sheets and putty

We proceed to the installation of drywall sheets. There is nothing complicated in the mount itself, we raise the sheet to the profile and with the help of self -tapping screws we fasten it. The interval of 10 15 cm between the screws will be enough. We sew up around the perimeter and center, and the center is not on the wall on the wall. When connecting sheets of drywall, it is necessary to monitor the endings at the joints. The sheets themselves, as you can verify, have rounded ends, this is done so that there are no putty cracks at the joints, the layer will be thicker there. So, when connecting whole sheets or pieces, it is necessary to use a small depression on the edges with a knife, where it is not.
Also, you should pay attention to the heads of the screws, they should be drowned in the GCL by about 1 mm. If they protrude carefully, this will greatly facilitate the putty of the ceiling at the end of the work.
In places of installation of lamps or any other communications using a knife, we cut out all the necessary holes. For these works, you can purchase a special nozzle for a perforator or drill, this is as you like.
If the drywall sheets are fitted tightly to the other, the joints are cut and all the necessary holes are cut out to put the surface. To do this, in addition to gypsum plaster, you will need a special adhesive mesh for processing the joints of the GCL. If everything is available, we proceed to putty. And we start with joints. Let them dry a little and you can putty the entire surface of the ceiling with the finish plaster.

Let two days dry for a day, we take sandpaper 100/120, a lamp for illumination from irregularities and make an even and smooth surface. After that, your ceiling is ready for any type of decoration.
We examined the installation of a suspended ceiling made of drywall of a single -level type. And if you did not install such a ceiling with your own hands, we strongly recommend starting with a simple one. When the experience of such work comes and you will know the nuances of this design, you can already collect the next ceiling and two -level. And not only, you can simulate and think about the design yourself, because you will understand the main part of the device of the suspended ceiling made of drywall.
Below are drawings of suspended ceilings made of drywall, possible options


Possible decoration methods

In fact, it is very difficult to describe the methods of decoration. The first is that there are no comrades to taste and color. And secondly, the modern construction industry produces such a huge number of all kinds of decorative, and not only materials, that the volume of the article simply will not allow them to consider them. Everything will depend on your tastes, desires and financial capabilities. Someone likes the decoration of the surface with gypsum modeling, someone is enough to use foam baguettes in the decor. Someone will apply a drawing to the ceiling, and someone simply glues wallpaper and replace the chandelier.

In fact, do not pay attention to all sorts of fashion trends and other stupidity. You live in this room, so think about what ceiling will give you comfort and joy. After you understand what you want and you can afford, go to the nearest building materials hypermarket and take what will embody your idea into reality, do it for yourself.
There is nothing very complicated in the technology of suspended ceilings from drywall, it is only important to remember popular wisdom: measure seven times and cut once. And you will succeed, believe me.
Installation of a hanging ceiling made of drywall video
![]()
StrPort construction portal 2011-2018. Articles about repair, construction, building materials.
Copying information from the site is possible only with permission of the editorial office Or indicating a direct link to the source. Legal justification
Very informative and
A very informative and interesting article, 100% will help many people. Thank you, the author for the post will add your blog to the bookmarks. In addition, I want to offer another article on the topic: with my own hands, a gypsum cardboard ceiling.
http: //info-stroyka.ru/otdelka/potolok-iz-gipsokartona-svoimi-rukami-vid ...