If you want to equip an attractive, durable and inexpensive floor in your house ...
|
|
The frame design has a negative property to remove heat accumulated inside ... |
In the construction of private houses, it is customary to use the pitched roof structure. Such... |
How to make a box on the ceiling

Literally every modern room is oversaturated with various communications, the appearance of which is far from decorative elements that can decorate the interior: water and sewer pipes, electric wires and communication cables, ventilation systems. Meanwhile, there is an effective way not only to successfully hide communications, but also in parallel to bring a little originality and practicality to the situation. It will be about a gypsum cardboard box.
Content:
- Gypsum cartoon boxes on the ceiling
- Gypsum cardboard on the wall
- Drywall box in the bathroom
- Corner
- Gypsum card
- Gypsum cardboard for battery
- Gypsum cardboard for pipes
4. How to make a box on the ceiling: stages of manufacture
Gypsum cardboard boxes: main purpose
Almost no repair can do without drywall work the manufacture and installation of gypsum plasters, thanks to which designers and masters skillfully recreated all kinds of decorative elements and structures. Today we’ll talk about what a drywall box is needed for and how to make it yourself for any project.
This plasterboard structure is considered not only an excellent addition to the interior style, but also excellently hides defects and irregularities in the flow, masks the electrical wiring and communications.
An unconditional plus is the possibility of installing additional lighting equipment, especially in those rooms where there is a lack of main lighting bathrooms and children's rooms. By installing several switches, you can adjust the intensity of a certain area of \u200b\u200bthe room.

Choose drywall
What is a modern gypsum cardboard finishing material? The basis of sheet drywall is mineral wool (gypsum), on both sides, protected by a layer of paper. In addition to the protective function, the paper allows you to maintain stretching work that can occur when working with drywall and at the time of operation of the finished design.

Depending on the purpose and place of installation of finished structures, the following types of drywall are distinguished:
- Gypsum cardboard is ordinary (URK)intended for decoration of the surface of the walls, ceilings and manufacture of partitions in rooms with a normal level of humidity;
- Sumero -resistant drywall (DURK), saturated with a special composition that prevents the appearance and reproduction of the fungus and possessing water -repellent properties. The core is directly made using special additives, which largely reduce moisture penetration. Designed for decoration of rooms with a high level of humidity (kitchen, bathrooms and garages);
- Fireproof gypsum cardboard (GCllo)containing special mineral fibers and additives in the inside, which give drywall of fireproof qualities.
It should be remembered: the wall is better to sheathed with a plasterboard with a thickness of 12.5 mm thick, and a sheet with a thickness of 6-9 mm is more suitable for the manufacture of arches of various curvatures. At the same time, experts do not recommend using a 9 millimeter sheet for ceilings, since it may not withstand additional load.

When buying drywall, pay special attention to the quality of the product:
- If you are faced with the task of performing large volumes of work, then you will need to buy a large amount of drywall. Take a closer look at the packaging sheets. The fact is that the manufacturer often has to move their products, so the lower sheet can get various damage. The manufacturer usually marks this sheet and does not sell it. However, retail sellers often neglect this rule, taking advantage of the ignorance of customers.
- The main rule of storage sheets of drywall should be stored exclusively in a horizontal position. Carefully inspect the sheets for chips, inspect the edge.
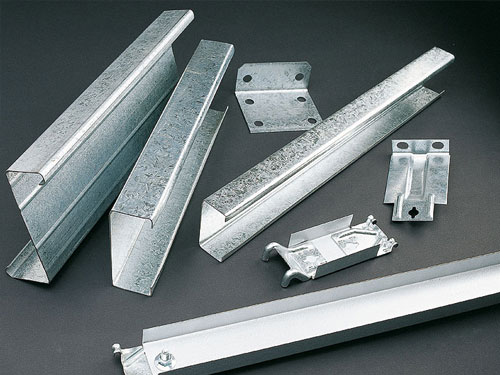
- When choosing components, be sure to consider the thickness of the material and their rigidity. So CD profile is stiff and not bend when pressed. Taking one edge of the UD profile, you should not have the feeling that it will break. Remember, the safety of the design directly depends on the quality of the selected material!
- When buying a profile, pay attention to its ending, the presence of a primer indicates a poorly galvanizing product. If there is a uniform shine over the entire surface and there are no white spots, then high -quality galvanizing.
Types of drywall boxes
So, in absolutely any room, you can install structures and gypsum -plate boxes: designer partitions and walls, original arches and ceilings, all kinds of decorative elements. It should be recalled that each plasterboard box consists of a frame and sheathing, which means that it involves the use of wooden parts or a metal profile and directly drywall. In this case, the complexity level of the box is determined by the type of structure and its main purpose.
Gypsum cartoon boxes on the ceiling
Ceiling boxes are considered the most common and popular plasterboard constructions, since suspended multi -level ceilings are created on their basis. Having made the simplest gypsum cardboard, you successfully disguise the irregularities and minor defects on the ceiling and hide some communications. A more complex design, for example, a box with illumination, will allow you to enjoy a soft, muffled decorative light emanating from spotlights that are mounted in drywall. Only a well -prepared professional can masterfully cope with such a time -consuming and complex work, but you need to remember: there is nothing impossible and, having attached considerable efforts and accuracy, you can also make a similar design.

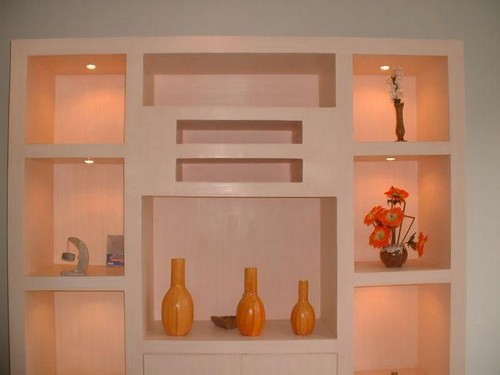
Gypsum cardboard on the wall
The technology for manufacturing a plasterboard box on the wall is much easier than creating a ceiling structure, however, it still implies the presence of basic knowledge of work with drywall, marginal accuracy in calculations and accuracy during the creation. Made of the same materials, the box on the wall in addition to leveling the surface of the wall and its insulation also pursues other goals: the creation of original niches and shelves, decorative interior items, for example, a plasterboard box for a TV.
Drywall box in the bathroom
A plumbing drywall box is a plasterboard structure in the form of a special compartment for laying water and sewer pipes and ventilation systems. It is often installed in the bathrooms to create the illusion of built -in plumbing equipment, when the sink or toilet is partially sewn into the wall.

In addition, gypsum plasterboard boxes in the bathroom perfectly mask cranes and counters, end the interior with new decorative shelves and mezzanines made on the basis of such structures. However, to create structures made of hyprot card for a bathroom or toilet, a material resistant to high humidity should be used.
Corner
The most striking example of an angular drywall box is a decorative box for a fireplace. The assembly of a complex design for the decoration of this type is carried out using a special technology and only after careful design, taking into account the planned sizes, the characteristics of the source materials and standard building factors.
It can be with the courage to admit that if you managed to build an angular plasterboard box, then you can trust you to perform almost any work with drywall.

Gypsum card
The gypsum cardboard for hoods is the simplest design of the correct rectangular shape, which allows you to successfully mask the ventilation move or ventilation grille. The design consists of a metal profile and drywall. Ready-made boxes under the hood can have a M-shaped shape and fit to the corner of the wall, the U-shaped and attached to the ceiling, be placed on all sides with drywall and stay on special suspensions.

Compact and outwardly attractive ventilation boxes and gypsum -plane boxes for hoods are very popular today both at industrial facilities and at home.
Gypsum cardboard for battery
The plasterboard box for the battery is an elementary design, the manufacture of which is even a beginner. Such a box is a simple frame based on a galvanized metal profile and fragments of drywall carved in advance.
The boxes under the battery are mounted around the section, the mount is carried out on the lower part of the window sill and the surface of the floor or on the surface of the wall behind the radiators. In finished structures, special slots are made for the release of warm air flows, and decorative design will perfectly fit the plasterboard box into the overall interior of the room.

Gypsum cardboard for pipes
The plasterboard box for pipes, as well as the box for ventilation or hood, can take M-shaped or P-shaped shape. The mount is carried out on the surface of the walls, floor and ceiling, as well as in the corner of the room. Ideal for high -quality masking of heating or sewer pipes, water supply in a room of any type.
How to make a box on the ceiling: stages of manufacture
The variety of designer and color solutions, the highest quality and excellent operational characteristics turn a plasterboard box for the ceiling into an optimal solution with the decorative design of the ceiling space.
Experienced craftsmen, armed with modern construction equipment and owning manufacturing technologies, can almost create an unusual shape from drywall with their eyes closed. However, if you are a beginner of drywall, then our recommendations should first learn to make elementary structures, and then gradually move on to more complex construction work with drywall.
Basic installation rules
Installation of ceiling boxes from drywall should be made by some rules:
- the base surface of the ceiling should be smooth and even. In advance, worry about the performance of the preparatory work, plastered and process with putty;
- use a special aluminum profile that is sold in construction stores;
- to create drywall boxes under the stretch ceiling, use exclusively high -quality products, otherwise the design will turn out not only ugly, but also unsafe;
- Immediately after installing the frame on the ceiling surface, begin to prepare drywall. To do this, plan and apply marks, as well as perform holes for lamps;
- After installing the drywall sheets on the frame, the cracks are carefully sealed with putty and the box is painted;
- In addition, experts strongly recommend installing a metal frame away from pipes and other communications. The fact is that the warm air flow emanating from the heating pipes will heat and expand the metal profile, which can further lead to deformation of the drywall box and the appearance of small cracks at the junction of sheets.
It should be noted that experts can use various technological techniques for the manufacture of drywall boxes, but the result is important the finished design should have a smooth and even surface and be strong enough. Consider the most common and at the same time quite simple configuration of the box of rectangular shape, which passes around the entire perimeter of the ceiling. To do this, we are armed with the necessary building tools, materials and stage and into battle!
For the manufacture of a drywall box for a stretch ceiling, we need the following tools and materials:
- shurovyrt
- level
- roulette
- pencil
- mocking
- the square
- scissors for metal
- plasterboard knife or ordinary stationery knife
- a hammer
- the concrete drill (if the walls are brick or concrete) of the desired diameter
- drywall (one sheet is enough 1200x2500)
- the guide profile and rack in size 50x40 and 50x50, respectively
- self -tapping screws for drywall 3.5x25 (for 1 layer) and 3.5x35 (for 2 layers)
- dowel-gvo 8x60 or 6x60
Training
So, at the initial stage of manufacturing a gypsum plasterboard box on the ceiling, you should determine its size with a length, width and height. Regardless of the purpose of the finished design, experts recommend carefully considering the assembly order and approach the issue of saving the size of the room, the smaller the boxes, the more difficult it is to fix it on the ceiling. A well -thought -out and compiled scheme or project with all calculations and sizes will become the starting point of all subsequent works. But the slightest error in calculations can lead to a violation of the integrity and strength of the structure, the impossibility of attaching to the surfaces and the need to remake part of the work.
We start installing a gypsum cardboard with marking. We mark the places of mounts with a pencil on the surface of the walls and ceiling on them in the future will navigate. Particular attention should be paid to the thickness of drywall and metal profile.
After applying the marking, you can start installing guide profiles. The profile of the standard sizes 27:28 We fasten using a perforator along the marking lines. The design circuit for starters is better to break on the floor, and then, using a plumb line and pencil, apply all points to the surface of the ceiling.

By decomposing the correctly metal profile on the floor, we fasten the surfaces along the contour using screws. To do this, drill holes and forget the spacer dowels in them;
Now you can transfer the structure to the ceiling, drill the necessary holes with a perforator and reliably score dowels;
We make a control measurement.
Installation of suspensions
Using scissors for metal, cut the suspension. The size of the suspension is determined based on the size of the future box;
We fix the finished suspensions on the fixed guides to the screws and proceed to the manufacture of the lower part of the box;
We fasten the guide profile to the installed suspensions on the bottom of the box, paying special attention to the quality of the fasteners of excesses. Materials should be of high quality.
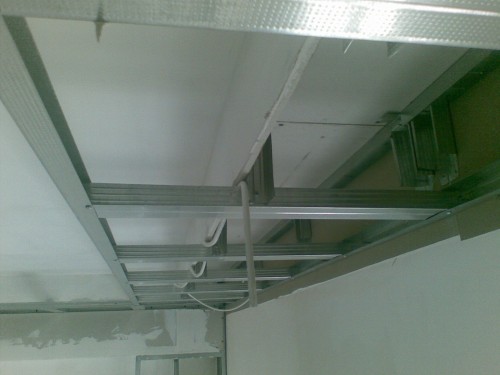

We perform the fasteners of the electric wiring on the ceiling. Before placing spotlights, do not forget to mark. Fasten all the wires so that they do not interfere with further work. Cut and secure the transverse metal guides perpendicular to the walls on screws. The distance between the guides should be no more than 60 cm. From the drywall we cut fragments of the required parameters of the elements. We reliably fix it in the lower part of the finished frame.

We collect the entire structure and produce mounts using self -tapping screws.
You can learn more about the installation of the box for stretch ceilings from YouTube modorolik
Putting the box
At the end of the assembly of the drywall box, it should be put down with their putty. If you approach this process responsibly, then the finished design will have a very presentable look.
To do this, purchase two spatulas the main worker with a width of 200-250 mm. And auxiliary, with which you will put putty to the surface, 50-100 mm wide. In the process, both spatulas will be in your hands. Thus, you can transfer the mixture to the working spatula and clean it from already dried putty. It is incredibly convenient to apply a layer of putty to the surface with an auxiliary spatula, and then align with the help of the main, wider spatula.
The wall processing should not cause you difficulties to press the spatula and conduct it on the plane. All recesses are filled with putty, and surpluses are removed. However, on the box, the corners are somewhat more difficult to remove. To form a clear geometric line, you must use the perforated painting corner.
In order to fix it, apply two heaps of the mixture on both sides of the side close to the rib of the box. Then press the corner in the putty layer. Due to the perforation of the excess, the mixtures move out. Dismatize putty with a spatula. Following the geometry of the structure.

Council from experts: If you need to apply first a starting and then finish mixture, use the materials of one manufacturer, otherwise the mixture may exfoliate from each other when dried.
The grout is performed in a large grid, then use small, and after drying, go through the entire plane with milk - this will help eliminate small scratches that arose after processing.
Fasten the corners to all the corners that will burn the flaws and make the angle even.
Only when fulfilling all the recommendations and rules for the installation of a drywall box on the ceiling, the finished design will serve you for many years.

![]()
StrPort construction portal 2011-2018. Articles about repair, construction, building materials.
Copying information from the site is possible only with permission of the editorial office Or indicating a direct link to the source. Legal justification
the installation itself is filled up. What
the installation itself is filled up. What is the points that the diode tape, and the cable laying. It will be more interesting.