Accommodation in a country cottage has long ceased to resemble camping conditions, now in ...
|
|
With the statement that the cottage is the best place to rest and unity with nature to argue ... |
Among the positive qualities of ceramic tiles, its practicality should be noted and ... |
Dismantling of stretch and rheal ceiling
DIY REMOVE TRASHING or REKED ceiling is nothing easier. There is no need to call specialists, wait for arrival, pay for work. We will step by step will consider all the stages of dismantling the ceiling. But if you are still not confident in your abilities or skills, it is better to turn to professionals who will quickly and efficiently do their work.
Table of contents
Dismantling of a stretch ceiling
In what cases there is a need to dismantle the stretch ceiling:
- repair of overlapping seams or communications hidden by the ceiling. The reasons may be as follows:
A) flow or flooding of the roof. The stretch ceiling withstands up to 200 liters of water. If flooding occurs, it is necessary to remove water within 3 days. Remove water by dismantling one of the corner corners.
B) repair of communications hidden by the ceiling. If you need access to wiring or pipes, remove the necessary part of the ceiling. At the end of all the work, the ceiling is installed in place, while warming up the gun.
- Adding new lighting points. Over time, you can make a rearrangement in your room, and the old lighting points may simply not arrange you after that. This issue is resolved by partial dismantling of the canvas.
- Complete replacement of the stretch ceiling. The reasons for the replacement can be:
A) Mechanical damage: cuts, burns, scratches, etc.
B) change in design. In this case, the ceiling is installed on existing fasteners.
DIY stretch ceiling
There are two types of stretch ceilings. The first type allows you to not disposable a stretch ceiling without difficulty. The second type, no matter what is disposable. Of course, it can be removed repeatedly, but you can’t do without damage to the canvas. At this moment, you should pay attention even when buying a ceiling. It is not worth saving on this at all. The difference in price is not very significant (a couple of tens of dollars), but it will pay off repeatedly.
DIREED TECHING CEARTION with your own hands exactly, on the contrary, repeats the installation process. Consider by steps:
- First of all, carefully remove the decorative rubber insert. To avoid damage, do not use acute objects. It is easily removed, you need to start with the connection site. If the ceiling is straightforward, then the connections are located in the corners (start with any). If the canvas of a curved shape, it is necessary to look, from close range, the joints are clearly visible.
- We take a gas gun and warm both the ceiling and the entire room. It makes no sense to dismantle a stretch ceiling without warming up, you will simply bring the paint into unsuitability. The place where you will start dismantling, warm with special care. On straight -line ceilings these will be angles. In the curved, there is no difference where to start, the main thing is convenient to catch the edge of the edging. It is advisable to consider the entire area of \u200b\u200bthe ceiling well, perhaps you will notice somewhere sticking kantiki that can be grabbed with pliers, just these thoroughly warm up.
- There remains jewelry work. Pull the pliers smoothly. Praise the edging slowly. Each time, expand the capture area evenly in different directions. As you cool, move the gun, and warm the area that you are working on now.
Useful tips
To easily start dismantling the stretch ceiling, you can sharpen the pliers to the required thickness. In this case, it is necessary to round the edges well, check if there are burrs. An ideal option will be if you are killing the edges, so you definitely will not damage the film.
As you can see, the dismantling of a stretch ceiling with your own hands does not require special skills and knowledge. The main thing is to do everything carefully, without unnecessary and sudden movements, and you will definitely succeed. But if the film is easily pierced, this does not mean that it will be easy to break.
The cost of dismantling a stretch ceiling
Choose, dismantle the ceiling with your own hands or trust professionals only to you. We only give advice and practical recommendations. For dismantling the stretch ceiling, the price ranges from 1000 rubles. It all depends on the area of \u200b\u200bthe ceiling, complexity of the design and other points. You can find out the exact cost from the specialists of the company you contact.
You can also watch the dismantling of the stretch ceiling video. From it you will understand that dismantling it with your own hands is much easier than it seems.
Dismantling of the river ceiling
To dismantle the rack ceiling, as well as suspended (and drywall, etc.) there may be a thousand reasons. As they say not to break not to build, the soul does not hurt. If you decide to completely replace the ceiling, then the old one can certainly be broken. But if you need to carry out only repairs, the task is much more complicated here. Let's try to figure it out.
RECHIC CEART - dismantling without problems
In this case, we need to start with the dismantling of a ceiling baseboard. You can dismantle the ceiling plinth in several ways. It all depends on the mounting method. If the baseboard is glued, then you must first deal with it.
We dismantle the ceiling baseboard
If the baguette is made of foam, it cannot be dismantled normally. Even if you maintain its integrity, it will be unsuitable for re -gluing. Although, the price of baguettes allows you not to worry about it. Therefore, we get down to business:
- Make an incision, after which remove the baguette with a spatula. The spatula is inserted into the incision, smoothly and carefully carried out throughout the seam;
- finished with the baguette;
- eliminate the stapler brackets;
- must be placed using an anti -marter;
- If you could not pull the whole bracket, work with pliers.
We continue dismantling
Step -by -step instructions for dismantling the river ceiling:
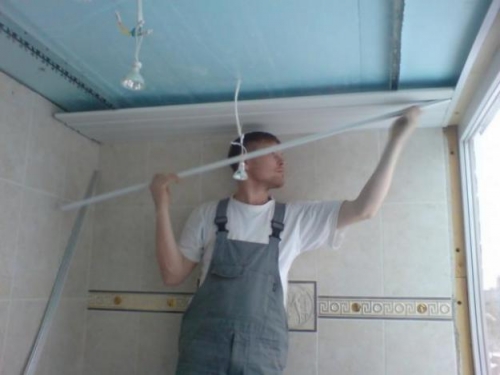
- We begin the dismantling of the rack panels from the extreme bar;
- gently bent the edge of the panel and released from the hook (using a screwdriver or chisel);
- The remaining panels are dismantled in the attachment sequence. Remove as neatly as possible. We remove the panels diagonally with a wall corner. We remove the inserts that are between the rails along the way.
-It came to the queue to dismantle the tires. It is necessary to loosen the spring clamp. We free the tire from the vertical suspension and remove. We remove all other tires in the same way.
- We dismantle the suspensions. We unscrew the head of the anchor bolt and send the connection with the ceiling. Depending on the type of fastener, a screwdriver or a wrench is used.
- Pull out the anchor bolt. If the suspension is attached with a dowel, we twist it with a screwdriver. If the screwdriver does not take, take a chisel and a hammer.
- If the dismantled suspensions will no longer be used, that is, you will decorate the ceiling in other ways, you can use a grinder. Cut the mounts at a minimum distance from the ceiling.
-Det the wall corner. We twist the dowel from the wall with a screwdriver or screwdriver. If you have to use the chisel, then it should be twice as a already fastened corner.
Nothing is difficult here. The main thing to dismantle carefully so as not to bend the panel.
Useful tips
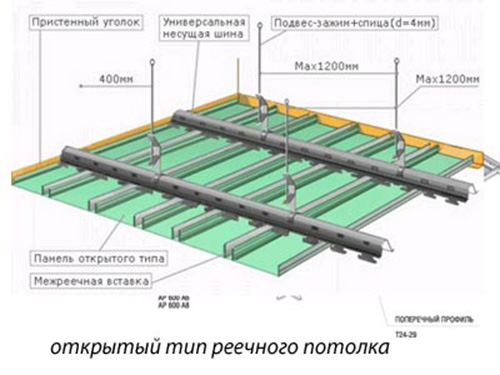
If you plan to replace only the rails, you will just have to remove the decorative baseboard and the rails themselves. Be sure to check the condition of the fasteners. If necessary, replace the parts or strengthen additionally. Now you can install new rails.
Below you can watch a video on the dismantling of the river ceiling (the video shows dismantling and other types of ceilings).


