If problems arise with a drain tank, it is not necessary to call a specialist on ...
|
|
One of the best heat and soundproofing materials is foam glass. This... |
The floors in the room are most undergoing loads, but an impeccable surface ... |
Paul in a cottage with your own hands
With independent construction of the cottage, sooner or later the question arises of how to make the floor. The task is also complicated by the fact that the floor of the first floor is always built on the ground, and few know the rules and technology of arranging such sexes. But I want the floors in the cottage to be strong, warm, reliable, protected from moisture and served as a support for many years without the need for major repairs. In this case, it is necessary to strictly observe the stages of work and the technology of styling, not save on protective films and bedding. In this article, we will consider how wooden and concrete floors can be made, as well as how to equip a warm floor system on them in order to provide comfortable conditions in the cold season.
- Grounding device in the cottage: Options
- Wooden floor on the logs in the cottage with your own hands
- With your own hands, concrete floor on the ground in the cottage
Grounding device in the cottage: Options
In total, two types of sexes can be distinguished, which can be equipped in a private cottage - concrete and wooden. Concrete floorsthey are performed according to the soil if the level of groundwater surplus permits, it should be lower than 4 5 m. It is also important that the soil itself should not be mobile, otherwise the concrete floor can destroy and damage the foundation during the progress. If these conditions are met and year -round accommodation with heating is planned in the cottage, then you can safely fill the concrete floor along the ground. On the second or attic floor, a concrete screed on top of the floor slab is also poured without any problems.
Wooden floors You can equip the soil without restrictions, since even in the case of seasonal living and high ground water, wooden floor elements are ventilated through holes in the underground and persist perfectly. On the second or attic floor, wooden floors are performed both on the concrete floor slab and on the beams of the ceiling.
The flooring of the wooden floor is single and double depending on the planned mode of residence. For the summer summer cottage, a fairly unscarried single wooden floor, and for living in winter or even temporary collisions in the cold season, it is necessary to equip the floor insulation and preferably double flooring.
Wooden floor on the logs in the cottage with your own hands
For wooden structures of the floor, coniferous wood is selected: spruce, pine trees, fir, larch. This is due to the fact that resins in coniferous wood protect it from rotting and formation of fungi. But more durable and hard coatings are made of expensive oak wood and ash, on which there are no traces of sharp heels. The moisture content of wood should be no more than 12 %so that the floor does not lead in the future. It is advisable to treat all the elements of the wooden floor with an antiseptic and antipyrene, but this is not necessary, it is enough to treat only lags and beams.
Performing a wooden floor in a cottage with your own hands, do not forget about a well -ventilated underground. To do this, in the foundation, it is necessary to provide for the lots or perform them after pouring. If the winter is snowy, then ventilation pipes with a visor are removed from the purge. To protect against rodents, the holes purges are protected by a net with cells of 8 mm.
The base of the wooden floor
Depending on the design features of the cottage, the support of the wooden floor can be the embedded crown of the log house, support beams and supporting columns.
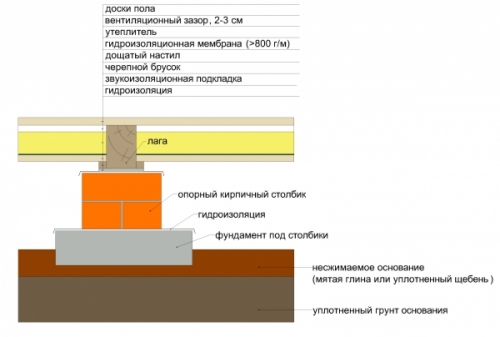
If the distance between the opposite walls is too large to firmly fix the long logs, in the interval between the mounts to the mortgage crown or support beam, supporting columns with a step of 70 to 100 cm are installed. The size of the step depends on the cross -section of the floor. For a beam of 150x150 mm, the distance between the support columns should be no more than 80 cm.
We perform support columns for the lags:
- In the places of the planned installation of the lag, we make marks on the support beams. We pull the cords along the entire underground in both directions. In places of intersection, we will form columns.
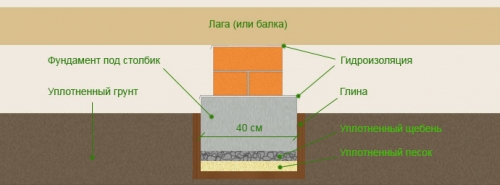
- In the places of installation of support columns, we perform the excavation of soil to a depth of 40 60 cm in the form of a square with a side of 40 50 cm.
- At the bottom of the seizure, we fill up 10 cm of sand and 10 cm of gravel as a spiver under the foundation of columns.
- We install a wooden formwork for each support column.
Important! If the columns are planned to be performed completely concrete, then the formwork can be done at the full height of the pillar. If the columns are made of brick, then the foundation for them should be 5 cm from the soil.
- For greater strength, the foundation for columns can be reinforced with a net or reinforcement.
- Pour the formwork with concrete.
- After the concrete dries, we install brick columns: if the height of the column is less than 25 cm, then we perform a laying of one and a half or two bricks, if the height is more than 25 cm, then in two bricks. We fasten bricks with cement mortar.
Important! At this stage, it is necessary to strictly control the horizontal surface of the support columns, they should be in the same plane.
- We waterproof the surface of the supporting columns: we lay the roofing material without sprinkling in two or three layers, smear with mastic on top.
After removing the formwork from the foundation of the support columns, we remove the fertile layer of soil over the entire area of \u200b\u200bthe room, level it, trim and perform a spatch: first a gravel layer of 10 cm, and then sand 10 cm. We shed each layer with water, and then seal with a vibrating plate.
Laying lag for a wooden floor
The lags of the wooden floor can be laid directly on the support columns, but if the step between the lags is too small 40 50 cm, then this method is inconvenient. It is better to put the beams on the support columns, and fix the lags to the beams. Consider this particular option:
- We take a beam with a section of 150x150 mm as support beams. If there is no timber of the required length, you can grow them two, joining the beams in the middle of the support column.
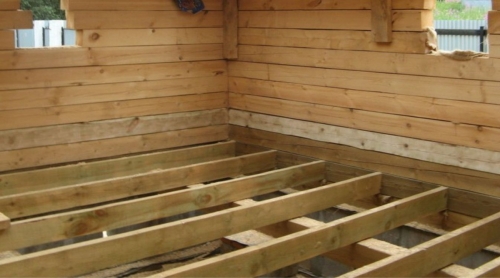
- We lay the beams on the support columns and the embedded crown. We control the horizontal and even arrangement of the beams relative to each other.
Important! You can fix the sagging of the beams on the columns by placing wooden lining under them and firmly fixing them.
- We fix the beams to the columns with the help of steel corners: we fix the corner with self -tapping screws to the wood, which should enter the beam by 3 5 cm, we fix with the support column with anchors. At the junctions of short beams, we make a cut in a paw or half a berel and fasten the connection with self -tapping screws or a wooden bump. In places of connection of beams with a embedded crown, we do the same.
The cross -section of the lag We select the wooden floor depending on the layer of insulation, which is planned to be laid between them. If a layer of mineral wool is 100 mm, then the height of the lag should be 150 mm. If the insulation layer is 150 mm, then the height of the lag is 180 mm.
The step between the lags It is calculated taking into account the loads that should withstand the floor, and also depends on the section of the floor boards. The smaller the thickness and width of the floorboard, the more often it is necessary to install the lags. The exact data can be viewed in the table.
- The first to lay the lighthouse lags, at a distance of 2 m from each other. We check their horizontal and even location.
Important! The permissible deviation in the evenness of the lag is 1 mm per 1 m of length. If required, we remove the excess with a shirt, and in the places of deflection we put the wedges or gaskets.
- We lay all the remaining lags and firmly fix them to the beams with self -tapping screws, which should enter the beams of the beams of 4 5 cm.
The last time we are convinced that the lags are in the same plane, and we proceed to the thermal insulation of the floor.
Thermal insulation and installation of a black floor
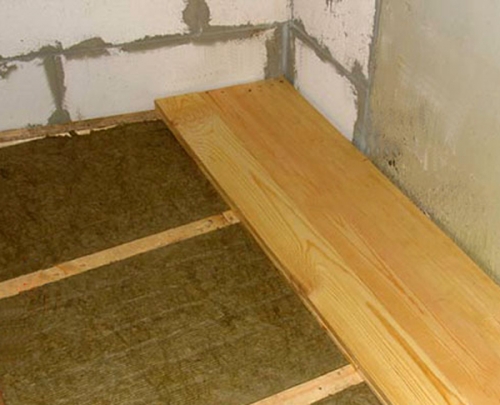
Laying waterproofing and thermal insulation is carried out between the lags. To ensure such a constructive possibility, from below the lag must be equipped with a roll from the boards:
- Below to the lags, we nail the cranial bars with nails.
- We put the rolls of boards on the bars. For rolling, we take boards 25 mm thick, the width does not matter much, since the laying is carried out across the lag, and not along.
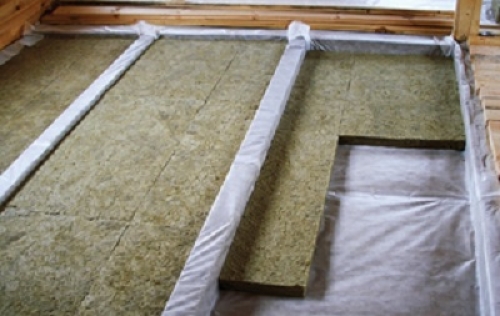
- On top of the roll we spread the waterproofing film. We glue the joints of the films with a special ribbon. The edges of the film are set to the walls of 15,100 cm.
Important! Do not use the usual polyethylene film, as it is almost vapor permeable. The condensate that will accumulate in the insulation will not be able to get out of it. In order to avoid wetting the insulation between the floor lags as waterproofing, we use vapor -permeable superdiffusion membrane.
- In the space between the lags we put the insulation, for example, mineral wool density 30 55 kg/m3. You can also use ecowata, mineral and basalt cotton wool in rolls or plates, sawdust and other materials.
- It is impossible to leave a ventilation gap of about 2 3 cm above the insulation.
After laying the heat -insulating material on the lags, you can lay a black floor or finishing floor, if the thickness of the board allows. Having planned the laying of a massive floor with a thickness of 50 mm, it is not necessary to equip a black floor, the boards can be laid directly on the lags. If the flooring is made of a 20 mm parquet, then it is better to pre -arrange a black floor of plywood sheets or boards with a thickness of 15 50 mm with minimal processing. We tightly adjust the boards to each other and fix the screws to the lags.
Paul the wooden floor
For flooring, we use the highest quality wood with processed edges or a downstone lane, this will greatly simplify the laying task.
When laying the draft floor and flooring, it is necessary to perform the indentation from the walls of 1 2 cm. The tree is alive and plastic, collecting moisture, expands. The gap between the floor and the walls will make it possible to freely expand and refer to the boards.
We perform the flooring of the wooden floor:
- We begin laying from the far side of the room. The first downstone board has a spike to the wall, having previously cut it off.
- We fix the board with self -tapping screws to the lags: from the side of the spike, we tighten the screw directly into the board (later the hat is hidden with a baseboard), from the side of the groove we screw the screw at an angle of 45 degrees in the groove.
Important! If the floor boards have the same length as the room, then laying is carried out without displacement. If the boards are shorter, then it is necessary to launch a run.
- The next board is inserted into the groove of the first board. Fuck it tightly with a kiyanka. We fix the self -tapping screws in the groove.
- We lay and fix all the remaining floor boards. Do not forget to screw them to each lag without exception.
We fix the last board with self -tapping screws so as to hide the hats with a skirting board.
Modular warm floor in a cottage
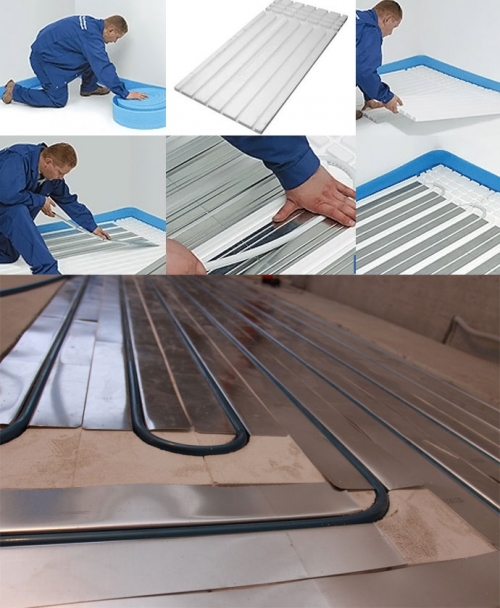
The installation of a warm floor for a wooden floor is made after laying the heat -insulating material between the lags. Further actions are the following:
- We lay special modules for a warm floor on the lags, which are chipboard slabs with grooves for aluminum plates and pipes for pipes.
- We mount aluminum plates in grooves.
- We insert a water warm floor into the grooves and snap them in the canals.
Important! The warmest option for laying pipes of water warm floor alternating warm and cold pipes. So heat will spread more evenly.
After the installation of the pipes of the water floor, we lay the slabs of the GVL, and on top the flooring of the final floor. We connect the pipes to the collector, which is best placed on the wall.
With your own hands, concrete floor on the ground in the cottage
The concrete floor is a strong and reliable base, but only if everything is done correctly, in compliance with the technology and all stages of work. Otherwise, the floor can be very cold, drew or even crack quickly.
Preparation of the foundation and the formation of adding
Before making the floor in the cottage, we plan it zero level. To do this, we make a mark on the wall at the bottom of the doorway, retreat 1 m up and mark this level around the entire perimeter of the walls. We check the horizontal level of the applied level and draw a line according to the marks. We put off from the line 1 m down, connect the marks with the line. This will be a zero mark our level of finishing sex.
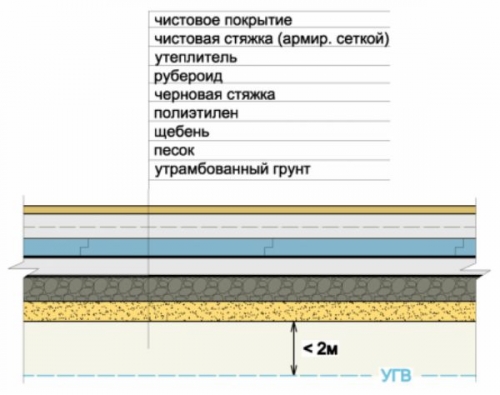
We measure about 35 cm down from the zero level and perform the excavation of the soil to such a thickness. We seal the soil and perform a spiver: 10 cm of sand and 10 cm crushed stone (fraction of 40 50 mm). We thoroughly trim each layer and check the horizontal.
Waterproofing, thermal insulation and reinforcement of the concrete floor
In order for the laying of waterproofing material to occur most evenly, a layer of skinny concrete must be poured onto the crushed stone base of the pouring.
We prepare a cement mortar a little more liquid than for filling the floor. Pour a layer of 4 5 cm.
After this layer is dry, we spread the waterproofing material. It can be a roofing material without sprinkling in 3 layers or other roller materials.
On top of the waterproofing, lay the insulation. For the concrete floor, you can use polystyrene foam, extruded polystyrene foam or basalt wool with a density of more than 150 kg/m3. We put the plates into the run.
On thermal insulation material, we install a reinforcing mesh of 100x100x5 mm on special stands 2 3 cm high.
Installation of guides
To make the concrete base even, without slopes, it is necessary to install guides or as the lighthouses are also called. To do this, you can use pipes of both round and square section, wooden bars, special aluminum profiles. So that after pouring concrete, the lighthouses can be easily removed, lubricate them with an inspection oil.
The installation of beacons is carried out on concrete buns from the solution. We make the distance between the beacons 1.5 2 m. We strictly control their horizontal and even location relative to each other. If necessary, add the solution to the buns or pressed the lighthouse. The height of the beacons should be equal to the thickness of the floor 7 10 cm.
You can fill the floor in the cottage after the solution in the buns is slightly grasped.
Pouring the concrete floor in the cottage
It is advisable to fill the floor in one or two approaches. We prepare a solution of 1 part of cement, 2 parts of sand, 4 parts of crushed stone and 0.5 part of water. Mix in a concrete mixer. To compensate for the thermal expansion of the concrete floor, we lay the damping tape to the height of the entire floor along the perimeter of the walls.
We begin to fill the floor from the corner opposite to the door. Pour the solution between the guides, pierce it with a shovel and compact it with a vibrator to avoid voids.
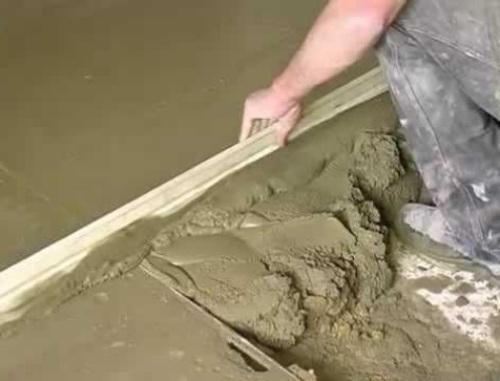
For leveling, we use a 2 m long rule. We set it on lighthouses and pull it to ourselves with movements to the left and right, distributing the solution and removing the excess. When the floor in the entire room is flooded, we take the guides, fill the voids with the solution and leave to infuse and dry for 28 days.
Warm water floor in the cottage: concrete laying system
When laying the system, a warm floor on a concrete base must first heat up it by decomposing the heater slabs (extruded polystyrene foam) and covered with a foil film that reflects the heat into the room. You can immediately use foil insulation for warm floors.
We lay the reinforcing mesh on top. We lay out the pipes of a water warm floor in any way: a snail (spiral) or parallel styling (snake). We fix the pipes to the grid with plastic clamps.
Important! Sometimes they are advised top of the pipes of the warm floor to lay a reinforcing grid. This will harden the design.
Along the walls we lay out corrugated pipes to protect compensation seams.
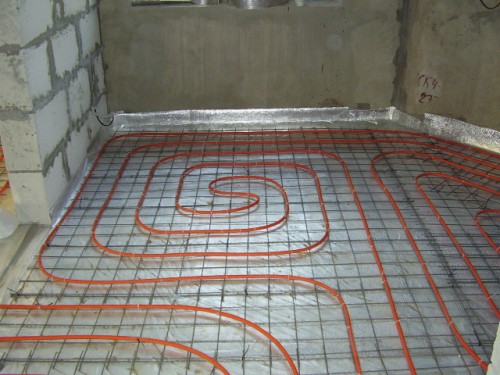
At this stage, it is necessary to check the performance of the system before pouring everything with concrete. Hydraulic tests are carried out strictly according to the instructions within 24 hours. If problems are found, they must be eliminated.
The finished floor screed in the cottage is poured with a cement mortar with a layer of 5 15 cm. Next, it should completely dry for 28 days. Only after that can you start using a warm floor, gradually increasing the temperature.
The proposed method of installation of a warm floor is suitable both in the event that a concrete floor slab is the base, and a concrete floor on the ground. In the latter case, you can mount the pipes of the warm floor immediately after the stage of laying thermal insulation. Set the beacons on top and pour the floor immediately with a layer of 10 15 cm.
As you can see, to complete the floor in the cottage with your own hands, although troublesome, but quite real. Compliance with all stages will ensure the durability of gender, comfort in the house, dryness and lack of mold. The final stage of the floor arrangement will be the laying of the finish coating. It can be a massive floorboard, linoleum, tiles, laminate, parquet and other materials that the modern market can offer.

