Each owner wants to protect his house or summer cottage from penetration ...
|
|
From such an event as sealing seams in panel houses, in... |
The arrangement of the tent roof on one side has clear advantages in reduced ... |
Installation of a skirting board with a cable channel
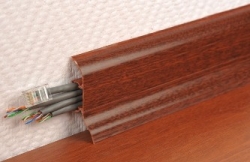
The installation of skirting boards is considered a joyful moment of repair, because this procedure is its final stage. The skirting boards differ in the material from which they are made. Wooden skirting boards are called classics, but MDF products that imitate wood, as well as plastic, are also available. Recently, plastic skirting boards have been very popular, which in their design have cable channels in which a cable can be hidden from the eyes, with the possibility of replacing it without dismantling a skirting board.
Content:
- The purpose of plastic skirting boards with cable channels
- Advantages of plastic skirting boards with cable channels
- Installation of a skirting board with a cable channel
The purpose of plastic skirting boards with cable channels
Literally a couple of years ago, all the cables and the wires had to be hidden in the walls, while spending a huge amount of effort and time on stroke and future hiding holes. Well, the lazy owners simply attached all the wires directly over the skirting boards with the help of special brackets, which looked very unsympathetic.
Later, plastic cable channels arose on sale, which coped with a similar problem, but they also did not add comfort to the interior, as in the previous case, because they were placed directly on the wall and, of course, attention to themselves. In general, there are many options to cope with the shock of the wires, but the most aesthetic is the installation of a skirting board with a cable channel.
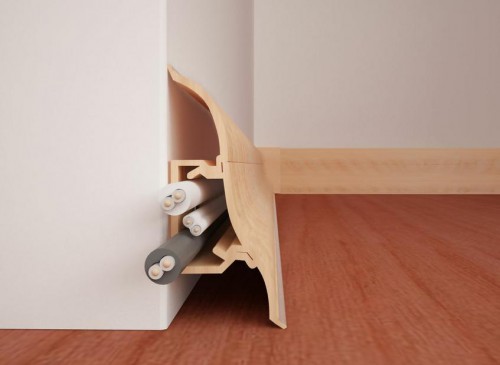
Considering the peculiarity of the internal structure of such skirting boards, it should be noted that inside the cavity of such a product there is an additional space for laying a variety of cables and wires of network, cable, telephone, power and signaling.
In most cases, such skirting boards are made of synthetic materials, because it is quite problematic to combine a cavity under the wires in a whole bar. Of course, everything is possible, and such models are produced for a specific order, but the cost of wooden skirting boards with a cable channel is quite high. And in the case of plastic, all work is carried out much easier.
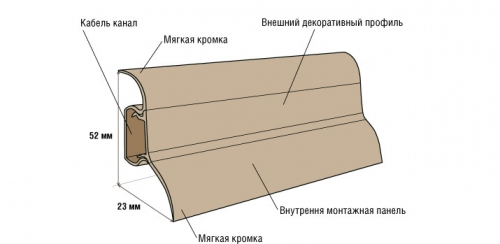
The cable channel is closed by a decorative panel, masking the channel itself and fasteners (nails or self-tapping screws). In addition, the panel also serves to docking in a straightforward section of two skirting boards. Such plastic skirting boards are equipped with sealing elastic bands from above and below, which hide the possible irregularities of the floor or walls after installation.
Advantages of plastic skirting boards with cable channels
There are two types of plastic skirting boards with a cable channel: a skirting board with a channel that is located in the center, and a skirting board, on top of which is a removable part, which is essentially a cable channel. The choice in favor of installing a skirting board with a cable channel is a right solution, because it has a lot of undeniable advantages. Let's list the main advantages of a plastic skirting board with a cable channel:
- Naturally, the most important advantage of the skirting board with the cable channel is the ability to install hidden wiring, and the whole process does not require special skills from the contractor and takes a minimum of time.
- The presence of a channel cable in the skirting board allows you to hide the cable quickly and very simple with the possibility of replacing the cable and installing new wires without dismantling the skirting board itself.
- High flexibility is characterized by high flexibility flooring with a cable, which allows its installation even on uneven floors and walls. In addition, in combination with rubberized edges, such a plinth provides an ideal fit to any type of surface.
- A wide selection of the color scheme of floor plinth allows you to choose a product with high accuracy for any flooring.
- A plastic skirting board does not require painting and other decorative decoration. As they say, I installed a plinth and forgot.
- You can use the skirting board with the cable channel more than once: if you carry out neatly dismantling, you will be able to re -install the product, while it will look no worse than the new.
- Floor plastic skirting boards are surprisingly unpretentious in operation. They are easy to clean from pollution and wash. They do not need a periodic update in the form of painting and do not burn out in the sun.
- The price of plastic skirting boards is the lowest wooden and laminated products in relation to their competitors. As for the cost of a floor plastic skirting board with a cable channel, it will cost you a little more than usual.
Installation of a skirting board with a cable channel
So, you already finally decided to install a plastic skirting board with a cable channel around the perimeter of the room. And bought all the necessary material. And to find out how to attach a skirting board with a cable channel, read our article further.
Measurements
First of all, it is recommended to measure the length of all the walls in the room where you want to install a baseboard. Do not forget to subtract the size of the doorways from the resulting result. After that, add 9%to the length, which will have to be cut. All external and internal corners, connectors and plugs should also be taken into account. After such manipulations, you can safely go for the purchase of the material.

When buying the material, remember that the skirting board of plastic with a cable canal consists of 2 parts: the main bar with the cable channel and the front masking bar. Also included in the set of end and corner docking camouflage plugs. Of the tools during the mounting of the skirting board with the cable, you will need a jigsaw, a perforator, a screwdriver, a cross, a hammer, a file, a knife and a pencil.
Preliminary work
The plastic skirting board is usually attached to the floor, but to the wall. You must choose one option of 3 possible: use liquid nails or glue and stick a skirting board on the walls; Apply dowel-processes; Install a plastic baseboard with a cable channel on screws.
If the wall made of concrete or brick, then the best option will be the installation using a dowel and a high-quality perforator with the function of impact, which can significantly save time. If you plan to install a plastic skirting board on a wall of drywall, then you can use screws with traffic jams designed for drywall, or ask how to glue the skirting board with a cable channel.
Before installing a plastic skirting board with a cable, it is necessary to bring all the walls to the level in order to nullify all the possible cracks that occur between the wall and the baseboard, as well as reduce the need for frequent spraying. If you do not have such an opportunity, or simply it is unrealistic to bring the walls to an ideal state, then do so.
Attach the PVC skirting board, remember the places where the gap occurs, and then take the mark on this place. Here you will need to fix it. If everything turned out evenly, then select the optimal step for drilling 40-50 centimeters.
Subscribing the plinth
When attaching the skirting board with the cable, the need for cutting it arises. Before cutting, remember that all measurements should be taken taking into account the end and corner docking plugs, because otherwise you can ruin the product, cutting off the wrong length that is required.
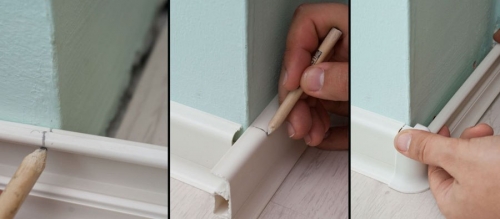
Immediately before cutting the floor plinth, remove the cable channel from it, it must be cut separately. When cutting a plastic skirting board, it is recommended to use a special tool for cutting with a worship and a hacksaw for metal or wood. The cut line is marked with a simple pencil.
Mounting skirting boards
The installation of skirting boards with a cable canal begins from the corner of the room. Work can be started with any corner of the room, but it is best to start from the corner of the longest straight wall. Remember that starting the work in this way, the maximum number of whole whips will be used, and only one piece will remain cut off, which will continue to be installed in niches, stroke of support columns and short sections of the wall. As a result of this technique, you will receive by the end of the work the minimum number of scraps and save money on building material.
Next, disconnect the plug of the channel cable, insert the plinth profile into the corner, install a plastic connector from the opposite side of the product if the profile is less than the wall. After that, cut another profile.
The main back of the plastic boat with a cable canal will be attached to the wall itself. The front masking part is dressed at the very end of the installation work, when the cable is laid and everything is screwed. Before installing a skirting board with a cable channel, remember that it is worth drilling through the plinth itself!
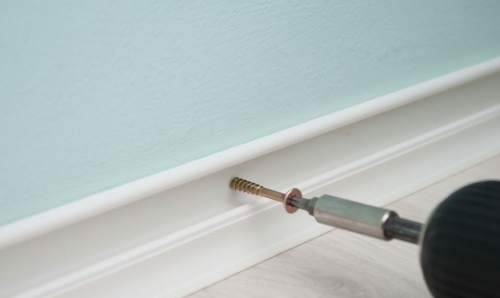
To do this, press the plinth profile with one hand to the wall, check for the occurrence of the gap between the floor and the product. In the other hand, take a punch with a drill of the required size and drill through a plastic skirting board of holes, every 30 centimeters. After you have made the first hole, you must immediately twist. This will help to fix the skirting board of plastic with the cable channel and will further drill holes with greater confidence.
When drilling, the situation may happen that the edges of the hole will melt from the heated drill, these unpleasant moments will further find the process of screwing the skirting board. To avoid this moment, it is enough to drive a drill back and forth.
After that, you need to use the vacuum cleaner to remove garbage created in the process of drilling walls. Next, insert plastic plugs into the holes and screw the screws, thereby fixing the skirting board with the cable to the wall. The most quickly screws will be twisted with a screwdriver, in this way you can save most of the time with a large amount of work.
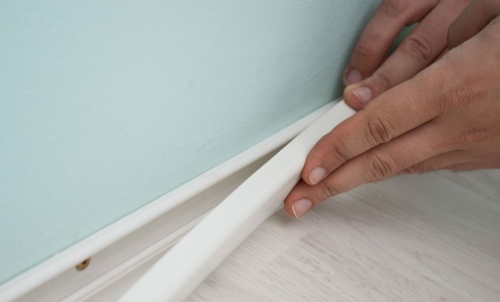
Only after all of the above operations can you put a plug of the channel cable. At the same time, do not press on the lid of the channel cable with excessive force, because the latches may break. After you screwed the back, you need to lay the wires followed by fixation of the cable in a special plastic skirting channel.
In the corners you can knock down the walls a little so that the wires do not pop up and adjust better. Depending on the situation, they are allowed to fix them on double -sided tape. At the very end, the end plugs and corners are attached. If you constantly fly off with you, then remember that they are not recommended to glue them. It is better to put these products on a transparent sealant.
Mounting angles
Installing the wall of the baseboard in a straight line, from one inner corner to another, you have almost installed 2 inner corners. It remains to deliver the interior of the inner angle with the floor skirting board, which will be adjacent to the perpendicular wall. Apply for this the baseboard along the wall adjacent perpendicularly and insert it to the stubborn plan into the inner angle. Fasten the design with screws.
Sometimes there is a need to make a transition from the internal immediately to the outer corner. To make such a transition, you need to do the following operations:
- mark on the facial surfaces of the internal and external connective element the location of internal stops;
- attach to each other the internal and external connecting elements and measure the distance between the marks;
- cut a piece of a plastic skirting boat with a cable channel along a measured size, throwing 2-3 millimeters to the gaps on two side, such a piece will be a frame on which you will fix the angular elements:
- set the outer and internal corner element on a cut piece.
To install and connect the outer corner, you need to approach the outer corner with the skirting board with the cable channel along the straight section and cut it off in the length in such a way that the tip of the baseboard does not reach the corner 2 millimeters. The end of the outer corner element must be joined to the stop. Fasten the skirting booth with a screw.
After that, the baseboard should be attached to the perpendicular wall and season one end to the stop into the inner bar in the external corner element. Close the channel with a decorative plug. You need to act in a similar way if you need to get around the column. Gradually moving along the entire room, the baseboard is installed in straight areas and the framing of the internal and external angles.
Now you got acquainted with the methodology how to fix the skirting board with the cable channel. We hope that now the installation of plastic skirting boards will not be difficult for you. But you can hide the entire shock of the wires, which used to wriggle ugly along the walls and prevented him from moving around the room.



I wonder what to do if
It is interesting what to do if the wires are not immediately cleaned in the cake. (Yes, this happens too!) How then to pull out the notorious plug, without the danger of damaging the appearance ...