The kitchen and bath are special areas of the apartment requiring special care and, ...
|
|
The construction of any building begins with the foundation. There are several of it ... |
The growing popularity of wooden houses associated with their highest environmental friendliness, ... |
Laying on the plywood laminate
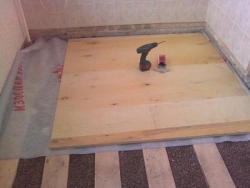
There are a lot of options for aligning the floor, for example, to lay the laminate. All of them are available for independent implementation and allow you to carry out work quickly. Sheets of plywood, as an even foundation, both professionals and amateurs acquire quite often. Difficulties in the work should not arise, but it will be useful to find out the properties of the materials that are planned to be used, as well as the nuances of their styling. The article will have how to put a laminate on the plywood.
Content:
- All you need to know about the faner
- How to align the plywood under the laminate
- How to lay a laminate on a plywood
All you need to know about the faner
Since the main task of getting an even and strong surface so that the laminate lasts longer, the lamella does not disperse, and when walking there is no creaking, then the plywood should be approached with the knowledge of the matter.
How is the material produced?
- Plywood is a product of woodworking industry. The basis are sheets of veneer of various wood (deciduous or coniferous). The manufacturing process resembles the assembly of puff pie. There can be several floors, but the minimum amount is three.
- Fibers of wood have a longitudinal or transverse orientation, when gluing sheets into a single product, alternate an veneer with different directions. The outer layers always have the same orientation of the fibers. Therefore, the division of plywood into longitudinal and transverse depends on the direction of the drawing of the outer layers of building materials.

Tip: When installing, you need to lay the sheets, taking into account the main trajectory of movement around the room. Fibers of plywood should be perpendicular to her. If the sheets are laid on the lags, then their direction is selected taking into account this requirement.
Classification of plywood by purpose
- Material with the same name is not always suitable for leveling the floor.
- Construction plywood - This is what you need to ask sellers in stores.
- Industrial varietyb does not have such good quality as the previous option, but it can be used.
- Furniture, structural and packaging views of plywood are worth get around with attention. For the floor, they will not come in handy.
Movable resistance material division

In some houses, such a characteristic of plywood as resistance to absorption of moisture is especially useful. Marking will help determine this indicator.
- FBAThe environmentally friendly version of the material, but without creating the waterproofing layer it cannot be used: moisture resistance in such plywood as the indicator is practically absent.
- FSF It has increased protection against moisture. The glue used for its production includes phenol-formaldehyde resin. Such building materials can be used not only for internal, but also for external finishing work.
- FC This is a plywood, in the production of which the adhesive composition with a base from carbomido-formaldehyde resin was used. It is well opposed to moisture and meets all the requirements of materials intended for the work indoors.
- They also make plywood with marking FB, which is perfect even for a wet tropical climate, but in the conditions of our apartments and houses it is not necessary to use it, especially if it is planned to mount a warm floor. Bakelite glue that is used for its manufacture is also used in a material with a letter designation BSand BV. If you need to level the floors on a personal yacht, you can purchase them, and for apartments it is better to limit yourself to one of the above options.
Division according to the principle of surface processing
- After the floor is covered with plywood sheets, the coating will need to be polished throughout the area.

- You can avoid additional labor costs if you immediately purchase a plywood with a lag Ш2. This means that it has passed the grinding process on both sides. Sh1 - designation for sheets of material with a smooth surface on one side. NSh letter designation of unnecessary plywood.
The quality of the material
Like any other products, plywood can be first or distant from more or less acceptable quality. This is what it can be depending on the presence of knots or other defects.
- E Category.This material is from the category of elite. There are no knots on the veneer, there are no other defects (cracks, poorly processed edges). You can use it as a leveling layer, but it will turn out unreasonably expensive. Usually it is not used for such operations.
- I category. Minor flaws in the form of uneven swelling or sitting of veneer and knots are allowed. But their length should not exceed 20 mm. There may be wormholes, but their diameter should not exceed 6 mm, and for 1 m of such defects there should be no more than three pieces.

- II category. It is supposed to have fallen, fused or nascent knots. The number of wormholes per 1 square. The meter should not exceed six pieces. If the choice is made in favor of this material for other works, then if necessary, defects can be hidden from veneer inserts. In the case of aligning the floors, such additional actions are not needed.
- III categoryallows the fused or unusual knots, holes and wormholes (no more than 10 per sq. Meter). For the installation of structures hidden from an extraneous look, it can be used. Our case is just from the category of such.
- IV category It involves any production defects.
Tip: To align the floor under the laminate, it is better to dwell on any category of plywood from the first to the third. In principle, all sheets will be closed with laminate panels, and no one will appreciate their beauty. Therefore, in appearance, it is quite possible to save a little here.
Size range
One of the principles of the work of the stringing owner is a reasonable savings. The correct calculation of the materials greatly contributes to this. Therefore, it makes sense to get acquainted with the standard dimensions of plywood.
- The material is produced in the form of square (1525 1525 mm, 1220 1220 mm, 1475 1475 mm, 1270 1270 mm) or rectangular (1525 1350 mm, 1525 1220 mm, 1525 1475 mm, 1525 1270 mm) sheets.

Tip: taking the large sheets is not always profitable. It is necessary to carefully approach the measurement of the area of \u200b\u200bthe room and the calculation of consumables to reduce the number of scraps.
- The thickness of the plywood is selected depending on the method of its installation. To create the base on the lags, a material with a thickness of 16 to 21 mm will be required. This is provided that one layer will be laid out. And if you plan to lay the base under the laminate in two rows, then the thickness of the sheets can be reduced to 8 or 10 mm. To put the plywood directly on the draft floor, the material of at least 6 mm is suitable. The thickness of the finished plywood for the adjustable floor starts from 10 mm. Accordingly, if the home master decides to independently make an analogue of such material, then when purchasing the base he needs to focus on this indicator.
When everything is clear with the quality and number of plywood, it is time to start aligning the floor. This can be done in one of four ways.
How to align the plywood under the laminate
- It all depends on how even black floors are in the house. On a qualitatively made cement screed and wooden floor with a deviation of various sections in height no more than 2 mm, you can fix the plywood without the use of lag and without additional leveling.

- The wooden base will need to be treated with acrylic gemetics or prepared a mixture for putty (sawdust and PVA, slightly moistened with water) and use it. If the differences between the floor sections of 1 m are more significant, then it will be correct to make a crate from the beam. Wooden floors that have significant height deviations are better to disassemble and mount from new lumber.
Fastening plywood for glue and screws
The method is fast, simple and applicable to any even floor, both wooden and concrete.
- The plywood sheets are marked, cut into pieces of the required size, cut the necessary recesses for door jambs or to go around the heating risers. Most often, plywood with standard dimensions is sawn into four parts.
- Each fragment of the future base fits on the floor, taking into account technological clearances. Along the walls they have a size of 10 or 20 mm, and between the sheets they are left with a bus from 0.5 to 1 cm. This is not just the prevention of the creaky floor, but the provision of natural air circulation. Such prudence will have a good effect on the faner itself and at the service life of the finish cover for the floor.
Tip: When laying sheets, take into account that each subsequent row will not begin with the whole, but with a half -shifted plywood sheet. That is, installation is carried out in an order resembling brickwork. And when sawing and preliminary laying of fragments, they should be marked, since after you will have to be removed for preparatory work.

- So, it was decided not to align the base of the draft floor, but it is still necessary to prepare it. This stage is slightly different in wooden and concrete surfaces.
| Preparation of a wooden floor | Preparation of the floor from cement |
| The old wooden coating is recommended to galvanize and clean. Large cracks are closed with wedges with their simultaneous planting on glue, small defects are put down. |
The base in the form of a cement-sand screed requires not only cleaning from dust and garbage. Creating a vapor barrier is a prerequisite for such a gender. You can use special roll materials or apply bitumen mastic. |
- Now the plywood sheets are planted in the prescribed manner on glue, not forgetting to leave the gaps. Additionally, each fragment is fixed with self -tapping screws or any other metizes with a step of not more than 20 cm from each other. The hats of self -tapping screws should be lined with plywood properly. Unnecessary material will need to be processed mechanically or manually using sandpaper. After cleaning, the base of the plywood can be covered with a substrate and lay the laminate.
Adjustable floor from plywood
- For it, a specially produced type of material is used, in which holes are drilled using a drill. The height is regulated by questionnaires equipped with washers and nuts to fix the desired position.

- First, anchor studs are clogged into a concrete base. A nut with a puck is wound on them. The height of the nut is set according to the laser level. Now sheets of plywood are laid on the anchor. The excess length of the rods is cut off. Now you can lay a second layer of plywood so that the upper plates overlap the joints of the lower plates.
Such a floor cannot be called cheap, but with significant differences, this system allows you to do without aligning and installing a crate from a beam.
Aligning the floor with sheets of plywood by lags
- The black base of the floor is cleaned of garbage and covered with a film for vapor barrier. Using the level, a zero mark is determined, lighthouses are set (with an interval of about 20 cm). Lags made of timber are laid on top with a section of 80 40 mm. When laying them, you need to focus on the lighthouses: if there are large hollows, with the help of improvised materials, lining is built to set the lag in level. The interval between the guides should be from 40 to 60 cm.

- After the draft installation of longitudinal lags, their even location is once again checked using the level and the final fastening with meters is carried out. In order for the crate to acquire a finished look, you need to fix the transverse structural elements. The distance between the crossbars should not exceed 50 cm, and the minimum step of their location is 30 cm. The thicker the sheet of the layered plywood, the more often it should be attached to the beams, which means that the distance between the transverse segments of the chatter must be reduced.
- The empty space between the lags is filled with any insulation, if the base allows, it can be filled with expanded clay. After the heat -insulating layer is created, the lags are closed with a layer of vapor barrier material and proceed to the marking and sawing of the sheets of plywood of the desired size. It should not be forgotten that laying will be done in the same order of brickwork, and the joint of neighboring sheets of plywood should fall in the middle of the lag.
- The need to fulfill the base in two rows of plywood sheets is evaluated by specialists ambiguously. Some believe that in this way a more durable surface will be obtained. Others recall how the material is produced (when the layers of veneer with different fibers are alternated). And this feature already in itself provides a faner with a well -chosen thickness of sufficient strength. In any case, the master himself will have to decide.

Installation of plywood base for boards
- The described method is suitable for bulk black floor. This method of insulation and simultaneous raising the base is used in apartments and in private houses. A dry screed is poured and tamped in accordance with the technology, and wide boards are laid on top. Most often used material with a width of 200 or 150 mm.
- The interval between the guides approximately should be equal to their width. On top of them, starting from the far end of the room, a layer of vapor barrier is laid.
Light: You can move only through the boards without stepping on a screed.
- Immediately on top of vapor barrier, a plywood sheet is attached to self -tapping screws. The next after the starting sheet, the whole layer of the material is fixed, placing it along the opposite wall with the necessary shift.
Tip: you need to carry out installation in this sequence, immediately fixing the large pieces of plywood to cover them as large as possible. This is due to the mobility of the dry screed. And using such a method of fastening, it will be possible to move more freely on the floor, and without fears to fix in their places the smaller elements of the plywood base.

Now you can proceed to the installation of the finish coating.
How to lay a laminate on a plywood
The first step will be the laying of the substrate. Which of its species presented today in the building materials market is decided by the home master itself, depending on personal preferences and the size of the budget. But the need for such a layer between the draft base from the plywood and the laminate board is justified.
The substrate is not attached to the floor, it will be tightly pressed with a laminate. It is only necessary to fasten the canvases together with tape, because the width of the material in the roll is not enough to close the entire area of \u200b\u200bthe floor in the room.

Several general rules will avoid the basic errors made when laying the laminate on the plywood.
- The general view of laminated lamellas, if you look from above, should resemble a brickwork. That is, the ranks will alternate, starting from a whole bar, then from a trimmed. A similar method of laying the scope helps to properly distribute the load on the lamellas.
- The laminate is not mounted close to the wall. The gap of about 1 cm is left so that with further operation of the floor, the lamella can expand. Quiet adjacence of the material to the walls around the entire perimeter of the room is the key that after a while the laminate will not stand on end. You can purchase spacers in a construction store or use the same pieces of scraps from laminated boards.
- You need to carefully study the recommendation of the manufacturer indicated on the packaging. It contains information about the necessary thickness of the substrate, describes the basic principles of installation and the lock system. Most often, lamellas are attached in two ways:
- Click Connection assumes that the elements first join at the right angle, then neatly move along the groove before a characteristic click occurs. It means that the combination happened correctly, and the panels are firmly fixed to each other.
- Lock connection requires the top of the dicks with the groove of the previous lamella. It will also be possible to find out by click on the correctly done action.

- The laminate requires special accuracy when it will be necessary to tap the bar (to ensure a denser fit). It is convenient to use a kiyanka or an ordinary hammer, but not to allow contact of the tool directly with the board (you can damage the locks). When tapping, you need to attach the laminate to the board and through it to be exposed to the lamella.
- In order to snap the castle in the panel final in a row, a strip is used. This tool has at the ends of the bends, which are located at a right angle, but each is oriented in their direction.
- Before you start laying the first row, locking joints aimed at the walls must be cut off.
- For sawing the material, it is better to stock up on an electric jigsaw. It is more convenient for them not only to cut the boards along the length, but also to cut the recesses in order to go around the battery or door frame.
- The first row is mounted from the whole lamella. The direction of the direction is dictated by the location of the window in the room. The joints of the rows are recommended to be made in parallel to the light stream. This will make them less noticeable. Work should start with the very remote from the entrance of the corner located on the left side. When calculating, it is important to take into account the moment that the length of the cutting element should be at least 30 cm. This should be taken into account that the coating remains durable to the entire life of the laminate.
- You can lay boards in turn each other from the previous one. At the same time, performing the entire sequence of actions before the locking of the castle. Or collect the bar in rows and combine them with lamellas already laid along the wall. The first method is preferred for those who are going to work alone or have little experience in laying a laminate. The second option allows you to speed up the installation process, but a couple of assistants will be required so that the long row is jointly and connected to the previous properly.
- The second row begins with a board, shortened from the first lamella of the initial row by 1/3, and the third with a displacement of 2/3 of the length. After the panels of the second row are firstathered with the first, you need to lay along the wall, which provide a gap.
- So, a coating from a laminate on a faner is gradually formed. The last row adjacent to the wall can be easily connected to the previous one using a clamp. Now it remains to take out the wedges that prevent the lamellas from contacting the walls, mount the baseboard and conduct general cleaning. You can arrange furniture and call guests so that they appreciate the skills of a home master.
![]()
StrPort construction portal 2011-2018. Articles about repair, construction, building materials.
Copying information from the site is possible only with permission of the editorial office Or indicating a direct link to the source. Legal justification
Thank you.
Thank you.