At first glance, it seems that it is not difficult to build a cottage from foam blocks. But, not owning ...
|
|
Enough part in the process of flooring, such a material as chipboard is used. Among... |
Parquet is a very beautiful and practical flooring that is made ... |
How to align the concrete floor
The flat floor in any room is necessary not only from aesthetic motives, but also prevents the injury of the owner of real estate. The unpleasant look of the rickety cabinet cannot be compared with the overturning of a swinging TV or a fracture of the limbs as a result of a fall out of an almost flat place. Whatever the reason: the initial errors during construction or the appearance of potholes and cracks during operation - the question is how to align the floor? Sooner or later, he stands in front of the news and during the repair.
Table of contents
In modern housing construction, the basis of gender in the house, apartment, garage, office is concrete or concrete slabs. Depending on the purpose of the room, linoleum, ceramic or PVC tiles, parquet, laminate, carpet, and the durability of the external, often expensive coating are laid on top of the concrete base of the floor.
How to align the concrete floor
To obtain a durable base for the finish covering of the floor, the achievement of heat and noise insulation alignment is carried out either by the method of screed or by applying solutions of special mixtures for alignment of the floor.

The choice of alignment method depends on the size of the flooring of the floor and the material of the finished floor: with a floor level difference of 3-4 cm, a leveling screed of the concrete floor is performed; If the floor is generally even, but a large number of cracks are detected, then alignment is performed with self -growing mixtures or tile glue.
Experts distinguish several types of screed based on two main styling methods: dry screed and screed with the addition of various liquids.
Dry screed
A dry screed is easily performed even by a beginner builder, it is cheaper and significantly insulations the room. As a filler, expanded clay, dry quartz sand, polystyrene foam are used. Plywood is laid on top, gypsumous moisture resistant sheets (GVL) or wood plates (chipboard, fiberboard), so a dry screed is more often in living rooms.

The cleaned floor is impregnated with a primer, strengthening concrete and increasing its waterproofing properties. You can use concrete contact. After drying, lay a layer of polyethylene (more than 50 microns) films, joining the panels overlooking 18-20 cm and gluing them with tape. A 12-15 cm is left on the walls and glued with a dumpfer ribbon.

In the absence of the necessary experience, it is advisable to lay the P-shaped profiles upside down on the floor, setting them in level, upside down. Having covered part of the filler into the formed cells, they align it with the rule and lay the sheets of the future sex, gluing the joints of the GVL with PVA glue and tightening with self-tapping screws after 18-20 cm.
At the walls, the edge of the gypsum -fiber sheets is cut off. Do not pay attention to the apparent instability of the first sheets, when they are fetled into a single monolith, a strong warm floor is obtained.
Cement-sand screed
Thinking, the better to align the floor, the majority is inclined to the classic version of the cement-sand screed, which gives a strong even base for the finish layer of the floor. The thickness of the future screed should be at least 3 cm, otherwise the strength is reduced significantly.

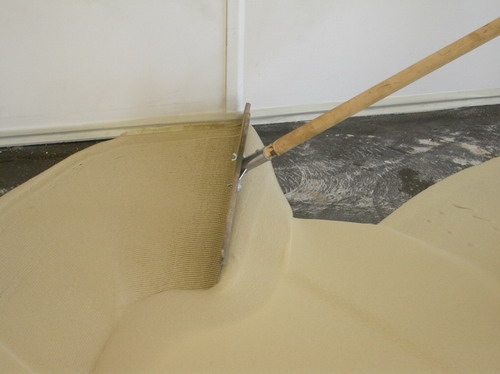
The concrete base is also cleaned, primed and dried. Using the usual, water or laser level, lighthouses are installed using a laser level, you can install lighthouses without assistants. Lighthouses mainly put durable metal rails or T-shaped profiles, but you can use pipes, a rubberized board or a beam.
Recks are installed on a thick solution, at a distance of no more than a meter from each other. The solution must be frozen, otherwise, when leveling the screed, you can move the beacons and all the work will go down the drain.

Subsequent work does not require experience, but patience: pouring the solution sequentially from the far corner, the floor is thoroughly aligned with the rule, moving it not only along the rails, but also making movements with the hands around the circumference. In this case, the solution moves to the right and left, compacting and filling the voids.

For the preparation of the solution, the cement of the M500 brand is most often used, adding to one part of its three parts of the sifted sand and water (about 1 liter per 1 kg of cement). You can also use ready -made leveling mixtures for the floor available: M150, M200, M400. The larger the number in the name of the mixture, the stronger the resulting coating. Prepare solutions in accordance with the instructions available on the bag.
The next day after laying the day, the screed must be slightly moistened with a roller, on the second day they are repeatedly moistened and the strength of the solution is checked. If you can already walk along it, beams carefully pull out and all the resulting voids are wiped with a fresh solution.
The screed is covered with a plastic film and, periodically moisturizing over the next week, withstand until hardening at least 2 weeks, and better than a month.
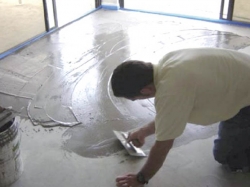
Self -leveling mixtures
Along with the strength and relative cheapness, the leveling of the floor takes a lot of time, which modern self -leveling mixtures are devoid of, often called bulk floors or smooth mixtures. The upper coating can be installed after 10-12 hours, and the completely bulk floor gains its characteristics within 12-14 days.

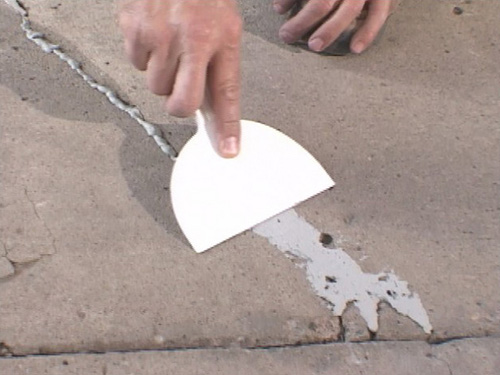
Such mixtures can be used with a drop in heights of not more than 3 cm, focusing on the instructions attached to the bags with mixtures, since the further strength of the coating is more dependent on the chemical filler of the mixture. Deep (more than 6 mm) cracks and recesses must be preheated with a solution and dried.
An equal mixture diluted and disgusted and primed concrete is poured and leveled with a metal spatula. After that, roll the bulk floor with a needle roller, removing the smallest air bubbles that reduce the strength of the floor.
It is necessary to perform the work together, since the mixture grabs after about 10 minutes. If necessary, slow down the speed of solidification, the floor is pre -slightly wetted with cold water, which also avoids cracking of the bulk floors.
The small thickness of the finished floor allows it to be widely used in rooms with low ceilings. Along with the high cost, the negative characteristics of self -leveling mixtures include fragility and weak resistance to low temperatures of epoxy mixtures; mixtures based on polyuretenes of non -chemical effects; Methyl methacryl are demented to abrasives.
Sometimes small cracks or irregularities are found in the floor, in this case you can level the floor with tile glue, given that, for example, ceresit can crack with a thickness of 3 mm. It is undesirable to use the full alignment of the floor with tile glue, replacing it with a bulk floor, despite the cheapness of glue.

When deciding for yourself, in what way or what mixture to align the floor, it is necessary to take into account the temperature and humidity of the room, the difference in the level of heights and the slope of the concrete base, the estimated loads during the operation of the floor, labor and financial costs.
![]()
StrPort construction portal 2011-2018. Articles about repair, construction, building materials.
Copying information from the site is possible only with permission of the editorial office Or indicating a direct link to the source. Legal justification