There are many insulation materials, the largest sphere of application has ...
|
|
There are two options for arranging woody floor ceilings: on beams and in lags ... |
Modern production technologies provide the opportunity to make ... |
How to lay chipboard on the floor correctly. Do -it -yourself recommendations for laying chipboard, the main stages and features of work on laying chipboard with your own hands
DSP acts as leveling material for finishing flooring. It must be laid on the plank floor, on the lags and on the concrete base. But because of the properties of the material, absorb moisture, it is necessary to use it only in dry rooms and accurately observe the installation technology of all layers of the finish floor. In the article, we consider the features of laying chipboard on the floor of different material.
Content:
- Using chipboard for the floor advantages and disadvantages
- DSP or plywood on the floor, what to choose?
- Features of the use of chipboard for the floor
- What is the difference between the usual chipboard and a dumped
- Which chipboard to choose for styling on the floor
- How to calculate the number of chipboard for the room. The main sizes of the material
- How to lay chipboard on a concrete base with your own hands
- How to lay chipboard on lags
- What is a dodgy chipboard
- Features of laying a laminated chipboard with your own hands
Using chipboard for the floor advantages and disadvantages
A large number of advantages made chipboard a popular material for black flooring.
- If the layout of chipboard is carried out directly on the lags, then the cost of the floor will be much less than when using a trimming board.
- The plates have a flat surface and are suitable for laying laminate, tiles and parquet.

- DSP has high strength and rigidity. By the characteristics of compression strength, it is almost equal to wood.
- Provide sound and thermal insulation.
- It can be laid on glue, as the chipboard has high adhesion.
- Laying plates refers to easily executive work that do not require skills and special tools.
- It has a long -term operational period and is little subject to decay.
- The design of the chipboard provides a compensation layer, it will protect the seams of the floor material from destruction under poor operational conditions.
But chipboard has disadvantages
- In the manufacture of plates, formaldehyde harmful to human health is used.
- They have low moisture resistance, so their use is limited. When getting wet, the sheet swells and crumbles. Moisture -resistant chipboard can withstand no more than 4 soil cycles.
- It is necessary to transport neatly due to the high fragility of the edges. Often they break off, and the docking will no longer be dense.
- The Russian chipboard, which is used everywhere due to low cost, is fire hazardous.
- Due to the low density of the material, it is better to use screws, since the nails will not fix it strong enough.
- It needs mandatory finished coating, since the material is not resistant to abrasion.
DSP or plywood on the floor, what to choose?
- Plywood is more expensive, unlike chipboard.
- The plywood is made of veneer, and chipboard made of chips. Therefore, plywood is more resistant to moisture and mechanical loads.

- DSP has a castle connection and is already with a decorative laminated coating, plywood is suitable only for a black floor.
- DSP has a phenolic component that provides for the manufacturing technology of these plates. Plywood may contain, or may not contain phenola harmful to humans.
Features of the use of chipboard for the floor
- DSP is a slab material. It is made of wooden chips and resins by pressing. Despite the excellent characteristics, you can not use it for flooring on the floor in all cases.
- It can only be used for residential premises, where humidity does not exceed 60%, and the air temperature does not drop below 10 degrees.
- You can not use in crowded places or in those rooms where a high load will be on the floor. DSP can deform and begin to collapse.
- It is perfect for leveling and insulation of the plank floor for laying the finish flooring.
- When arranging the lag for chipboard, the resulting space is additionally insulated and soundproof.

- This material is perfect if the apartment or house needs to restore the old floor, but there is no possibility to dismantle it or make a screed.
Tip: If the sheets of chipboard have green color, this means that instead of formaldehyde, urea-melamid resin was used. Which not only improves moisture resistant characteristics, but is also harmless to humans.
What is the difference between the usual chipboard and a dumped
- Sheets of the downtime chipboard have a spike/groove system, which will become a guarantor of strong seamless joints.
- The presence of crests and grooves in the keyboard also reduces the installation time, and the connections are especially strong and less susceptible to deformation at high load.
- They are used as an additional strengthening of the flooring, for example, on model catwalks.
Which chipboard to choose for styling on the floor
DSPs have a marking in the strength class. Before buying, you need to carefully read it.
- DSP PA. These are sheets with the greatest strength. They are simple and laminated. Suitable as a finish coating in rooms with small cross -country ability.
- DSP density less than 550 kg/m3 is used for the black floor of the coating and as thermal insulation.
- DSP with a density of 500 750 m/3 is recommended as a base for laminate and parquet. It levels the floor and has sufficient strength to lay on the lags.

- According to the degree of safety for human health, chipboard is divided into E-1 and E-2 classes. They indicate the content of formaldehyde within the norm. But in any case, they are not recommended to be used as a finish coating, but used as a black base.
- DSP with a density of 750 kg/m3 is more moisture resistant. It can withstand 2-3 windings without losing its technical characteristics. This is important if there is high humidity from below (in the basement).
- A special marking also speaks of the moisture resistance of the material. So, the plate with the designation P5 is the most moisture -resistant with complete wetting during the day it swells no more than 10%. Material with designations P3 and P6 swell much stronger and suitable only for dry rooms.
- The skinny a sheet of chipboard, the greater the step is allowed between the lags. It is better to choose the thickness of 2.4 mm. DSP 1.6 mm is suitable only for laying on a continuous base (plank or concrete floor). But the changes in height should be minimal up to 2 mm.
How to calculate the number of chipboard for the room. The main sizes of the material
In accordance with GOST, the length of the plate can be from 1830 to 5680 mm, a width of 122 mm, a thickness of 10 to 38 mm.
The most popular chipboard plates, which can most often be found on sale have the following sizes:
- length 2750 mm, width 1830 mm, thickness 16 mm;
- length 2440 mm, width 1830 mm, thickness 16 mm.

To calculate the required number of chipboard sheets for the room, you need to make simple calculations:
- first, it calculates the area of \u200b\u200bthe room with multiplying the length by the width, for example, take a room of 5x3 m. The area of \u200b\u200bthe floor will be 15 m2;
- next, the area of \u200b\u200bone sheet of chipboard 2.75x1.83 \u003d 5.033 m2 is calculated;
- now you can find out how many sheets will be needed, for this, we divide the floor area into a sheet area 15: 5.03 \u003d 3 pcs. (rounded, taking into account indentation from the walls).
How to lay chipboard on a concrete base with your own hands
If it is supposed to lay chipboard directly on the concrete floor, the screed should be in perfect condition. If it is old, then all the irregularities, cracks and changes in heights must be leveled. And the finish coating will quickly become worthless.
- Before laying, the prepared screed is cleaned not only of garbage, but also with a construction vacuum cleaner. If wet cleaning was carried out, the base is given time to dry completely.
- Before laying sheets of chipboard, they are treated with moisture -resistant impregnation. Olifa is suitable for these purposes.
- When the processing is finished, they are laid on the floor in a checkerboard pattern. To prevent the creak, small gaps are left between the sheets.

- The walls also make a small indentation 1 cm. The last sheets are cut according to the desired size by an electrician.
- To concrete, the chipboard is attached to the dowel-grooves using a perforator. There are 14-16 fasteners per sheet, which are evenly distributed at the edges, angles and the center.
How to lay chipboard on lags
Wooden lags are used if the house where work is carried out has a wooden floor or concrete slab is badly damaged and there is no way to produce a new screed. This is a more time -consuming and expensive process, but it has a number of advantages:
- you can additionally insulate the floor and make noise insulation by laying mineral wool in the space between the lags;
- under the floor, additional communications are secretly carried out;
- the resulting surface will be almost perfectly flat.
Tools and materials for laying chipboard on lags with your own hands
For work you will need:
- wooden bar for the lag;
- dSP plates with a thickness of 12 mm;
- building level;
- roulette;
- screwdriver and punch;
- electrician;
- dowel-gvo and wood screws.
Stages of work
- It is advisable to put a moisture -resistant material with a film under the lags or smear concrete with liquid mastic (primer).
- The lag at the door passage should be the greatest strength 5-6 cm thick.

- In order for the lags to stand smoothly, the level (preferably laser) is made around the perimeter of the room. Focusing on it, boards-lags are attached from the opposite ends of the room. The twine is pulled along them, which will become a guide to all subsequent lags.
- If you need to do some higher, then a piece of chipboard, plywood or OSP is laid under it. The step between the lags is observed the same, and so that all the joints of the sheets are in the center of the boards. Maximum step 40 cm.
- Brushes are attached to the anchors using a punch.
- In the resulting space, you can lay a heater. If noise insulation is also needed, it is better to choose mineral wool, and if you just heat insulation, then foam crumb or ecowata, which fill the entire space. To do this, use wide boards, fixing them with self -tapping screws perpendicular to the direction of the lag with a step of 50 cm. The lattice and very strong base is obtained.
- DSPs with a tent of 10 mm are attached to the crate. If necessary, the edges are cut so that the joint comes in the middle of the label boards. The sheets are located in a checkerboard pattern, the gap between them is also made in 10 - 15 mm.

- Self -tapping screws are often twisted, with a step of 20 cm along the entire area of \u200b\u200bthe sheet.
- For reliable fixation, the length of the screws should be three times greater, the width of the chipboard. When twisting, the hats should be 1 mm drowned into the material.
- It remains only to lay the substrate and mount the finish flooring.
Tip: with improper laying, when the sheets are placed close to each other without a locking connection, after a while a creak appears. How to prevent chipping chipboard on the floor when laying with your own hands? Very simple, between the sheets they must leave gaps of 1 cm. There are no joints, no creak.
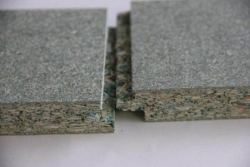
What is a dodgy chipboard
Spooned chipboard slabs have a spike/groove lock. It is made from all 4 sides, which guarantees a dense and strong connection. In addition, it facilitated the assembly, it will be performed efficiently, even if the layer does this for the first time.
Thanks to this, the dodgy chipboard acquires a number of advantages at once:
- simple and quick installation, which is available even to a non -professional;
- absolutely smooth surface, without gaps;
- if necessary, fast and simple dismantling;
- it has high strength characteristics for a fracture and pressure. The roped chipboard laid on the lags with a step of 40 cm without deformation, deflection and the appearance of the creak withstands a high load;
- the spike/groove system evenly distributes the load on neighboring plates through the lock connection, which makes the coating even more rigid.

DSP is also used to level walls and ceilings instead of drywall. To do this, use slabs 9 -12 mm. It will be a great base for any finish coating: plaster, wallpaper, tiles. And unlike GKL, the bearing capacity of such walls is much higher.
Most of the manufacturers of the Spunted chipboard make their material more resistant to moisture than ordinary. But there are no features of laying a moisture -resistant chipboard with your own hands, all work is performed according to the usual technology, which will be described below.
How to lay a moisture -resistant chipboard with your own hands video
Features of the use of a downtened chipboard with your own hands when laying on the lags
- Having checked the horizontal evenness of the lag, they begin to lay the first sheet of the dodged chipboard from the far wall. That is, from the opposite wall from the entrance. Fix it with self -tapping screws to the lag behind the spike. Along the perimeter, the step between the mounts is 20 cm, 25-30 cm is allowed in the center of the sheet. Twisting screws, the hats are deepened by 1 mm.
- Before putting the second sheet, on the spike laid along the entire length, PVA glue is applied. This will make the connection more sealed and dense. The next plate is inserted with the groove and the connection is pressed so that the glue is evenly distributed. So that the spike enters the groove to the end, a bar with a groove is applied to the mounted sheet and knock on it with a hammer. Thus, when adjusting the sheets, the material and the connecting element will not be damaged.

- This method is laid the entire floor. All joints are located strictly on the lags. If the draft floor from the chipboard is made in a narrow room, the lags should be located across the movement.
Features of laying a laminated chipboard with your own hands

- Laminated chipboard already has a decorative and durable upper layer. Therefore, it is used as a finish coating for the floor, walls and ceiling.
- Such plates necessarily have a locking connection so that the flooring turns out to be whole and even.
- To protect joints from swelling, when moisture gets on them, all compounds are glued with glue during laying. And after laying, on top, all joints are treated with paraffin. An ordinary white candle is suitable.
![]()
StrPort construction portal 2011-2018. Articles about repair, construction, building materials.
Copying information from the site is possible only with permission of the editorial office Or indicating a direct link to the source. Legal justification