Crossing structures must meet the requirements regarding strength, ...
|
|
Insulation of the front door contributes not only to minimizing heat loss, but also ... |
The double -glazed window is the most vulnerable window element. Modern wooden ... |
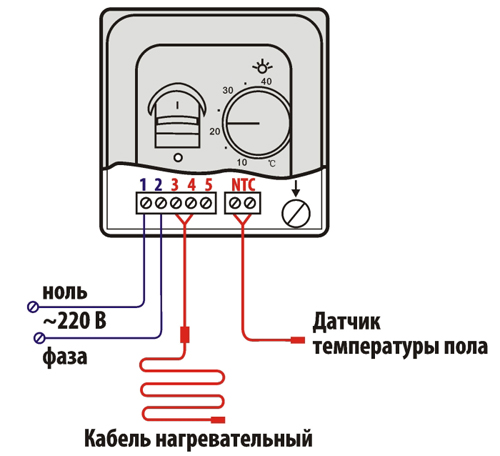
DIY Electric Warm Paul

The heat of the hearth is still sung, probably from the cave times. It attracts us to itself at any time of the year and day. But when the cold begins, we begin to perceive it in the literal sense. Autumn slush and freezing, winter frosts, spring thaw - all these natural phenomena make us remember about a warm and cozy house where you can warm ourselves with both soul and body. However, the temperature is not always comfortable in our house. Of course, in autumn and in the spring, many use electric heaters, but also pay for this in full - both for electricity and their own health. But there is already a way out! And this is the connection of a warm floor. And what? The device of warm floors has long been known for a long time, and we can do a warm floor with our own hands.
Content:
- The general scheme of the warm floor of the electric
- What to pay attention to when buying a set of warm floor
- Installation of a warm electric floor
The general scheme of the warm floor of the electric
And by the way, what exactly do we know about the device of an electric warm floor? Those who have never thought about this question can answer the simplest phrase: heating the floor with the help of electricity, and will be completely right. But this does not explain the technology itself. Therefore, let's now look at information from specialists. So, the most ordinary structure of the electric warm floor looks like this (we go from the lower layer):
- chernova (main) concrete floor - we try to ensure that the floor is quite even, without obvious tubercles and cavities, otherwise you can burn the cable
- non -melting thermal insulating substrate under the warm floor - polyethylene or polystyrene foam with a reflective (foil) layer, the thickness of thermal insulation is selected depending on the temperature load
- fixing system - reinforcing mesh or mounting tape
- heating cable with a temperature sensor of a warm floor that supplies information to a thermostat
- a cement-sand screed or pouring with a special mixture for warm floors, its thickness ranges from 3 to 5 centimeters
- the finish flooring, for the most part, is tiles, but there may be other coatings

Here is such a pie in the end
Many are afraid that due to so many layers, a significant part of the living space is eaten in our apartment, because the floor rises about 8-10 centimeters. But this is far from always the case. Think, if we equip the warm floor, we start with a concrete base, then the height of the warm floor does not look so impressive at all. Why? Very simple - remove your wooden floors, remove the lags and you will see that the space for a warm floor has just appeared. It is worth worrying only to those owners who have already lowered their gender, for example, laying linoleum or parquet directly on concrete. But even they should think that it is better to walk on the cold floor or still sacrifice ten centimeters of height for heat and comfort.
What to pay attention to when buying a set of warm floor
We already see that the general scheme is quite simple, but with materials you need to understand in more detail. You can, of course, buy a finished set, for example, a warm floor Tepllyux. But it is still better to understand what you buy, so to speak, in order to avoid excesses. Therefore, consider the varieties of the heating cable. For most people who want to enjoy home warmth, the most useful information will be the breakdown of any electric warm floor into two categories:
- paul formed by independent laying of the heating cable
- subtle floor with heating mats - a fiberglass with an already laid cable

Heating mate with a cable laid in the glass -shock
What is the difference? There is no fundamental difference - there is a cable, and there. But if the first option gives us greater freedom both in heating mode and in various cable configurations, then in the second version we have much simplified the installation process. And the most important difference will be the ability to use a separate heating cable for the main heating system and for additional. But mats are often used only as additional heating, for example, as a warm floor for tiles in the kitchen or in the bathroom.
What else do you need to know about the heating cable to increase the reliability of the warm floor? Let's start with the division of cables into resistive and self -regulating.

The resistive cable consists of one or two heating cores with increased resistance. It is called that - one -cereal or two -core. The design of the two -core heating cable is indicated in the figure. Why are we talking about two -wire? The fact is that the two -core cable is not only easier to install, but is also much better equipped with a system for dispersing electromagnetic radiation, which is in any energy system. Previously, this radiation was considered a solid disadvantage of the use of an electrical heating system of floors due to the harm caused by human health. At the moment, studies have shown that this is another myth, and the value of such radiation is so small that it can not be taken into account. Especially if when installing a warm floor we use a two -core resistive cable.

A self -regulating heating cable has a slightly different structure (in the figure it is indicated in sufficient detail), thanks to which an independent regulation of the current strength affecting the heating element occurs throughout the cable. Due to this ability, the cable cannot overheat any section and violate the entire heating system, unlike resistive. Although if the usual two -core cable is properly laid, then it has a similar opportunity very small. However, the great reliability of a self -regulating cable, which allows not to think about repairing a warm electric floor, affects both its popularity and price.
Given this information, the choice of a set of warm floor becomes more justified.
Installation of a warm electric floor
The most important thing in the formation of a warm electric floor is to correctly calculate the power of the heating system in relation to a particular room. We remember that the temperature of the electric warm floor should be taken into account when selecting not only cable, but also flooring. And the general data on premises of various types is usually the following:
- for the bedroom - from 100 to 150 W/sq.m
- for the corridor, kitchen and hallway - 150 W/sq.m
- for a bath and toilet - 180 W/sq.m
- for loggia or balcony - 200 W/sq.m
However, it is still better to use the services of a specialist who can accurately determine the necessary power and even choose and check the desired cable. By the way, the electrical circuit of the warm floor should also be compiled with the participation of a specialist, his help will be needed for connecting the system, and for a separate reinforced wiring line from the distribution shield. Purely installation work remains for our share.

Well, start work? Here is the plan of our actions during the installation of a heating cable:
- we determine and prepare a place for installing a thermostat and wire eyeliner
- we carry out the preparation of the draft floor (if necessary, we align)
- we glue the damper tape around the perimeter of the room
- we lay thermal insulation
- install the mounting tape (with a distance of half a meter) or reinforcing mesh
- distribute and fix the heating cable
- we mount a temperature sensor for a warm floor in a corrugated tube
- check the integrity of the cable and carry out the connection of the heat regulator of the warm floor
- measure the resistance or make a trial inclusion of a warm floor
- we fill the warm floor with a prepared cement-sand mixture
- we lay the finish flooring
Nevertheless, we also add a video with a demonstration of installation of heating mats.
It would seem, once, two and everything is ready, isn't it? But there were still some little things.
Firstly, when compiling a scheme for the location of the heating cable, you need to take care in advance so that the cable does not fall under bulky furniture (furniture on the legs may well stand on the heated area), otherwise we can get overheating of the cable and, as a result, early repair of the warm floor. And who needs it?
Secondly, after filling the warm floor with a concrete screed, you must wait for its complete drying. The standard time for this process is 28 days. The inclusion of a warm floor before this time can lead to cracking of the screed or the formation of cavities in it. But these troubles threaten us with uneven heating of the floor, burning out the cable and, again, unnecessary repairs to anyone.
Well, finally, it is worth recalling the exact following instructions attached to the warm floor. True, it is still better if there is a specialist next to you who can take into account all the little things. Otherwise, the saying of the stingy pays twice can be embodied in a harsh reality.
However, to intimidate masters who easily cope with any repair was not at all part of my plans. By no means. I just want you to understand - the ability to correctly evaluate your strengths and capabilities greatly affects the quality of work. If you are not familiar with electricity and installation-repairing work, you can be calm: you will succeed! And let your family enjoy warmth and comfort created by your hands.
![]()
StrPort construction portal 2011-2018. Articles about repair, construction, building materials.
Copying information from the site is possible only with permission of the editorial office Or indicating a direct link to the source. Legal justification