To date, many owners of housing in apartment buildings are thinking ...
|
|
The garage is the second house. At least for a man. And if the apartment is in order ... |
Among the positive qualities of ceramic tiles, its practicality should be noted and ... |
Step tile cladding: step -by -step instructions

The highest load when walking the stairs takes on the steps. Therefore, it is very important to protect them from destruction, make the design as resistant to wear and strong as possible. Facing steps with tiles solves the tasks. At the same time, such a technology is considered a rather complicated process that requires certain skills from the contractor.
In the article we will tell you how to choose the right material for the design of the steps, describe the sequence of laying the tiles, as well as give practical tips for finishing the stairs.
- Compliance with the technology of facing facial guarantees of high -quality and safe masonry
- Choose tiles for steps: clinker, ceramic or concrete coating
- Methods of finishing end joints
- Stage finishing sequence:
- Recommendations for staircase trim
- Facing steps: design options
Compliance with tile laying technology the key to high -quality and safe facing facing
Terras, wings and outer steps are quite complex in facing. Without certain skills in working with tiles, the material may crack, fall off, and the steps themselves can be a place of increased injuries.

The steps are subjected to mechanical load. In addition, the effect of rains, snow, dust, heat or frost is constant. All of these factors affect the stability and integrity of the coating.
When conducting finishing work outside the room, it is important to comply with the following conditions:
- The steps and the base of the porch should be made of reinforced concrete or concrete. Shrinkling, cracks and backlash are unacceptable.
- The design must be protected as much as possible from moisture: ensure waterproofing of zones in contact with the soil and expand the overhangs of the roof.
- For work, quality materials should be used: primer, grout and adhesive composition.
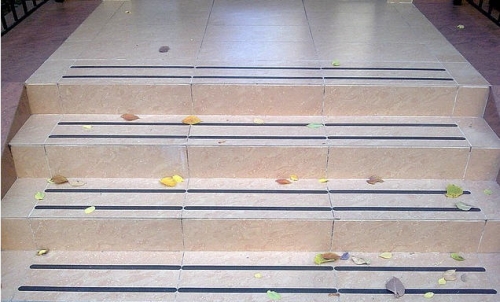
- It is necessary to protect the rise to lay down the anti -slip pads or use tiles with notches for cladding.

Choose tiles for steps: clinker, ceramic or concrete coating
Different types of tiles are used for facing the steps. The arrangement of stairs is most often performed by clinker, ceramic or concrete tiles, less often by natural stone. Consider the features of each coating.
Clinker tiles It is considered the best option for facing steps. In fact, the clinker is a variety of ceramics. Slender clay of a special type passes the firing and pressing at a temperature of +1200C.

Before conventional ceramics, the clinker coating has several advantages:
- high impact resistance and wear resistance;
- long service life;
- low level of moisture absorption;
- frost resistance of the material allows the use of tiles for external work;
- the safety of the use of the tile surface is not slippery.
The clinker receives high technical and operational characteristics thanks to production technology. A protective layer is formed on the surface of the tile, which is practically not polluted, retains its color and lends itself to cleaning with any abrasive and chemicals.
Ceramic tile Presented on sale with a large assortment. The coating can have a different surface: structural, glossy, embossed, glazed, convex or concave.

Here are some recommendations for choosing ceramic tiles:
- The optimal size of ceramic tiles is 30*30 cm or 30*60 cm. In this case, the tile corresponds to the size of the step and does not need pruning.
- For facing the steps on the street, it is better to choose a ceramic coating of double firing. The use of this technology adds tiles of resistance to external factors and mechanical stress.
- The tile strength class should be at least 5, at least 4 abrasion resistance (category according to rei).
Concrete tiles For porch facing, it has the following properties:
- Moisture resistance. The concrete solution in the production process is pressed and fired, it removes the pores from the structure of the material and makes the tile dense.
- Practicality. Concrete cladding does not absorb pollution, which greatly facilitates the care of the coating.
- Wear resistance. Throughout the entire service life does not change the structure and appearance.
- Duration of operation. Tiles withstands significant physical activity and various natural factors.
The concrete coating cannot be cleaned with chemical products, the structure of the tile may begin to deform
The steps can be lined with artificial (porcelain tile) or natural stone. Part graying tiles Different varieties of clay, quartz and field sparks are included, which give the material special strength and reliability. The price of artificial stone coating is slightly higher than for ceramics.

Recently, the cladding of stairs has become popular granite and marble. Both materials are moisture -resistant, practical, able to withstand any loads. Natural stone does not respond to temperature fluctuations and has an almost unlimited service life.

Among the disadvantages of marble and granite include their high cost and complexity of installation due to the high weight of the tile.
Methods of finishing end joints
Particular attention when facing the tiles of the steps must be given to the edges and outer corners. The appearance of the cladding largely depends on the quality of the joints. There are several ways to design end joints. Here are the most practical.
Mounting tiles with overhang This is an inexpensive and simple option for cladding. Front tiles of the tile are laid with a small overhang above the edge of the step. In this case, the size of the overhang is equal to the thickness of the tile. The front edge of the coating in this case should be glazed.

The sequence of laying tiles with an overhang:
- Glue the tile to the vertical side of the step (approximate) and combine it flush with the edge.
- Put the tiles on the horizontal surface of the step.
- The glazed edge of the tile and the approach should not contact.
- Wipe the seam between the cloudy and the approach.
This method of facing is not advisable to use in places with high cross -country edge of the steps can be strongly worn out and collapsed over time. It is advisable to use over the overhang to be used when covering the stairs with clinker tiles or natural stone
Installation of plates with a safe edge Reduces the likelihood of slipping when walking. Relief plates are mounted along the edge of a dormant with a small overhang.

To improve the decorative qualities of the staircase indoors or street, slabs with a rounded front edge are used. The surface of the coating can be smooth, embossed or rough.
Using corner tilesthe installation process significantly fits. Tiles with a shelf (side) are bent at right angles. The profile of ceramics with its upper side covers the upper part of the impress and captures part of the approaches.

There are special ones corners and overlays for decorating edges steps. They are made of ceramics or metal (aluminum and stainless steel). Metal corners on top are supplemented by inserts from soft PVC this layer ensures the safety of the steps.

Metal overlays are screwed to the steps with special dowels or screws, ceramic corners are planted on glue.
Stepage sequence of steps with tiles
Consider the algorithm for the preparation and laying of tiles on the porch and adjacent steps.
Tools and materials
So, for work it is necessary to prepare such tools and materials:

- spatula and trowel;
- rubber spatula;
- electric drill;
- glass cutter;
- roulette and ruler;
- a hammer;
- crossings for tiles;
- cement (M200 and above);
- sand;
- pVA glue;
- tile.
Preparatory work
Before the start of the cladding, a number of preparatory measures must be performed:
- Level the porch with screed, giving it a slope of 1.5-3 (about 2 cm per linear meter of coating).
- Find deep cracks on the steps. The arrangement of the slope is performed directly during the installation of tiles.
The procedure for creating a slope on the finished concrete porch is as follows:

- Put a metal mesh on the surface. You can use a rib of a rod with a thickness of up to 4 mm.
- The installation step of a metal wire 20 cm. The net is attached with mounting brackets or dowels.
- Put the lighthouses. It is better to make them from sand and tile glue. With this option, the entire preparatory design can be poured and walled up with a screed.
- Apply a layer of solution and tile glue to the created frame. The work is performed in the direction from the front door to the first stage.
- Leave the processed surface until completely dry (24 hours).
Laying tiles on the porch
After the day after pouring concrete, the surface of the porch should be sanded, all the ledges are wiped and defects. Further work is performed in the following sequence:
- Clean the surface of the porch (accommodate, take out construction garbage).
- Generate the concrete surface. You can use special soil or aqueous solution of PVA glue.
- Leave the primer for complete drying (about 30 minutes).
- Lay the tiles on the porch. It is necessary to try to make the surface as much as possible with whole elements. The layout is made from the door. Small sections are acceptable around the perimeter of the porch (at least 20-30% of the overall sizes of the tiles).
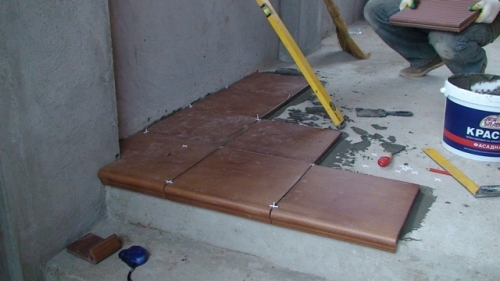
- Put the tiles on a thin layer of tile glue (layer thickness of not more than 1 cm). The gaps between the tiles should be filled with an mounting solution.
- If the tile is not fixed firmly, then it must be removed, checked by the adhesive composition and re -lay down.

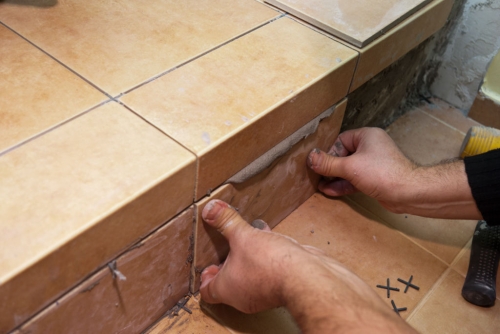
Preparation of the approach, laying tiles and cladding of ends
After facing the porch, you can start laying tiles on the steps of the stairs.
- The design of the first one is on top. For a strong docking of tiles on the porch and the approaches, you can use a special stencil. The tool is a corner with a small neckline under the thickness of the tile tile.
- If approached a very deep (more than 3 cm) it must be reinforced with cutting of reinforcement or a metal net.
- While the first end of the step dries, the tile on the horizontal surface is mounted. Trying on the coating without glue Assessment of the appearance and consumption of material.
- During laying, it is necessary to withstand a small slope for water drainage (2-3).
- After facing all the steps, you can begin to design the ends. Laying must be started with the corners to avoid symmetry disorders.

For cladding the ends, different material is suitable: ceramic tiles, decorative mosaic, granite, marble or various tiles
The final stage
A day after the end of laying the tile coating, you need to wipe the seams. As a grout, a solution based on liquid glass or special compounds of frost -resistant jackets, designed for external use, are used. The turns and angles of the steps can be decorated with metal corners, protective rubber rugs and an anti -slip coating.
General recommendations for staircase trim
Here are some tips that will help improve the quality of the facilities:

- Installation work is preferably carried out at a temperature of 20C.
- The optimal width of the seams is 3-4 mm.
- To apply glue to the tile, it is better to use a gear trowel.
- In order to fix the tile firmly in the right position, after masonry, it must be tapped with a rubber hammer.
- Traces of glue must be removed from the tile in a timely soft sponge moistened in water.
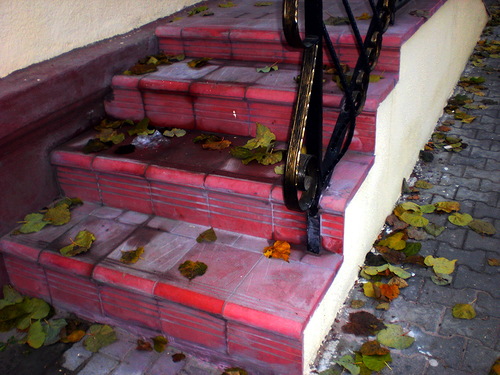
Facing steps: design options
Design of steps with clinker tiles in combination with natural stone.

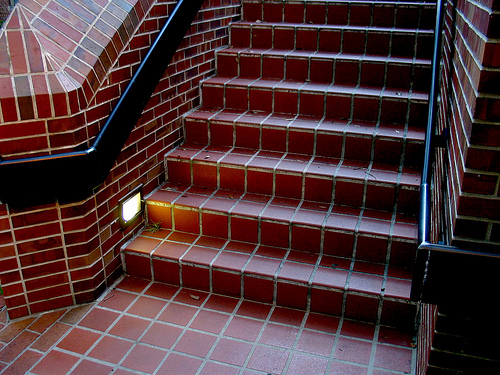
Finishing the concrete staircase with tiles.
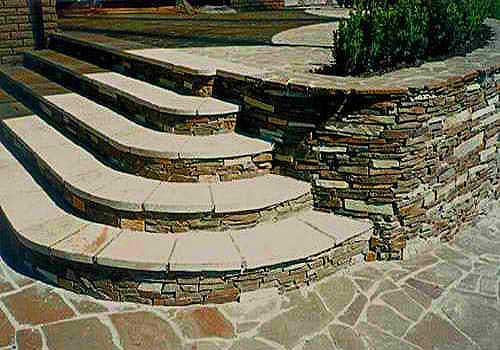
Steps in the classic style. Getting natural stone.
Unusual decoration of the stairs. The approaches decorated with decorative mosaics form a whole pattern.

A single stylistic solution for the porch, steps, railing and walls of the room.

![]()
StrPort construction portal 2011-2018. Articles about repair, construction, building materials.
Copying information from the site is possible only with permission of the editorial office Or indicating a direct link to the source. Legal justification
mmia
mmia
I agree, this is not easy
I agree, this is not only beautiful, but also durable and firmly. It looks very good and rather rich .https: //mirkamnia.com/uslugi/otdelka-lestncy-granitom/
Discussing tiles, stairs and
Discussing tiles, stairs, etc. It is necessary to clearly indicate for which climatic zone they are, since for each recommendation they are different. In our climatic zone, it is better for the tissue and risers to be combined, for example, C3 steps.