The front door is a remedy that separates the personal space inside the house from the external ...
|
|
Copper roof is called roof coating made of sheet copper. Such... |
It is quite difficult to imagine any construction process without the use of crushed stone. His... |
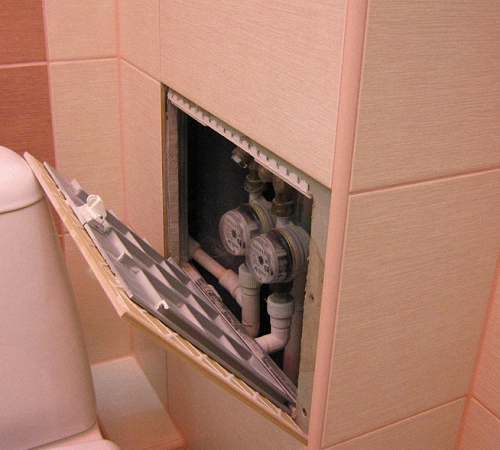
DIY tile hatch

The arrangement of an invisible hatch helps to make the appearance of the bathroom more attractive. It is in the hatch that all communication elements of the bathroom are hidden. Buying a hatch in a bathroom is an expensive process, and not everyone in force to afford it. But the manufacture of the hatch with your own hands is much cheaper, although it requires considerable effort and time. About how to make a hatch for tiles and how to install the hatch under the tile we will consider further.
Table of contents:
- Lukes for tiles: features, purpose and advantages of installation
- Varieties and photos of hatches for tiles
- Making a hidden hatch for tiles with your own hands
- Installation of the hatch for tiles: technology and instruction
Lukes for tiles: features, purpose and advantages of installation
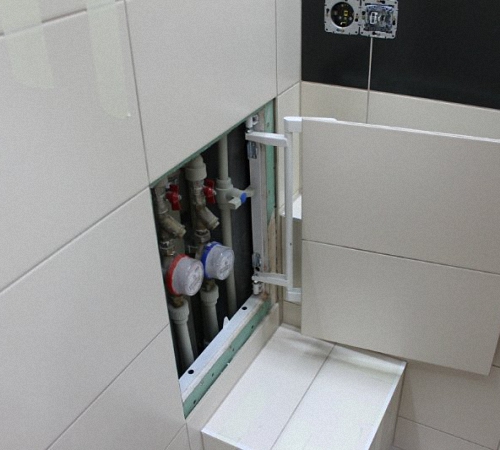
The main function of the plumbing hatch of invisibility is to hide all the communications in the room and ensure free access to them at any time.
The main advantage of the hatch for tiles, its invisibility against the background of the main interior. In addition, they combine the quality of functionality and simplicity.
Among the advantages of installing hatches for tiles should be highlighted:
- complete harmony with the interior of the room;
- preservation of the integrity of the cladding;
- the presence of strong doors allows you to use various kinds of finishing materials, including tiles;
- invisibility;
- duration of operation;
- simplicity of installation and structure;
- high level of reliability;
- Ensuring free access to the equipment of communication systems.

Varieties and photos of hatches for tiles
There are several varieties of hatches for tiles:
1. Lukes under the tile of a shift type.
This version of the hatch consists of:
- frames;
- doors;
- castle;
- external finishing layer;
- loops that connect it to the wall;
- adjusting mechanisms.

As the main element of the hatch is the frame mechanism, for the manufacture of which tubular steel or aluminum is used. Aluminum is most often used, since it is stable before corrosion, however, in cases where the hatch should withstand heavy loads, it must be made of steel.
Doors are most often made of the same materials as the frame. Its upper part is finished using moisture resistant gypsum fiber or drywall. And finishing materials are applied to it. The perimeter of the door is equipped with an insulating material that prevents moisture or air from entering the hatch. In addition, its presence protects the inner part of the hatch from the appearance of mold, dust or fungus.
The sliding version of the hatch differs from its other variations by the presence of a three -to -be design of the loops. Thus, the front and lateral opening of the doors is ensured. The loops will allow you to adjust the position of the door in two variations.
An important element is the presence of a pressure lock, with which the door opens very simply and without the application of special efforts.
The use of sliding hatches is recommended if it is installed in a small room. This type of hatch is great for decoration using tiles, porcelain tiles, mosaics and other finishing materials. If necessary, in ensuring free access to the communication system, this type of hatch is used. Opening this type of hatch is carried out using minimal stretching the door and taking it to the side. The installation of this hatch is carried out in the surface of vertical wall partitions, foam blocks, walls made of drywall, concrete, etc.
Such designs are great for both residential and public premises, and for installation from the outside of buildings. There are two variants of shift hatches:
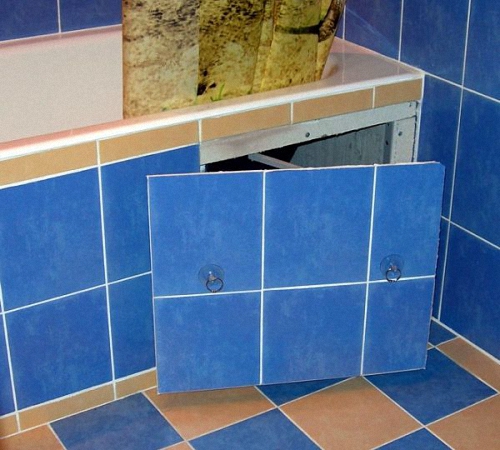
- hatches, which are opened with a sucker handle, are installed in the case of decoration of the room with materials;
- Lukes, click -type - are used when finishing with a mosaic, tiles with a embossed or matte surface, to open this type of door is not needed by a cloud handle, it opens with one press, in order to close this door it is necessary to provide its institution with a characteristic click.

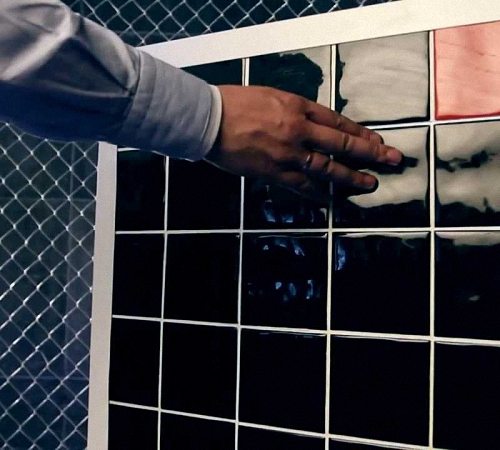
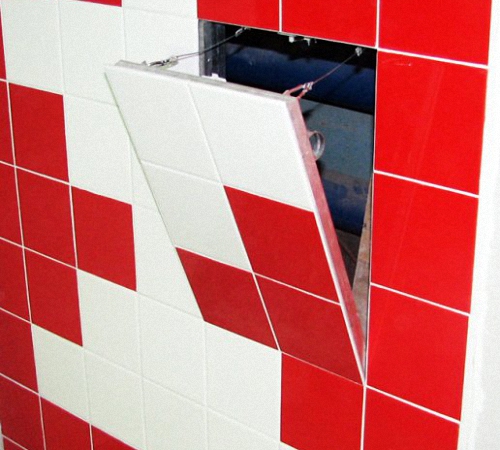
2. The hinged type of hatch - this option is especially popular, since its design is the simplest and resembles ordinary swing doors. Such hatches are used in the case of wall decoration in the bathroom or bathroom bathroom or smooth tiles. Revision hatches for the swing -type tile have colossal advantages over other varieties of hatches. It is this type of hatch that is most invisible after its installation. The tile is installed directly on the surface of the door.
This type of hatch is widespread for hiding water meters, thermostats, filters, siphons, etc. In addition, such a hatch will be a great place for arranging a safe or a secret shelf.
The design features of such a hatch include the following elements:
- welded frame;
- door frame;
- gypsum plate;
- holes for installing dowels and screws;
- The loops connecting the design of the outer frame to the door.
In addition, to fix the hatch in a certain position, it is equipped with special locking latches.
3. Lukes for tiles, pressure tiles are distinguished by high characteristics of the carrying capacity. Using frontal opening of the door, it is possible to prevent mechanical damage to the finishing material, in our case, tiles.
In relation to technical design features, such hatches consist of:
- a steel frame fixed in the opening using self -tapping screws;
- frames for the door, which is finished with gypsum fiber;
- a two -to -line loop that regulates the opening of the door in different positions;
- locking mechanisms.
With the help of loops, this type of hatch opens with one press. The door seems to be stretched out of the wall, thereby ensuring the invisibility of the hatch on it. The loops are designed in such a way as to ensure the decoration of the door with any of the materials, including tiles. This type of door opening is the safest of all of the above.
In relation to the location of the hatches, they are:
- Nasty - the most popular option, access to which is most easily provided;
- Floor hatches for tiles are more complicated in arrangement and operation;
- Ceiling - are extremely rare, although their arrangement is also possible.
The dimensions of the hatches for the tile directly depend on its internal filling, the number of communications and objects that are planned to be placed in it.
Making a hidden hatch for tiles with your own hands
To carry out this work, it will take a lot of time and effort, in the absence of skills in the manufacture of such devices, we recommend that you work at least together.
The easiest way to build an audit hatch is the use of furniture fittings, which is redone under the shut -off mechanism of the hatch itself. From the system you will need the presence of canopies and a pressure system, with which a light opening of the hatch will be provided.
For the manufacture of the door, a drywall or gypsum fiber with moisture resistant characteristics is required. If you plan to finish the surface in the future with tiles, then it is better to choose the option of gypsum fiber. It is this material that is characterized by higher adhesion with tile glue, and, accordingly, with the tile itself.
The assembly of the hatch is carried out directly at the place of work, as this procedure requires careful measurements and adjustments during the implementation of all instructions.
First you need to decide on the size of the plumbing hatch for tiles. When choosing a size, you should take into account the fact that the hatch needs to do as little as possible. Since the arrangement of a large structure makes no sense.
The size of the hatch directly depends on the type of communications to which access is required. For example, if it is planned to equip the hatch, for servicing a water meter, then for these purposes there is enough area of \u200b\u200bone standard tile, 10x10 cm in size.
If it is necessary to check the communications in the form of a siphon, pipes and so on, then the size of the hatch must be increased to such a size to provide unhindered access to them.
After determining the optimal size of the hatch, direct work begins on its creation. The easiest way to start with the manufacture of the frame that will be inside the hatch. Its manufacture is a fairly simple process that requires attentiveness to measure measurements. The frame is made of steel or aluminum corners and profiles. To connect them, you need a welding machine and experience with it.
Next, the finished design is installed in a niche and fixed in it using self -tapping screws. The next stage involves the manufacture of a door, for the frame of which it is enough to apply the OSP, sheathed with gypsum fiber or drywall.
The door should have the same size as the hatch.
Tip: choose the size of the door, taking into account the fact that it should fit whole tiles, with joints between them. That is, the door should be designed for one, two, four, six tiles.
Using OSP, try to choose a high density and thickness of at least 12 cm, since the tile requires a certain rigidity to fix it on the surface.
After the manufacture of the door follows the process of attaching to it, on which it will hold. Keep in mind that such a hatch is installed at the same distance with the wall, it cannot be deepened into it, since the integral appearance of the wall will be disturbed.
Keep in mind that the door emphasis should differ in maximum rigidity. After installing the door and shut -off mechanisms, the tile laying procedure begins. The first tile is laid directly from the bottom of the door. Take care of the thorough calculation of the vertical and horizontal rows of tiles. For these purposes, it is advisable to use the laser level. Do not grout the seams between the tiles laid on the door. This is what will be its only difference from the general interior.
The manufacture of a hatch for tiles with your own hands will be done qualitatively only if all of the above conditions are met.

Installation of the hatch for tiles: technology and instruction
There are several stages of setting the hatch for tiles:
1. Preparation of the opening.
The opening under the hatch should be cleared of dust and dirt, and its dimensions should exactly coincide with the parameters of the hatch itself.
2. Installation work.
Install the hatch on the previously prepared surface of the opening in such a way as to ensure the coincidence of the door of the door with the wall on which the tile will be located.
Please note that during the installation of a universal hatch having spring locks, you should put forward the hatch two, three millimeters above the wall. Thus, after pressing the hatch, the tightness of its fit will be ensured.
3. Luke's fixation.
This process requires fixing the hatch in the wall with dowels and self -tapping screws.
Tip: Before fixing the hatch, check its evenness several times to avoid damage to the appearance of the wall.
If the frame is made of steel, then elements are put into it in the form of wooden bars, which provide a strong connection and fixation of the hatch.
Next, the door is adjusted with special mechanisms that are provided for it to open it. A special kind of plugs are installed on the lateral sections of the frames that improve the attractiveness of its appearance.

4. Luke finish using a tile.
In the loop areas, a tile performance is allowed, a maximum of 4.5 cm. In other areas, a tile performance is allowed outside the door by a maximum of 30%.
Tip: To ensure maximum adhesion between the tiles and the surface of the door, it is recommended to treat the door with a primer before applying the glue. Keep in mind that the glue for tiles should be of high quality, if desired, the option of using liquid nails is possible.
It is forbidden to sticker tiles on the door of the hatch with tile glue on a cement basis, since due to the high weight of the structure, there is a risk of door deformation.
In order to provide even joints between the tiles in them, crosses are installed. Only after the glue is dry, they are removed from the seams, and the door opens through pressing.
To ensure sound insulation and sealing the door, glue a painting tape along the perimeter of the door. The gap is treated with sealant, after which the painting tape is removed.
Tip: a sealant should be on a silicone basis.
Please note that if the hatch has a pressure base, then not all space is filled with sealant, but only a seam of 3-4 mm. The sealant should by no means fall under the tile, otherwise, there will be problems with opening the door.
Using an elastic spatula, get rid of the excess silicone. Remove the tape after the sealant dries. After 48 hours, make a seam cut at an angle of forty -five degrees.
Tip: In order to facilitate the opening of the hatch during its operation, you should cut the tile located on the wall, and not on the door.
Lukes for tiles video:
![]()
StrPort construction portal 2011-2018. Articles about repair, construction, building materials.
Copying information from the site is possible only with permission of the editorial office Or indicating a direct link to the source. Legal justification
We turned to the company
We turned to the company Novosibirsk-Luki. I liked the big selection. The hatches are all pressed - just click on the door and the hatch opens. Yes, and the hatches themselves, better in constructive than in other places. The loops are not so flimsy, the door does not hang out and the size of the tile for the hatch is not critical. We have collection tiles 33.5 cm wide, so we bought one hatch 25 cm wide with lateral opening, and the second 30 cm with opening from above. Extra centimeters of tiles go to the wall. And they wiped the seam between the tiles of the silicone grout, and then cut it out between the door and the wall. And now you can’t see where the hatch is located. If accidentally not leaning against this place. )
Lukes invisible for tiles ›››!
Help for Tiles ›› Https://goo.gl/ksgntf
Huge selection and excellent prices! Free delivery in Russia!