The fence in the personal or summer cottage is a visiting card of the owners of the house. AND...

|
|
During the construction of a bath, whether it be a Russian steam room, a Finnish sauna or hammam, a developer ... |
Building a house using TISE technology attracts a huge amount ... |
With your own hands glazing
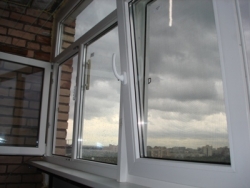
Many people want to make their apartment much quieter and comfortable by glazing the loggia, which is ideal for people who are tired of dust, poplar fluff and snow cleaning. Also, this option is suitable for those who no longer want to hear the sounds of construction and want to expand the area of \u200b\u200btheir apartment by converting the loggia into the room. Remember that these issues are better to deal with in the summer. Carefully study the examples of glazing of the loggia and strictly follow our instructions.
Content:
- The need for glazing loggia
- Types of glazing
- Design options
- Calculation and measurements
- Preparatory work
- Installation of windows
- Insulation of the loggia
The need for glazing loggia
Before starting work, you need to choose materials that can approach your loggia. Decide in advance what function the loggia will perform - whether it will be a simple place to store things or a real room with lighting and heating. Often glazing of the loggia also includes the redevelopment of the room in a full -fledged room.

Remember that the profiles should be sealed to avoid heat loss and provide protection against humidity. Also consider that independent glazing is not always permitted. If we are talking about a radical change in the external style using architectural elements, it is necessary to obtain permission in the corresponding authorities.
Types of glazing
For the correct implementation of all the stages of installing a window structure, it is necessary to make a lot of effort. It all depends on the type of glazing of the loggia. There are many different tools and options for its installation. To select quality material, it is necessary to have elementary knowledge. If you get acquainted with preliminary information, you can make the right decision.
Aluminum glazing
The cheapest windows are aluminum constructions. This material is resistant to different microorganisms, to the effects of fire, it is also very durable. If you just want to protect the loggia from atmospheric precipitation and sounds, you can use a cold aluminum profile.

Warm is used only in the manufacture of window products. As a rule, the set of aluminum design includes all the necessary units for installation and accessories: rollers, locks, profiles, clamps, various latches, etc. The installation of glazing is carried out according to previously made measurements of the fence of the balcony or loggia. The procedure of such an installation itself is quite simple.
You will be brought home with a ready -made kit, which will need to be connected and installed. In such sections, glass from four to six millimeters is often used with thickness. As a rule, the profile is made of white, but you can always choose another shade. Such glazing increases sound insulation at times. But such structures will not make your room warm, and the temperature of the loggia will be higher than three to five degrees.
Wooden glazing
Such windows are very environmentally friendly and hold heat well. But wooden windows are often made from glued beams, which complicates the technology of their production. Therefore, the price of glazing of the loggia with such windows is quite high, and it is very invoice to use them to protect the loggia.

Also consider that the material is fuel, which means that it needs to be processed with a special composition. The wood has the ability to rot, so it must be additionally impregnated with antibacterial agents.
Plastic glazing
Today, this species is most popular. With it, you can turn the loggia into a warm and cozy room. As a rule, frames with double -glazed windows are often used for this.

This design protects the room from the wind, dust, a seething megalopolis and rain without additional sealing. In addition, plastic windows do not need additional care, they are not deformed or cracking.
Remote glazing
This version of the glazing of the loggia increases the useful area and allows you to install a wide window sill. When taking out the profile for the fence, you can get an additional windowsill that will hold firmly. It also provides the opportunity to use a small area of \u200b\u200bthe loggia more functionally.

Glazing with a roof
Such glazing is necessary in a situation where the loggia is located on the top floor. The roof will be a kind of protection of glass from external influences, it will not create an additional load on the structure, since it is not connected with it.

Bezramic glazing
This option looks continuous when the frames are not visible at all. The feeling is created that the loggia is not at all glazed and is in the air. But such glazing has many minuses. The first can be called the high cost of glazing loggia.

This material cannot be insulated, so cold air will penetrate the gaps between the glasses. Over time, the fixation will decrease, and the window twitch at the slightest manifestation of the wind.
Combined glazing
This option is used as an alternative to other technologies for the insulation of the loggia. Frames can be made from two materials at once. You can take a wooden frame with an aluminum pad on the outside or a wooden lining from the inside to an aluminum profile.

Design options
After you decide on the material, you need to choose the type of structure. The loggia can be glazed along the entire length, you must consider the number of wings, how they will open, solve issues with a parapet and a roof. If a concrete or brick parapet is installed on your loggia, you can install window frames immediately on it.
If the parapet is metal, it is not recommended to install plastic windows on it: due to excessive weight of the structure, the metal can be damaged and the frames are skewed. Therefore, it is better to lay out the parapet of foam blocks. You can also glaze the balcony to the full height. In this case, the parapet must be dismantled and put in its place the manufactured frame of the desired design. This option of glazing is quite expensive, and also, conditions rarely allow this project to implement.

Each material is endowed with the maximum permissible height of the continuous glass, so they use a horizontal jumper, which divides the entire surface into the upper and lower parts. As a rule, the lower part is less than the upper one, so double-glazed windows and sandwich panels are used for it. The more wings you saw in the photo of the glazing of the loggia, the more expensive it will cost. The most optimal option is the alternation of deaf and opening wings. This design allows you to easily wash and maintain windows.
You can use rotary, sliding and rotary-oxide sashes. The side sides can be laid with foam blocks or set a sandwich panel. You can also install a dull double -glazed window. This will increase illumination, but will make it difficult to access the side glasses. The most convenient and most expensive solution is the installation of all the wings opening. As for the simplest and cheapest option - this is the minimum number of opening wings with a single -chamber double -glazed window.
If the design of the loggia does not provide for the presence of the upper floor slab, the calculation and installation of the frames must be carried out taking into account the installation of the roof, for which the ondulin, a galvanized corrugated roster, corrugated board or timber can be used. The visor (the junction of the roof and building from above) is waterproofed by hermobutil. Do not forget to install thermal insulation under the roof, after which you can install the ceiling.
Calculation and measurements
Let's look at an example of glazing with plastic windows. Before ordering windows from any company, it is necessary to make calculations and measurements to find out how much glazing costs the loggia. It is necessary to remove old glazing along with frames and fasteners. Also remove everything before the railing and floor slabs on top. After that, you must measure the distance from the railing to the ceiling with a tape measure and also from one wall to another. Check the horizontality of the parapet using the level. This should be treated with all seriousness, because if the skew is even one and a half centimeters, the window frame will simply not fit.

Measure the tilt relative to the horizon of the edge of the plate. To make an order for windows, this information should be enough. Often, manufacturers do not trust independent measurements and send their specialists. A professional will be able to see the subtleties inaccessible to your eye. He will pay attention to the material and structure of the parapet, to the type of house.
It is possible that the parapet will not be able to withstand plastic windows, so you need to install a new version of brick. The plate may also not withstand new railing and windows. In this case, you will have to install light aluminum structures. In any case, try to attract specialists to measure. Only after that can you agree on an order for your favorite and suitable type of window. Almost all manufacturers' sites have calculators on which you can calculate the approximate cost of glazing.
Preparatory work
If the parapet allows you to install plastic windows, it is necessary to fill in the gap (in case of its presence) using a galvanized sheet. Measure the size of the gap, cut a piece of galvanizing, get it from the outside of the fence under the railing and fix it with self -tapping screws. At this stage, you will need a friend’s help, it is almost impossible to cope with this task yourself.

If you decide to install a new parapet, watch a video about the glazing of the loggia and remove the old parapet. The new one is applied to a solution of cement and sand in one brick. Try to do the work in such a way that the level is strictly horizontal, and there are no differences. This option will facilitate the task of installing window structures.
From a metal bar or a corner with a cross -section of five millimeters, it is necessary to make a frame to fix the windows along the perimeter of the railing. Next, you need to screw with screws to the railing or dowels, if there is a too strong design.
Installation of windows
After you have received the finished design, you need to remove the double -glazed window from the frames. You must first attach only the frame to the parapet, since the design with a double -glazed window is excessively heavy. It is not necessary to remove the double -glazed window from the opening wings, because it will be attached in a completely different way. Before transportation, the staffing staff is not completely clogged, so that before installation it is possible to stretch the glass.
It is necessary to pull for a staff (guiding along the window) until the glass jumps out. If plastic latches fall out, collect and fold them separately, later they will be useful to you. After that, carefully put the glass on the pre -cleaned floor, resting them against the wall. Carefully make sure that there are no pebbles or crumbs on the floor, otherwise the glass may collapse. Remove the shootings from the windows.
After that, it is necessary to push the stem down a little from the upper loop, remove it from below with pliers and gently remove the sash from the upper loop. Tilt the sash on yourself, lift five centimeters and remove from the lower loop. Next, it is necessary to attach the standing profile to the bottom side of the window. To do this, just turn the light frame, take a profile that goes in the windows, and insert into the grooves that are visible on the frame.

Close with a kiyanka in the grooves of the frame. Turn the window into its original position. Set the frame mount. Make an indentation of fifteen centimeters from each edge of the window, fix the fixing plate, drive a hammer into the groats of the window and expand the protruding part by ninety degrees to attach to concrete walls. After that, use silver screws and a 30 mm drill with a drill.
After you installed the mount, you will need the help of friends for glazing the loggia with your own hands. The frame is quite large and weighty, when lifting you can accidentally drop it from your hands or fall out yourself. Several people should set the frame in the opening, aligning in level. Fix the fixing plates or screws, use a winning drill, which has a diameter of six millimeters.

Remember that screws need to be screwed, but not to drive. With the help of self -tapping screws, collect the frame into a single whole. Be sure to check the horizontal and vertical level. Where necessary, insert lining and chopic. Using anchors, fix the frames to the parapet, then to the walls and ceiling, deepening them into concrete by sixty millimeters. All the cracks on the inside of the room must be close up (disconnected).
After that, install the visor. We insert double -glazed windows into the frames. Next, rotary-oxide wings should be hung on the loops. The folding mechanism must be fixed on the frame and the sash. Next, you should check the reliability of the wings and the level of tightness. After checking, it is necessary to fix the tide and the windowsill. Now all the stages of glazing of the loggia have come to an end!
Insulation of the loggia
For insulation, you can use a variety of materials - from 100 to 150 ml of mats from mineral wool, you can use polystyrene foam, highly effective thermal insulation materials from modern foamed materials. Additionally, the decorative decoration of the outer part of the parapet with panels or plastic siding will help to insulate the loggia.
If there are wooden details, be sure to treat them with an antiseptic. The floor is often covered with Eurodo, which in appearance is similar to plates made of different wood species. Such a floor is beautiful, but it can be covered with linoleum or carpet.
First of all, you should achieve good sealing the room, and then proceed to the insulation procedure.
For high -quality insulation, it is necessary to fix the insulation along the perimeter of the entire loggia, not forgetting about the floor and ceiling. First you need to lay a vapor barrier layer. To do this, you can use polyethylene film or foil. It must be fixed to the base of the loggia using a stapler or special glue. Using glue or plastic dowels, it is necessary to fix the insulation.
If you use polystyrene or polystyrene foam, be sure to treat all joints and cracks with foam with foam. Choose the type of foam correctly, some options can ruin your insulation. Let the foam dry and harden, after that you can remove all the excess with a sharp oil knife. Next, it is necessary to tightly lay the film, which is fixed on the glue, and with tape you can carefully glue the joints. After the insulation of the loggia, you can proceed to the final decoration.
Thus, independent glazing of the loggia will help save money. But you can only perform it if you already have experience with tools and construction work, and windows with for many years will not cease to delight you.
![]()
StrPort construction portal 2011-2018. Articles about repair, construction, building materials.
Copying information from the site is possible only with permission of the editorial office Or indicating a direct link to the source. Legal justification