In Khrushchevs and other buildings of the Soviet era, low problems are considered a big problem ...
|
|
The apartment from time to time needs repairs. And regardless of the volume of work, ... |
Trends prevailing in the construction market, which is in a state ... |
Do -it -yourself backgammon - drawings, dimensions. DIY
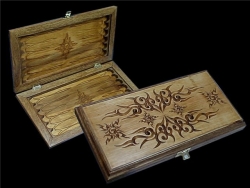
The process of making backs with your own hands is quite simple. When working, only basic knowledge, tools, drawings and incredible desire will be needed. In fact, the techniques and techniques used in the manufacture of a board game are very interesting: cutting boards, a sticker of even triangles, which must be additionally prepared for the connection with the wooden surface. All this, if desired, can be turned into a kind of fun and even divide the responsibilities between family members. Work is found even for the smallest.
Table of contents:
- Making the base for a board game
- Working with a gaming field
- Work with triangular elements
- Work with dividing stripes
- Final work with the main gaming field
- The final stage of work. Working with the basis
- Collection of gaming board
Making the base for a board game
Before you endure to the manufacturing technology itself, you should get acquainted with the basic requirements for the gaming board. So, it should have dimensions of 53x43.2x6.4 cm. To cut the game field, you can use materials such as a veneer of maple, nut tree or mahagoni. A MDF sheet is also perfect with a thickness of 0.5-0.6 centimeters.
You should not immediately start working with the main part of the wood, because if something goes wrong, there will be no more opportunity to fix everything. The best option will be training on several layers of veneer to learn how to make neat cuts and geometric ornaments. It is very important to adapt evenly to combine parts of the wood among themselves so that there are no wide gaps and gaps.

Working with a gaming field
To make the playing field directly, you need to cut only 60 wooden strips in size 3.8x19.1 centimeters. At the same time, it is worth considering that boards of two colors are needed for the board, so they cut 30 stripes of iller veneer and the same amount of maple or mahagoni.
For beginners, it is not always possible to make even and neat planks with a knife. A piece of plastic or organ, put under the bottom of the veneer, will help to simplify the situation.
Cutting remaining after work with veneer will also be used during the creation of the game board. They will be needed to cut several more planks of different types: 4 upper strips in size 3.8x25.4 cm and 4 lower measuring 5.1x25.4 cm.
To continue the work, it is necessary to carry out all the preparations with the upper plates. Small holes are drilled in them for further installation with a size of 0.4 cm at a distance of 2.5 centimeters from the end of the plank.
It is necessary to properly organize your workplace, immediately distributing the planks as they are used. To do this, they must be laid out into four rows (one and a half dozen segments in each). Each of the rows should be aligned in size and clamped between the plates forming the semblance of a bag. The upper planks must be fixed with brass screws (0.45x0.25 cm).
Now it is necessary to in turn insert packages into a saw machine (60-80 teeth) and cut off one edge from each. In this case, you need to ensure that the corner stop is equal to 5 degrees.
The plate must be turned over with the end side and draw a pointer, the end of which is turned to the cut edge. Now the design takes 180 degrees, after which the second edge is sawn off. The residual width of the package should be 33 centimeters. The same must be done with other rows. It is best to align the edges of the planks in several approaches, removing wood with thin layers. This will help to achieve maximum accuracy.

Work with triangular elements
In order to make these small details, you will need such a device as sling. It is necessary to make small notes on the end and lateral parts of the packages, measuring 3.2 and 16.5 centimeters, respectively. After that, the tags are leveled with the edge of the cut in the sleds, and the packet itself is circled so that the dies and emphasis can be fixed on it. It is very important that all the tags coincide with the edge of the drink.
After that, each set of packages is separately cut at an angle. It is worth paying attention to that the position of the longitudinal emphasis is strictly aligned on the base of the slide. At the end of the saw, it is necessary not to reach the back of the slide.
As a result of sawing at the output, a large number of identical triangular elements that need to be connected to each other are obtained. To do this, you need to take an even veneer bar, which will perform the function of the line for aligning the triangles. It is not recommended to immediately glue the individual parts of the resulting ornament on the board. To begin with, it is worth forming the drawing completely in order to see possible irregularities and disadvantages.
The veneer strip is placed on the working surface horizontally, and the triangular segments of the ornament are attached to it with painting tape. When forming each of the quadrants, it is necessary to remember that you need to start with gluing to the line of a light piece, after which you need to start glue in pair of dark and light parts (so that parallelograms are obtained from the segments). They must also be carefully attached to the base of the veneer strip.
The assembly continues until there are 7 light and 6 dark segments in each of 4 parts. The side on which there is no painting tape will be facial. When laying out triangles, it is extremely important to maintain their location relative to the ruler. Even a small angle of deviation can lead to a failure when laying out. When fastening all four quadrants, the painting tape should be removed.
Work with dividing stripes
An important stage in the construction of a playing board is the manufacture of dividing strips. To make them, you need to take two segments of an veneer plate size of 8x23 centimeters. The segments should be neat, so it is necessary to level their edges in advance.
Now it is necessary to glue one of the finished quadrants to the edge of the dividing strip, focusing on the center leveling. At the same time, it is important that the side on which the masking tape is glued is on top. It is necessary to use a small line with a pencil of the mark onto the other edge of the dividing strip. They will form boundaries to attach the second segment. It is important not to be too lazy and draw the lines from the first quadrant as accurately as possible, so that as a result of the border of the triangles coincide. Alignment is carried out according to the tops of nut triangles.
After that, you need the side on which there is already a masking tape, to seal it completely. It is undesirable to overlapping overlapping, because then the segments will stick to the base unevenly, and in some places there will be hillocks. The same procedure must be done with the second part of the game field, gluing together the third and fourth quadrants.
As a result, each part of the main playing field should in the proportions respond with the depicted drawing.

Final work with the main gaming field
After all the main parts of the game field are collected together, it is necessary to resisted them to be left, because the proportions may not coincide at the edges. The final width of each half of the game field should be 19.1 centimeters. It is best to cut the edges with a sharp knife. After these manipulations, you can give the design an aesthetic appearance by gluing the maple strips of the same thickness at the edges of the set. In addition, these fields perform not only a decorative function, but also serve as a storage for checkers. The average diameter of the figures is 3.2 centimeters. If the acquired NARDs have a larger diameter, it is worth taking care of wider edges.
The final stage of work. Working with the basis
It is necessary to take two dense foundations that will be used as substrates for playing fields. It is best to cut them from a sheet of MDF, having a thickness of 0.6 centimeters. In addition, 4 clamping plates will be needed, which can also be made of MDF, but their thickness should not be less than 2 centimeters, as well as two pieces of Mahagoni veneer (2.5x43.2 cm).
The basis must be made extremely neatly. To do this, directly on the basis of the usual stationery glue of PVA is applied, and a veneer sheet is placed on top. It is easiest to apply glue to such large sizes of the base using a foam sponge or roller. After that, it is necessary to act quickly: the veneer is covered with waxed paper on top and clamped between 2 clamping plates. When the first base dries, you can move to the second and carry out similar actions.
Now, with the help of a saw machine, the basics are undermined and adjusted to the standard size. It is necessary to use a cutter to sample a fold (0.6 centimeters) to process all the folds around the perimeter of the foundations. Only a side is processed, not pasted with veneer. It is necessary to configure the device in such a way that a small comb in a size of 0.3 centimeters is obtained along the edge.
Now on the other side of the basics, the playing field itself is glued. The same technology is used as for the first time (waxed paper, clamping plates). It is necessary to give the design to grab and dry.
Collection of gaming board
To finish the work on the gaming board, it is necessary to stick the basics for the game field in a closed box, and then divide it in half. Initially, two blanks of 6.7x46 cm and two more 6.7x30 cm are taken. The first is needed for long walls, and the latter for short ones. The blanks need to be made of Mahagoni wood with a thickness of 1.3 cm.
With the help of a conventional saw disk, it is necessary to make the strokes along each of the edges, while retreating from the edge by 0.3 centimeters. The holes made must be treated with a cutter and achieved the final length of the workpieces, making a bevel at their ends.
First, the box collects without using the adhesive base to check how tightly the parts of the base are adjacent to the walls. Sometimes you have to make small adjustments: deepen holes, cut off parts of the walls to eliminate visible gaps.
Only after complete preparation of the box should be applied to the slopes, facks and glue, glue. Without allowing the glue to dry, you need to quickly assemble the structure and fix it with clamps until the base is completely dry.
When sawing a wooden box, it is necessary to make incisions in short walls, where small gaskets are inserted, the thickness of which is 0.3 centimeters. You can fix them using ordinary painting tape. After that, it is necessary to saw a large wall and insert the gasket into the opening in the same way. At the very end, a residual cut is made to divide the box into two equal parts.
Now you need to make partitions used on the game field, a large length. To determine their exact location, you need to add another 0.3 cm to the diameter of the game figures. After that, the finished partitions are immediately attached to place. The latter are cut short partitions, the length of which can be accurately determined, just by the location of long details (therefore, they need to be attached in advance). On average, their length will be 3.5 cm. They are also attached to place.

Using a rounded file, it is necessary to check on one of the walls the hollow under the player’s finger. Now, using a drill for loops, 4 centimeters are drilled. The same recesses need to be made for magnets. Parts of the box must be polished with sandpaper, the grain of which reaches 220 units.
You need to add a small amount of second glue to the recesses for loops and fix the loops themselves. After that, you should do magnets. They can also be fixed with second glue, but by sure by checking the polarity before that. Otherwise, the magnets simply will not attract to each other. At the final stage, you can cover the box with several layers of colorless varnish and leave it for a couple of hours until it dries completely.
Now the playing board is ready, and you can spend the evening after several batches of battles in the backgammon.
![]()
StrPort construction portal 2011-2018. Articles about repair, construction, building materials.
Copying information from the site is possible only with permission of the editorial office Or indicating a direct link to the source. Legal justification