Quite interesting, reliable and high -quality polish kitchen tiles ...
|
|
Even if you want to install a bath on the wall is more tight, you are unlikely to succeed! On the... |
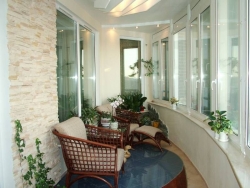
The apartment, designed correctly and with taste, will always delight the eye as ... |
Step -by -step instruction of the insulation of the loggia
Many residents of apartment buildings are faced with a problem of lack of square meters. An excellent solution to this issue can be independent insulation of the loggia. This case is painstaking, requiring certain building skills and time from the contractor. However, the finished result is worth it. A warm balcony expands the possibilities of using space, ennobles the living room and can become the pride of the home master.
- The need to warm the loggia
- The choice of thermal insulation material
- Methods for fastening the insulation
- Warm floor arrangement options
- DIY insulation with your own hands: step -by -step instructions
- General recommendations for the arrangement of the insulated balcony
The need to warm the loggia
Each owner of the apartment independently decides for himself how to use additional square meters of loggia. Some equip a pantry or workshop on the balcony, others operate the room more rationally create a winter garden or a separate room. The insulated loggia will be able to convert to a cozy place to relax, work, a compact gym or a zone for children's creativity.

In addition, the insulated balcony solves a number of problems:
- the heat loss of the room and the expenses for heating the apartment are reduced;
- reduces the risk of mold on the walls of the balcony.
You can perform external or internal insulation. Obvious advantages of the external method:
- useful area is not eaten;
- simplification of the interior wall decoration.
A significant advantage of internal insulation is the ability to perform work on your own without hiring workers.
The choice of thermal insulation material
Different tipsolation materials are used as a heater, ranging from traditional, inexpensive, and ending with modern high -tech. For insulation of loggia from the inside, it is better to use thin, light materials. Thanks to their insignificant width, it will be possible to save a useful space.
Consider the characteristics of the main thermal insulation materials for insulation of the loggia/balcony.
Foil polyethylene foam on one side of polyethylene is applied by a layer of foil, which reflects if radiation and throws thermal flows back. Deviling characteristics:
- roll width 1 m, thickness 2-5 cm;
- the simplicity of installation of the polyethylene foam is easily cut with a knife;
- a method of laying a wire or overlapping;
- the efficiency of thermal insulation is almost doubled;
- the material is used to warm the ceiling and walls.
Lodge insulation: step -by -step instructions. The use of foam
Mineral wool has good thermal insulation qualities and affordable cost. However, experts do not recommend using this material for the insulation of the loggia for a number of reasons:
- the poor moisture resistance of the mineral wool absorbs the liquid, so you will have to additionally enhance the waterproofing;
- when using miniral cotton wool, it is necessary to arrange natural ventilation over the insulation, you need to leave a gap, which steals the area of \u200b\u200bthe balcony slightly;
- for facing the loggia, you will need to reinforce the walls and conduct of pre -dopmeric access.

Foam foamed plastic of various densities. The main volume of the material is gas. The foam has the following characteristics:
- the size of the plates is 1*1 m;
- the thickness of the insulation is 2-10 cm;
- foam density 15 or 25 kg/sq. Cm;
- durability.
Extruded polystyrene foam (foam) is a modern heat insulator resembling polystyrene, but is characterized by a more durable structure and functionality. Properties of polystyrene polystyrene:
- rectangular slabs 1200*600 mm;
- thickness 2-10 cm;
- foam density 35-45 kg/sq. Cm;
- vapor permeability;
- frost resistance;
- the plates have a chamfer for a dense styling;
- small weight and simplicity of installation;
- combustibility class G-1;
- the material is not used in open places where UV rays penetrate.
DIY insulation with your own hands: step -by -step instructions. Photo installation of a foam

Methods for fastening the insulation
The choice of the method of insulation, first of all, depends on the thermal insulation material used and further wall decoration.
Warming for putty and plaster is suitable when using a foam or foam. Thermal insulation panels are glued to the base with tile glue. Plates are additionally fixed with dowry fungi. The walls/putty of the walls or ceiling can be proceeded to the plaster after the installation of the insulation.
Laying foil polyethylene foam occurs under the basis of the frame. In this case, the method of attaching profiles to the wall or through the P-shaped fasteners does not matter. Penophol sheets are applied to the ceiling/wall of the loggia and fixed with rails. In this case, the connection is permissible, and the docking strip can be glued with tape.

Insulation for the base of the frame is possible only when using a thin insulation with a thickness of up to 20 mm. Pressure of a thicker heat insulator will affect the stiffness of the racks and fastening
If it is planned to facing the balcony of plasterboard or PVC panels, MDF, then laying thermal insulation material is advisable in the frame cells. As a heater, foam of the 15th density or mineral wool is used. Minus of this technology increase the thickness of the thermal insulation pie.
Warm floor arrangement options
The technology of floor insulation on the loggia is somewhat different from the thermal insulation of the sen and the ceiling. Excessed requirements are imposed on this element of the balcony.
There are several main options for arranging a warm floor:
- Warming with mineral wool and foaming the laying of insulation on wooden lags with a section of 50*50 mm. The bars are laid out across the loggia, fastening the lag to the concrete base with dowels. A layer of steam and waterproofing must be located on top of the insulation.
- Ceramzite insulation occurs in the following order:
- spread the substrate (polyethylene film) around the perimeter, leaving the intercesses on the walls of about 15 cm;
- set the lighthouses horizontal to check the construction level;
- fall asleep expanded clay and flatter a layer of insulation by the rule;
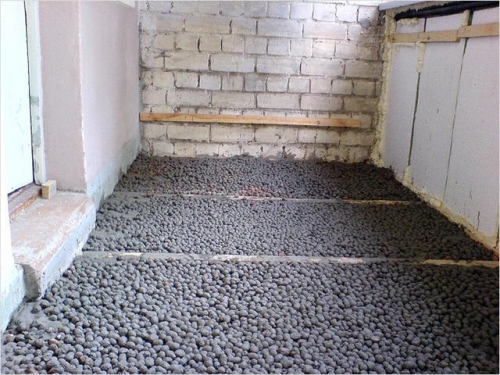
- pour expanded clay cement mortar;
- lay the reinforcing grid;
- pour the finish screed the thickness of the layer at least 3 cm;
- you can proceed to further floor finishing in a month.
- The arrangement of a warm floor using heating elements: a cable with a reinforcing mesh or infrared coating. These options are most effective and allow you to achieve good heating of the loggia. However, for the implementation of the project, qualified assistance of specialists will be needed.

DIY insulation with your own hands: step -by -step instructions
Below is step -by -step instructions for insulation of the loggia with a foam.
Tools and materials
For work you will need:
- foam stoves;
- building level, stationery knife, marker;
- pVC pipes for laying cable;
- capacity for kneading glue;
- construction mixer;
- trowel;
- polyuritan foam;
- mounting gun;
- grater for grinding heat -insulating sheets;
- plastic flat grater for grouting;
- metal grid;
- sand concrete M300 coarse;
- polyurethane glue.
Lodge insulation: step -by -step instructions. Photo - a diagram of a thermal insulation pie.

Preparatory work
First of all, on the loggia it is necessary to install energy -saving plastic windows. It should not be better to save on glazing to choose double -glazed windows and accessories of firms that have proven themselves in the window market.
If high -quality windows are already installed on the balcony, then you can proceed to insulation of the balcony.
Preparatory events:
- Make all extraneous objects from the loggia.
- Cover the plastic windows and doors with a film will protect them from mechanical damage, scratches and dust entering the working mechanisms.
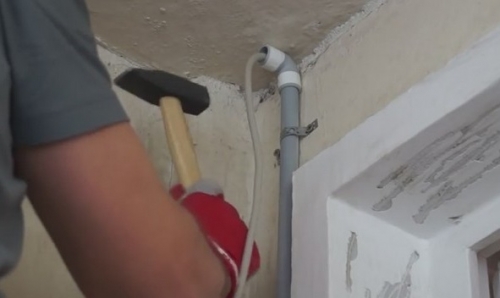
- Drill and make the strokes in the wall where the wiring will be laid, mount sockets and light switches.
- Metal elements that are not subject to dismantle to clean from rust and cover anticorrosion polyurethane paint.
- Clean the surface of the dirt. Remove the old layers of paint with a spatula.
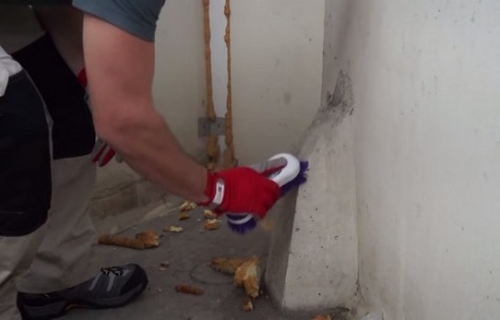
- The painted or whitewashed walls on the balcony is not always possible to completely clean, so on the surface it is necessary to make notches with a hammer and a spatula.
- Treat the walls, ceiling and floor with a product against mold and fungi. When performing work, it is necessary to put on a respirator, since the compositions of such solutions are toxic. Leave until completely dry.
- Make all the surfaces with a primer of deep penetration.
- If the outer wall of the balcony is made of brick, aerated concrete or expanded clay, then ventilation is not necessary under the insulation. In the concrete walls, you need to make a through hole during drilling the punch should be kept tushing towards the street.
- To carry out an electric cable, make holes and strobes. Put an electric cable through non -combustible PVC pipes.


Ceiling insulation
- The construction level measure the surface of the ceiling and identify the presence of irregularities.
- Apply a sheet of insulation to the ceiling and pencil to mark the places of the pvc pipes. Cleaning knife make cuts along the marked contour.
- Prepare the adhesive solution into the container pour water, pour dry glue and mix with a construction mixer.
- Leave the finished adhesive mixture to brew for 5 minutes and mix thoroughly again. The glue should not be too thick.
- Kelma apply the solution along the perimeter of the polystyrene plate, point the glue in 5-6 places in the middle of the insulation.
- The sheet is pressed to the base, the finish begins from any corner of the ceiling.
- Check the location of the sheet with a level.
- Brown two holes in the glued canvas, insert umbrellas, but do not clog them to the end.
- Attach the remaining sheets of the foam to the ceiling.
- Check the smoothness of the surface and seal joints that are more than 1 mm with polyurethane foam.

Installation of the heat insulator on the walls and parapet
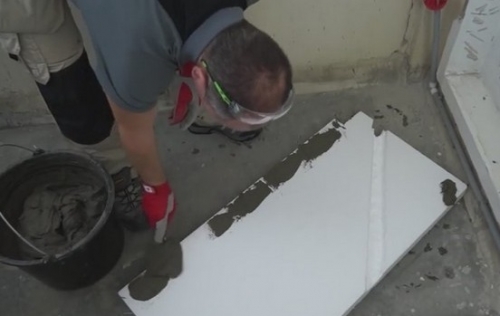
- Warming should begin with the coldest wall of the parapet loggia. Using the mounting gun, apply polyurethane foam on the back of the foam. During operation, it is important to remember that after the adhesive composition is hardened, it will not work to tear off the insulation panel.
- The foam is additionally applied to the wall itself.
- After the first sheet sticker, it is advisable to pull the cord and focus on it with further masonry.
- The remaining sheets are glued in a checkerboard pattern.
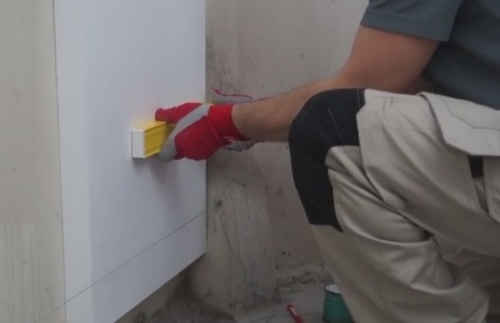
- In the corners of the door/window openings, heat-insulating plates with a B-neck are installed. The edges of the insulation are smoothed out with a grater.
- Close the slopes with stripes of thin foam.
- The resulting angles should be checked by the square they must have 90.
- Fill the seams between the insulation plates with foam.
- Cover the angles of the slopes with plastic profiles and a reinforcing mesh. The surface is plastered, and to strengthen the corners, glue a strip of 20*40 cm.
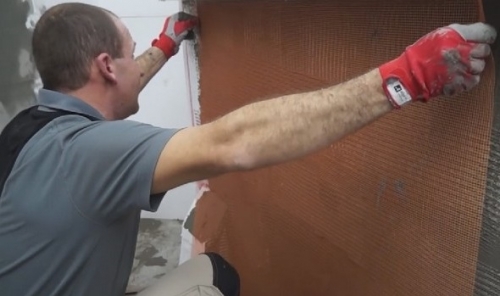
- Reinforcement of the entire wall:
- on the insulation (on the width of the mesh), apply the solution with a gear spatula;
- a mesh with an overlap at least 10 cm is laid on top of the solution (in the inner corners the net should be mounted in compliance with double overlap);
- leave reinforcement for hardening for a day.
- The surface of the walls is slightly moistened to increase adhesion.
- Apply a leveling layer. The rule to align the surface, remove the excess of the working solution.
- After the screed, the wall should dry for a day.
- The next step is putting their putty. This layer also dries 1 day.
- Finished finishing painting or wrapping wallpaper. The first layer of paint is applied after putty, and the second after the arrangement of the floor.


Insulation of the floor of the loggia with a foam: step -by -step instructions
Consider the stages of creating a warm floor using a foam and cement-sand screed:
- Put the high -polystyrene polystyrene sheets on the cleaned floor.
- Place a metal mesh on top.
- Prepare and mix thoroughly the cement solution (M-300).
- Distribute the working mixture on the floor.
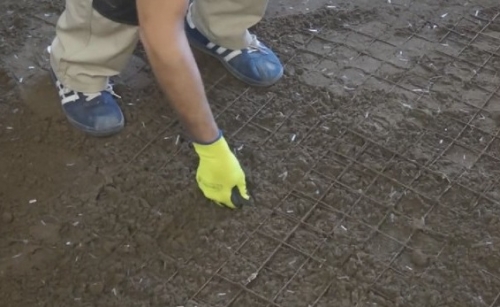
- Raise the reinforcing net slightly and tamp with your feet.
- Wipe the base with a plastic grater and check the horizontal level.
- Leave the cement screed until completely dry.
- Perform the finish flooring to lay laminate, boards, etc.

General recommendations for the arrangement of the insulated balcony
- If necessary, the installation of the supporting frame is better to use a galvanized metal profile. Unlike a tree, it does not rot and not heavy.
- Thermal insulation work should be performed in dry weather. Many adhesive mixtures and primer compositions have features of use in conditions of high humidity.
- Slits on the loggias are processed with foam resistant to low temperatures.
- The wood used must be dried, and then treated with means against fire and decay.
The insulation of the loggia with their hands: step -by -step instructions. Video.
![]()
StrPort construction portal 2011-2018. Articles about repair, construction, building materials.
Copying information from the site is possible only with permission of the editorial office Or indicating a direct link to the source. Legal justification