Before starting the installation of a stretch ceiling with backlight, you must carefully ...
|
|
Trends prevailing in the construction market, which is in a state ... |
If the roof roof flows, and the patching of damaged places of tangible results is not ... |
DIY screwdriver repair
One of the most popular instruments of the home master is a screwdriver. But, like any product, it breaks. What in this case to do? In some types of work, an electric drill can save the position, but only in some. You can attribute the tool to the service center and expect its repair. But this will require the time and money that you will have to pay for the repair of the tool. But, as a rule, the third option is also available to repair the screwdriver Makita, and the device of the screwdriver is not so complicated.
Let's look at the main signs of malfunctions of the screwdrivers and how they can be eliminated at home on your own.
Content
- The design of the screwdriver
- Malfunction of the electric part of the screwdriver
- Malfunction of the mechanical part of the screwdriver
The design of the screwdriver
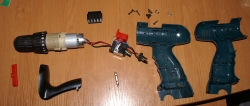
Before proceeding directly to the malfunctions of this tool, it would be nice to briefly get acquainted with the device of a screwdriver and the purpose of its main nodes. We’ll start with this. The photo below shows a disassembled screwdriver, on its basis and consider the purpose of the details.

We start with the start button. The button performs two functions: turning on the power circuit of the electric motor and its speed controller. When the button is pressed, the engine power circuit is closed by the button contacts to the line, providing maximum power and number of revolutions. The speed controller is electronic, consists of a PWM generator located on the board. Depending on the strength of pressing the contact button located on the button moves along the board. The degree of the generated pulse is dependent on its location along the board, the field transistor plays the role of the key (in the photo above, it is indicated as a rotation speed regulator). That is, the dependence is as follows: the stronger the user presses on the button, the higher the value of the pulse on the transistor and the more it opens, thereby increasing the voltage on the electric motor.

The reverse of the engine rotation is carried out by changing polarity on terminals. The change of polarity is carried out using cross -line contacts, which are thrown by the user using the reverse handle.
Electric motor. In this tool, as a rule, single -phase collector engines of direct current are used. They are characterized by reliability, simplicity of production and maintenance. The design of such an engine is as follows: the case on which the magnets, anchor and brush are located.
Gearbox. Its purpose consists in converting a large number of revolutions of the electric motor shaft into significantly lower speeds of the cartridge shaft. There are two types of gearboxes for screwdrivers: planetary and classic. The latter is very rarely used, so we will pay attention to the planetary type gearbox. The planetary gearbox consists of:
- ring gear;
- solar gear, which is fixed on the shaft of the electric motor;
- satellites and drive (their number depends on the number of steps, are two and three stepped).
Without going into subtleties, we consider the principle of operation of such a gearbox. The solar gear is driven by the rampage shaft, in turn its teeth are driven by satellites that transmit the rotation of the drive. With a two -stage gearbox, the cartridge shaft is connected to the second drive, with a three -stage with the third.

The force regulator is designed to adjust the effort that is supplied to the screw. As a rule, 16 adjustment positions are used. Thus, there is a wide range of tightening screws, which allows you to work with very fragile materials (drywall, etc.). Its principle of action is well shown in the video below.

The cartridge is attached to the output shaft of the gearbox and has three fists, which reliably hold the part in the cartridge.
Malfunction of the electric part of the screwdriver
Having examined the basic elements of the screwdriver, let's move on to possible malfunctions and possible methods for repairing the AEG screwdriver. And we will start with the electric part. The main signs of a malfunction of the electrical component of a screwdriver are:
- the tool does not turn on;
- no switching of the reverse regime;
- there is no adjustment of the number of revolutions.
The tool does not turn on. The first one should pay attention to when repairing a Skil screwdriver. If you put it on charging, and did not help, then we arm ourselves with a multimeter and proceed to find a malfunction. To begin with, we measure the voltage value to the battery, it must more or less consistent with the battery indicated on the housing. In the case of low voltage, it is necessary to determine the faulty element: a battery or charger.
You can determine the serviceability of the charger by a multimeter, for this we include it on the network and measure the voltage at idle on the terminals. It should be a couple of volts more from the nominal indicated on the device. If there is no voltage, a charging block is faulty. For such a repair of the screwdriver intercol, knowledge of electronics will be required, otherwise it is easier to buy new.
If the problem is with the battery, then for the repair of the screwdriver Makita with your own hands, it is necessary to open the block with elements. After the block has been dismantled, it is necessary to carefully examine all the places of the wire connection and check the quality of the soldering, whether some kind of broken. In the case of the integrity of all connections, we take the multimeter and measure the voltage on each element. On each element should be not lower than 0.9 1 in the voltage. If an element with a lower tension is found, it is necessary to replace it. The main thing is that the capacity and type of the element correspond to the rest (i.e., if nicd is also necessary nicd). You can find out in more detail about the repair of batteries from the article: Do -it -yourself screwdriver batteries.

If the charging and the battery are working, and the screwdriver does not turn on, it is necessary to disassemble the screwdriver. Two wires go from the battery terminals to the button, take the multimeter and measure the voltage at the buttons in the input (the battery is inserted). If there is a voltage at the entrance, then we take out the battery and with the help of clamps of the crocodile we will dig the wires from the battery. We put the device on the measurement of resistance in OM. Press the button until the stop and measure at the exit from the button. The device should show the value of the resistance striving to zero, if the button is in good condition, the problem is either in brushes or in other elements of the electric motor. If the tester shows a cliff, you need to replace or repair the button. You can try to repair yourself, as it often happens that contact at terminals is absent due to burning, it will be enough to clean with sandpaper and collect. The main thing when analyzing the button is not in a hurry and act carefully, otherwise all the details will scatter, and you will have to rack your head for more than one hour how to collect.
Similar actions will need to be taken in the absence of reverse. We put one probe of the device on the input wire of the button, the second, on the contact of the electric motor or the output of the button, this is like more convenient. Switch the handle of the reverse. If everything is regularly fixed by a certain value of the resistance, if it is silent, the conductivity of the reverse contacts is broken. The procedure for disassembling and cleaning contacts is similar to the above, as in the repair of a caliber screwdriver.
The engine operates at maximum speeds, and is there no speed adjustment? The cause of the malfunction can be either in the button itself and in the regulatory transistor.
If all the circuits are working to the electric motor, but the tool does not work. The malfunction can be associated with brushes. Ideally, brushes should change when they are long, erased 40% of the original length. In case of wear of brushes, replace the brushes with new ones, if the brushes are in order with the other elements of the electric motor. To check the electric motor, it is necessary to disconnect the wires that go from the button. After the wires have been disconnected, with the help of the multimeter, measure the resistance value on the contacts of the wires. If the resistance value is small and tends to zero, most likely, a break in the winding occurred, either rewinding or a new engine is necessary.

You can check the integrity of the anchor windings, since the anchor can be bought and changed independently. To check the anchor, it is necessary to measure the resistance on the two neighboring plates of the collector, along the entire circle. In this case, the normal value is 0. If during the check you find two standing plates, with a value that differs from zero, the anchor requires repair or replacement.
Malfunction of the mechanical part of the screwdriver
Signs of malfunction of the mechanical part of the screwdriver may be as follows:
- when working, the instrument makes extraneous sounds that have not been previously observed;
- strong vibration of the tool and the battle of the clamping cartridge;
- the screwdriver turns on, but its further work is impossible due to jamming.

The causes of extraneous sounds during the operation of the tool may be wear of bushings or anchor bearing. To do this, it is necessary to disassemble the electric motor and explore it for the integrity of the bearing and the degree of wear of the sleeve. The anchor should be easily rotated, without friction and distortions. If necessary, these elements can be purchased in the store and replaced independently.
The most common gearbox malfunctions are:
- the curvature of the gear shaft;
- wear of the working surface of the gear;
- wear of the bearing and/or supporting of the gear shaft;
- the curtain of the pin, on which satellite is attached.
In all cases, the replacement of faulty parts of the gearbox is required. All described actions require attention and sequence in disassembling and assembling a screwdriver. Having shown these qualities, you can independently repair the screwdriver of intercol with your own hands, or any other, and only in some cases resort to the help of the service center.
![]()
StrPort construction portal 2011-2018. Articles about repair, construction, building materials.
Copying information from the site is possible only with permission of the editorial office Or indicating a direct link to the source. Legal justification
Tell me, please
Please tell us in detail how to assemble a gearbox. (Bearings)
tell me what can be
tell me what there may be a problem - when working with a screwdriver in the drilling mode, it works a maximum of half a minute - a minute and then as if died, it will stand for half a minute and again! Previously, this was not - it was possible to drill until the acumulator died in what could be the problem?
please tell me what
please tell me what the reason was with a screwdriver and at the time of work switched speed without stopping and it immediately went out and stopped working
The engine smoked and burned
The engine of the screwdriver in the area of \u200b\u200bthe brushes was smoking and burning, I thought - the brushes burned, it was not there. Insulation of windings in order. It turned out to be something conductive between the rotor petals in the sites of the brushes. Visually, this is not noticeable. I scratched the grooves and everything works.
Please tell me what
Please tell me what could have happened to https://dnipro-m.ua/tovar/akkumulyatornay-drel-shurpovert-cd-120hq/? When clicking on the button does not work. Everything is fine with the wire.