Keramzit personifies real salvation when choosing a simple and durable ...
|
|
The microclimate and comfortable accommodation in a private house largely affects ... |
The roof of the building is one of its main protective systems from bad weather, ... |
DIY wiring wiring: from scheme to installation
Even 15 20 years ago, the load on the power supply was relatively small, today the presence of a large number of household appliances provoked an increase in loads at times. Old wires are far from always able to withstand a large load and over time there is a need for their replacement. Laying electrical wiring in a house or apartment is a matter that requires a master of certain knowledge and skills. First of all, this applies to the knowledge of the rules for wiring electrical wiring, the ability to read and create wiring schemes, as well as electrical skills. Of course, you can make the wiring with your own hands, but for this it is necessary to adhere to the rules and recommendations described below.
Rules for wiring wiring
All construction activities and building materials are strictly regulated by a set of rules and requirements of SNiP and GOST. As for the installation of electrical wiring and everything related to electricity, you should pay attention to the rules for the installation of electrical installations (abbreviated PUE). This document prescribes what and how to do when working with electrical equipment. And if we want to lay the wiring, then we will need to study it, especially the part that refers to the installation and choice of electrical equipment. Below are the basic rules that should be followed when installing electrical wiring in a house or apartment:
- key elements of the electrical wiring, such as distribution boxes, counters, outlets and switches should be easily accessible;
- the installation of switches is performed at a height of 60 150 cm from the floor. The switches themselves are located in places where the open door does not prevent access to them. This means that if the door opens to the right, then the switch is on the left side and vice versa. The wire to the circuit breakers is laid down from top to bottom;
- rosettes are recommended to be installed at an altitude of 50 80 cm from the floor. Dictated by this approach to flooding. Also, sockets are installed at a distance of more than 50 cm from gas and electric stoves, as well as heating radiators, pipes and other grounded items. The wire to the sockets is laid from the bottom up;
- the number of sockets in the room must correspond to 1 pc. 6 m2. The kitchen is an exception. It installs such a number of sockets as necessary for connecting household appliances. Installation of sockets in the toilet is prohibited. For sockets in the bathroom, a separate transformer is equipped beyond its borders;
- the laying of the wiring inside or outside is performed only by vertical or horizontal, and the place of the gasket is displayed on the wiring plan;
- the wires are laid at a certain distance from the pipes, ceilings and other things. For horizontal, a distance of 5 10 cm from the beams of the ceiling and cornices and 15 cm from the ceiling is required. From the floor, the height is 15,100 cm. The vertical wires are placed at a distance of more than 10 cm from the edge of the door or window opening. The distance from gas pipes should be at least 40 cm;
- when laying external or hidden wiring, it is necessary to ensure that it does not contact with the metal parts of building structures;
- when laying several parallel wires, the distance between them should be at least 3 mm or each wire should be hidden in a protective box or corrugation;
- the wiring and connection of the wires is carried out inside special distribution boxes. The joints are thoroughly isolated. The connection of the copper and aluminum wire is strictly prohibited;
- grounding and zero wires are fixed to the instruments with a bolt connection.
Project and wiring wiring scheme
Workword laying work begins with the creation of the project and the wiring scheme. This document is the basis of the future wiring of the house. The creation of the project and the scheme is quite serious and it is better to entrust it to experienced specialists. The reason simple on this depends on the safety of living in a house or apartment. Services for creating a project will cost a certain amount, but it is worth it.

Those who are used to doing everything with their own hands will have to, adhering to the above rules, as well as studying the basics by electrics, independently make a drawing and calculations on the load loads. There are no particular difficulties in this, especially if there is at least some understanding of what electric current is, and what are the consequences of inaccurate handling of it. The first thing you need is convention. They are given in the photo below:

Using them, we draw a drawing of the apartment and outline the lighting points, the installation site of the switches and sockets. How much and where they are installed, described above in the rules. The main task of such a scheme is to indicate the installation site of the devices and laying wires. When creating a circuit of electrical wiring, it is important to think in advance where, how much and what household appliances will stand.
The next stage in the creation of the scheme will be wiring to the connection points on the diagram. At this moment it is necessary to dwell in more detail. The reason is the type of wiring and connection. In total, such types are somewhat parallel, consistent and mixed. The latter is the most attractive due to the economical use of materials and maximum efficiency. To facilitate the laying of wires, all connection points are divided into several groups:
- lighting of the kitchen, corridor and living rooms;
- lighting toilet and bathroom;
- power supply of outlets of living rooms and corridor;
- power supply of kitchen outlets;
- electrical supply of sockets for electric stove.
The above example is only one of many options for lighting groups. The main thing to understand is that if you group the connection points, the number of materials used is reduced and the scheme itself is simplified.

Important! To simplify the laying of wiring, the wires can be laid under the floor. The wires for the upper lighting are laid inside the floor slabs. These two ways to use well if you do not want to post the walls. In the diagram, such wiring is marked with a dotted line.
Also in the electrical wiring project, the calculation of the alleged current strength on the network and the materials used are indicated. The calculation is performed according to the formula:
I \u003d p / u;
where P is the total power of all used devices (watts), U voltage in the network (volt).
For example, a kettle 2 kW, 10 bulbs of 60 watts, microwave 1 kW, refrigerator 400 watts. Current strength is 220 volts. As a result (2000+ (10x60)+1000+400)/220 \u003d 16.5 amperes.
In practice, the current force on the network for modern apartments rarely exceeds 25 A. based on this, and all materials are selected. First of all, this applies to the section of the electrical wiring. To facilitate the choice, the main parameters of the wire and cable are indicated in the table below:

The table indicates extremely accurate values, and since quite often the current strength may fluctuate, a small supply for the wire or cable itself will be required. Therefore, it is recommended to perform all the wiring in the apartment or house from the following materials:

- the VVG-5*6 wire (five cores and a section of 6 mm2) is used in houses with three-phase power to connect the lighting panel with the main shield;
- vVG-2*6 wire (two veins and a section of 6 mm2) is used in houses with two-phase power to connect the lighting panel with the main shield;
- the VVG-3*2.5 wire (three veins and a section of 2.5 mm2) is used for most of the wiring from the lighting shield to distribution boxes and from them to sockets;
- vVG-3*1.5 wire (three veins and section 1.5 mm2) is used for wiring from distribution boxes to lighting points and switches;
- the VVG-3*4 wire (three veins and a section of 4 mm2) is used for electric stoves.

To find out the exact length of the wire, you will have to run a little with a roulette around the house, and add another 3 4 meters of reserve to the result. All wires are connected to the lighting panel, which is installed at the entrance. Protection machines are mounted in the shield. Usually this is an RCD for 16 A and 20 A. The first are used for lighting and switches, the latter for sockets. For an electric stove, a separate RCD is installed by 32 A, but if the power of the plate exceeds 7 kW, then they put an RCD of 63 A.

Now it is necessary to calculate how many sockets and distribution boxes are needed. Everything is quite simple here. It is enough to look at the diagram and make a simple calculation. In addition to the materials described above, various consumables will be required, such as island and SIZ caps for connecting wires, as well as pipes, cable channels or boxes for electrical wiring, and sockets.
Installation of electrical wiring
In the installation of the electrical wiring, there is nothing superfluous. The main thing to adhere to the safety rules and follow the instructions during installation. All work can be done alone. From the tool to perform installation, a tester, punch or grinder, drill or screwdriver, nippers, pliers and a cross and slotted screwdriver will be required. The laser level will not be superfluous. Since without it it is quite difficult to make vertical and horizontal markings.
Important! When performing replacement with the replacement of wiring in an old house or apartment with hidden wiring, it is necessary to find first and, if necessary, remove the old wires. For these purposes, the electrical wiring sensor is used.
Marking and preparing channels for electrical wiring
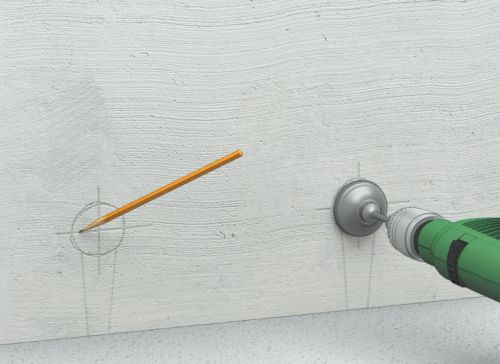
We start installing with markings. To do this, using a marker or pencil, apply a mark on the wall where the wire will be laid. At the same time, we follow the rules for placing wires. The next step will be the mark of places for the installation of lighting devices, sockets and switches and lighting shields.
Important! In new houses for the lighting panel, a special niche is provided. In the old, such a shield simply hangs on the wall.

Having finished with marking, we proceed either to the installation of the wiring in an open way, or to the trenches of the walls for hidden wiring. At first, with the help of a perforator and a special nozzle, the crown of the crown is cut holes for the installation of sockets, switches and distribution boxes. For the wires themselves, strobes are made using a grinder or perforator. In any case, there will be a lot of dust and dirt. The depth of the groove of the stroke should be about 20 mm, and the shirin should be such that all wires are unhindered in the strobe.

As for the ceiling, there are several options for resolving the issue with the placement and consolidation of the wiring. The first if the ceiling is mounted or stretch, then the entire wiring is simply fixed to the floor. The second is made a shallow stroke for wiring. The third wiring is hidden in the ceiling. The first two options are extremely easy to perform. But for the third you will have to make some explanations. In panel houses, ceilings with internal voids are used, it is enough to make two holes and stretch the wire inside the floor.
Having finished with a stroke, we move on to the last stage of preparation for the installation of the wiring. The wires, in order to get them into the room, must be stretched through the walls. Therefore, you will have to break holes with a punch. Usually such holes are made in the corner of the room. We also make a hole for the wire factory from the camshaft to the lighting shield. Having finished the stroke of the walls, we begin installation.
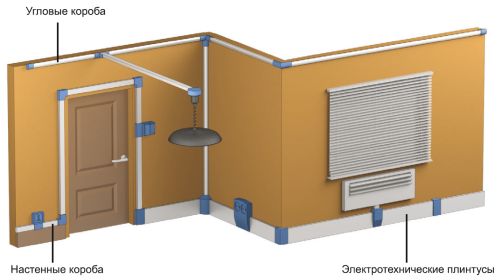
Installation of open wiring
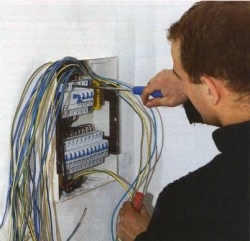
We begin installation with the installation of the lighting panel. If a special niche was created for him, then we place it there, if not, then we simply hang it on the wall. Set the RCD inside the shield. Their number depends on the number of lighting groups. The shield assembled and ready to connect looks like this: in the upper part there are zero terminals, grounding from below, machine guns are installed between the terminals.

Now we put the VVG-5*6 or VVG-2*6 wire inside. From the switching panel, the connection of the electrical wiring is performed by an electrician, so so far we leave it without connection. Inside the lighting shield, the introductory wire is connected as follows: we attach the blue wire to zero, white to the upper contact of the RCD, and we attach the yellow wire with a green strip to ground. RCDs are connected to each other sequentially at the top using a jumper from the white wire. Now we move on to wiring in an open way.

On the previously planned lines, we fix the boxes or cable channels for electrical wiring. Often, with open wiring, the cable channels themselves try to place near the baseboard or vice versa under almost the ceiling itself. We fix the box for wiring using screws with a step of 50 cm. The first and last hole in the box is made at a distance of 5 10 cm from the edge. To do this, plunge the holes in the wall using a perforator, clog the dowel inside and fix the cable channel with self-tapping screws.
Another distinctive feature of open wiring is sockets, switches and distribution boxes. All of them are hung on the wall, instead of smoothing inward. Therefore, the next step will be their installation in place. It is enough to attach them to the wall, outline the places for fasteners, dry the holes and fix them in place.

Next, proceed to wiring. We start by laying the main highway and from sockets to the lighting shield. As already noted, we use the VVG-3*2.5 wire for this. For convenience, we start from the connection point towards the shield. At the end of the wire, we hang a shortcut indicating what kind of wire and where it comes from. Next, we lay the wires of the VVG-3*1.5 from the switches and lighting devices to the distribution boxes.

Inside the camshaft, we combine the wires with sizes or thoroughly isolate. Inside the lighting shield, the main wire VVG-3*2.5 is connected as follows: brown or red veins of the phase, connected to the bottom of the RCD, blue zero, we attach to the zero bus at the top, yellow with a green strip to the tire below. Using a tester, we call all the wires to exclude possible errors. If everything is in order, we call an electrician and connect to the distribution shield.
Installation of hidden wiring
Hidden wiring is performed quite simple. A significant difference from open only in the method of hiding wires from the eyes. Otherwise, the actions are almost the same. First, we install the lighting shield and RCD machines, and then we start and connect the input cable from the switching panel. We also leave it without connection. This will do an electrician. Next, we install the distribution boxes and sockets into the niches made.

Now we move on to wiring. The first to lay the main highway from the VVG-3*2.5 wire. If planned, then we lay the wires to the sockets in the floor. To do this, we put the VVG-3*2.5 wire into a pipe for electrical wiring or a special corrugation and lay it to the place of output of the wire to the sockets. There we place the wire inside the sidelines and start it into the socket. The next step will be the gasket of the VVG-3*1.5 wire from the switches and the lighting points to the distribution boxes, where they join the main wire. We isolate all compounds with sizes or isolet.

At the end, we nickname the entire network using a tester for possible errors and connect to a lighting panel. The method of connection similar to the described for open wiring. At the end, we close the strokes with gypsum putty and invite the electrician so that he connects to the distribution shield.
Laying electricians in a house or apartment for an experienced master is quite easy. But for those who are poorly versed in the electrician, you should use the help of experienced specialists from beginning to end. This, of course, will cost money, but you can protect yourself from errors that can lead to a fire.
![]()
StrPort construction portal 2011-2018. Articles about repair, construction, building materials.
Copying information from the site is possible only with permission of the editorial office Or indicating a direct link to the source. Legal justification
RCD is never put before
The RCD is never put in front of the machine, if there is a sharp increase in the current in the wiring, then the RCD will burn, and the machine will turn it off but later on the fraction of a mile of seconds.
current strength - 220 volts ??
"current strength - 220 volts" ??
Current strength is measured in
The current strength is measured in amperes, and not in volts. "Current strength 220V" -Shobochka ...
Installation of electrical wiring is not
Installation of electrical wiring is not a supercomplicated task when you understand electricity. I don’t rummage about this, so I would not advise people without understanding what they are going to do on their own! This is all your home and suddenly, which is not so, you can be left without it. It is better to contact specialists. Installation of electrical wiring in a new house was done by megaskat, I was satisfied, and most importantly, I am not worried about safety.
the problem is how to find
the problem is how to find a normal specialist
how is the rules easier to break down than find a normal specialist
Article - complete nonsense, read
The article is complete nonsense, it is absolutely contraindicated to read this to ignorant people.
1) the selection table of the cross -section of the wire - all values \u200b\u200bare overstated 2 times (I wonder why?)
2) SIZ caps are only for a temporary connection!
3) RCD for lighting is not only useless, but also harmful (then you are tortured to look for the reason for the operation)
4) instead of a joint installation of an automaton and RCD, it is better to put a diplomatic device. Automatic
5) In no case should you stroke the ceiling !!!
the slabs are correctly noticed
correctly noticed, the floor slabs cannot be posted if you do not want the house to collapse.
Stop the floor slabs
You can’t stroke the floor slabs?) Everything is possible if you need to know where and at what depth.
We offer disconnected
We offer disconnected electricity meters on the remote control. All with the documents of fillings, a guarantee and without intermediaries! http://farmacolog.com
Sorry for the advertising, but I think it will be useful to many here.
A very useful article.
A very useful article. I liked the design and photo.
Only in the photo I am not
Only in the photo I did not see an RCD. There is a 16A of the Uzole company, but there is no RCD.
Afftar does not differ along the course
In the course of the Afftar does not distinguish the RCD from the machine gun. It is sad.
Everything is written without competently,
Everything is written without competently, if you do not understand, do not write.
anonymous from March 16, caps
anonymous on March 16, the caps are put on the constantly because they protect the twist, I have put them for a long time and nothing has happened yet, I still put them in the distant 78th year of the last century. They really were not enough who then worked at construction sites and remember but the meaning was one protection of the twist, this is how, yes, the article has some inaccuracies, but for an amateur it will go, and the ceiling will be spoiled if it is monolithic, which is now everywhere, now if it is a plate, then the loss of time, there are specially channels made there. , and for a person a little with hands growing from where necessary, patch the wiring is not the problem, the main thing is first estimated your knowledge and opportunities and then dare
indeed, if it's an RCD
indeed, if this is an RCD where is the test button?
Mass of empty text, nor about
The mass of empty text, nothing. How to connect (dilute) the wires in the box-chill will understand!
Pay attention! Hello
Pay attention!
Hello dear friend. I offer to your attention an interesting group of an electrician. Here you will find interesting thematic articles that will help you figure it out in this complex specificity. All features and secrets in my group!
https://vk.com/elektroarseniev
Thank you so clear
Thank you such an understandable article! And the video inserted very by hand, I watched - everything is immediately clear. The wiring, by the way, is best to carry out copper, it is more durable, here it is also written: https://cable.ru/articles/id-1700.php. And the video is very good on the topic there, how to lay the wiring, I think that the interest is likely to be useful
cap with a spring bad
cap with a spring bad connection
article in general terms.
article in general terms.
A lot of gross mistakes.
A lot of gross mistakes. The most important mistake is the table of the cross -section of wires and current, from the wrong choice of which a fire comes.
Quite informative
Pretty informative material, you immediately understand that an electrician is not two fingers on asphalt. Electrician for dashing Samyamich here: http://yserogo.ru/remont/elektromontazh.html
Steel pipes are divided
Steel pipes are divided into many types, based on linear sizes, the production method and the presence of coating. VGP pipes-https://steel-pro.ru/trubi/truba-vodogazoprovodnaya/
Dumb copywriters (rewriters)
Dumb copywriters (rewriters) and other nonsense changed someone else's article to uniqueness of at least 80% for the top issuance of search engines. And since for these non -teaching this topic is a dark forest, it has become contraindicated to read! In short, dear Seoshniki (although I do not respect you for a long time), if you order the text, do not fill it on the site, but give it to the person who knows this topic for testing. (You never do it!)
i will learn!
i will learn!
useful and informative.
useful and informative. I recently changed the machine guns and in general the shield in the apartment, there were several moments in which I did not know how to do it, they gave a competent consultation in the Voltjetik store well, where the components ordered and it was a pity that I had not stumbled upon your article earlier, all the questions also opened up .
I will add dumb to the commentary
I will add to the comment "Dumb copywriters (rewriters)" - everything in the comment is true and still notice - drilling with a grinder - is this the same how to make it up to drill a grinder?
introductory cable 2x6mm? but as
introductory cable 2x6mm? But what about grounding?