The scope of ceramic brick is extensive. It is used for laying load -bearing walls ...
|
|
The correct choice of insulation will reduce the heat loss of the insulated building and extend its term ... |
For owners of apartments in which there is something valuable, one day the question arises ... |
Installation of sockets in the apartment with your own hands: proper independent installation
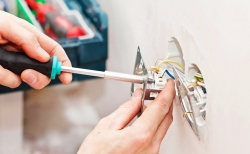
The outlet is the most important element of power in the house, which allows to supply electricity to household appliances and serve private goals. Electric outlets are part of the common electric network, so their independent installation requires compliance with safety rules and regulatory rules for placing sockets in residential premises. At first glance, it seems that all sockets are the same. But in fact, there are a large number of varieties of outlets for servicing various devices. Installation is carried out in two ways: internal and external. What method and type of socket for installation depends on personal requirements, but, in principle, you can install any outlet with your own hands if you know the exact installation scheme and general installation recommendations.
Table of contents:
- Classification of sockets
- Requirements for installing sockets
- The design of sockets
- Tools
- Choosing a place for installation
- How to install a rosette with your own hands?
- How to install an electric carrot with hidden wiring?
- How to install an electric carrot with open wiring?
- DIY Roset Repair in the apartment
Classification of sockets
Depending on the signs, the outlets are classified into several categories:
- according to the installation method (hidden and open);
- by the method of connecting electrical wiring (screws and terminals);
- by design features;
- by level of voltage protection (IP20 to IP68).
Electric appliances have different connectors, so selecting the type of socket is necessary based on the requirements for maintenance. For this purpose, you can consult with a specialist or independently choose the type of socket for a variety of a connector. The selection of the connector is fundamental for the installation of the outlet in the house. Many countries put forward their requirements for the standards of socket connectors, but most devices are characterized by a European standard, type C, or type F-Euro-rosette with grounding. By the type of groove, the sockets are overhead (external) and drowned (internal). The external ones are mounted exclusively on the wall, while hidden can be installed somewhere. The choice of sockets depends, first of all, on personal preferences and opportunities for installing the system. An important criterion is safety, and we are talking about both maintenance and the availability of sockets for children. All these nuances should be taken into account before the independent installation of the outlet.
Requirements for installing sockets
The correct installation of the electric carrot in the apartment is regulated by security and aesthetics and their location can be selected at your discretion. The recommended distance of the installation of sockets is 40 cm from the floor, but the standard placement is a height of 1 m. When installing sockets in the bathroom or in the kitchen. A mandatory requirement is to comply with the distance from the water source by 60 cm, therefore it is advisable to install sockets on the opposite wall. To install sockets in an apartment where there are young children, you should observe the principle of maximum inaccessibility and use sockets that have a protective cover to ensure additional safety. The main rule. It should be remembered when installing sockets to perform all installation work with a de -energized power grid.

The design of sockets
Before proceeding with the installation of a socket, you need to know what elements it consists of. Standard sockets consist of 3 parts:
- front panel;
- wiring;
- fundamentals.
The front panel protects and hides the inside of the outlet. Standard panels are white plastic cases that are made of fire resistant plastic. The conductors are the contacts through which the current is carried out. They are of different capacities and voltage. The base or block is the design on which contacts and the front panel are held. Modern sockets have additional grounding to ensure the safety of operation.
Tools
Installing sockets in an apartment with your own hands requires the availability of the necessary tools:
- screwdrivers with an indicator to determine a de -energized network;
- screwdrivers for fastening (straight or cross -shaped);
- drill, punch, pliers and hammer;
- dowels with self -tapping screws for fastening the box;
- sockets;
- level;
- sockets.
The number of necessary tools can be larger, depending on whether the initial installation of electric sockets with your own hands is produced or their repair.
Choosing a place for installation
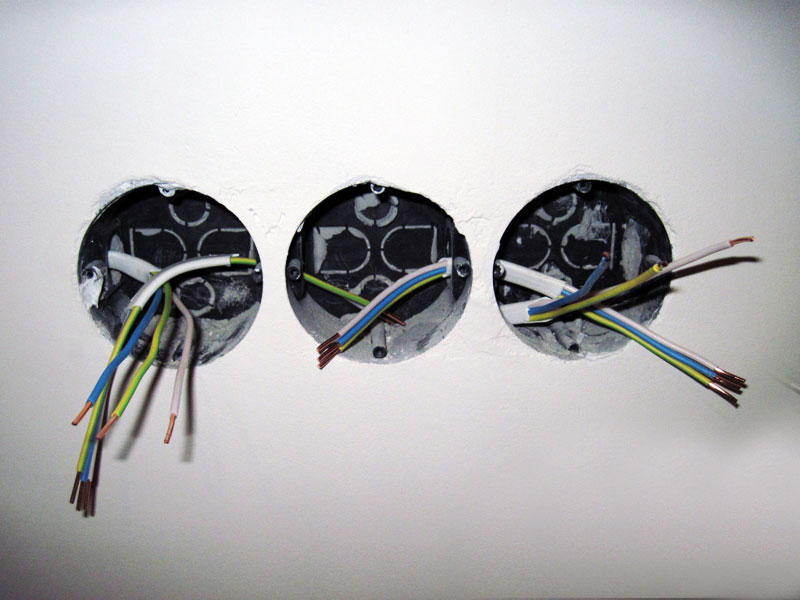
If you want to install a socket in a new place E, then first of all, you will need to hold an electric network. To do this, lay 2 wires, that is, zero and phase, or 3 wires: phase, zero, grounding, respectively. To ensure greater safety, it is recommended to lay 3 wires to install a new outlet. How to distinguish which wire, what function performs? They differ in color: white or brown phase, blue or black zero, yellow grounding. The standard location of 1 m from the floor, in the nursery 1.5 m. It is necessary to connect several devices to the network, it is advisable to install a block of sockets that are connected in turn with one cable. Please note that contacts need to be made from above, not from the side. Such a scheme for installing sockets is safer.
How to install a rosette with your own hands?
There is a certain algorithm of actions, how to correctly install a socket with your own hands. In general, installing a socket is a simple process. The standard scheme includes the following procedure:
- turn off the power supply in the shield or remove the corks;
- check the absence of voltage by the indicator;
- unscrew the lid, free the mounting legs and remove the wires;
- install a new socket in the place of the old;
- adjust the wires to the size of the wire, connect them to the working part;
- install the outer cover;
- check serviceability by turning on the power supply.
This scheme also allows you to connect an outlet with grounding, only you need to know how to connect the wires. Roughly speaking, the connection should look as follows: phase on the left, zero on the right, and grounding in the center. Before attachment, the wires must be pressed and tedded with screw clamps.
How to install an electric carrot with hidden wiring?
Installation of a socket with hidden wiring is a simple way to install an electric carrot if the walls are already lined with decorative panels or finished with drywall. In order to remove the wires outward, it is necessary to use the electric drill and make a hole in the wall. Before starting work, you need to check the wiring or not using the indicator. Before making a hole, you need to apply preliminary markings on the wall and carefully cut out the recess for the socket. When installing a socket in a concrete wall, additional strengthening is not required, it is enough to install a plastic dowel and attach the box with a screw, screwing it to the stop. To install the socket in drywall, it is necessary to use the appropriate boxes.
After installing the box, you need to attach the wires. First, you need to carefully eliminate the insulation material, approximately 5-7 mm from the end of the wires and start their connection. Then you need to fix the contacts in the housing using 5 screws: 2 for the expansion of the legs from the side, 1 for grounding in the center, 1 for the phase from the right and 1 for zero on the left. Depending on the type of connection, wires can be attached with screw clamps with a terminal block or clamps with spring -loaded plates. The second type of connection is characteristic of imported outlets.

Then it is necessary to insert the box into the socket, while using the spacer screws, screwing them one on each side of the outlet. Gently place the body in the center so that after fixing the outlet is located evenly. Spread the paws with lateral screws to fix the box. It is better to give preference to designs with gear legs. They better fix the structure in the wall and are not loosened during operation.
The final stage is the installation of a decorative case. Using the central screw, you need to wind the case all the way to hide it in the wall. Then the front panel is attached and is checked for stability. When the outlet is installed, it is necessary to check its serviceability. To do this, turn on the electricity and enable any electrical appliance. If there is no contact, you will have to unscrew everything back to them to check the reliability and correctness of the contacts. Be sure to make sure that the veins are tightly tightened, as this can cause a short circuit and melting the body.

How to install an electric carrot with open wiring?
The outlets with open wiring are the same electro -stops as the hidden type, only the connection wires are not hidden in the wall, but, on the contrary, are placed outside. This type is easier to install and do. Their use is advisable when it is not possible to carry out hidden wiring, for example, with wooden wall cladding. Since the bare wires do not look quite aesthetically pleasing, they are finished with decorative channels of plastic, mainly white.
To install an outlet with open wiring, the following actions must be performed:
- de -energize electricity and check the absence of voltage by the indicator;
- make markings and use an electric drill to cut a hole in the wall for dowels;
- gently insert a plastic dowel into the hole, you can use a hammer;
- fix the dowel and insert a box of sockets with self -tapping screws;
- attach contacts and tighten them with screws;
- attach the decorative part;
- check the serviceability of the outlet.
When installing a socket in wooden walls, it is necessary to use a paronyte, which is placed between the rear cover and the wall to prevent ignition. If the socket does not work or there is an extraneous sound/smell, you need to turn off the power supply and re -check all the contacts. Please note that the insulation is done correctly. Do not use a socket in case of a malfunction!
DIY Roset Repair in the apartment
If there is a need to repair a socket, then this is even much easier to do than its installation. It is recommended that the inspection of sockets in residential buildings at least once every 1-2 years, since the elements of power supply are also susceptible to wear. If you needed repair of sockets in the apartment with your own hands, then this can be done as follows:
- de -energize the electricity in the house and check the voltage in the outlet;
- remove the decorative panel;
- unscrew the spacer screws and take out the mounting box;
- disconnect the wires and free from the terminal clamps;
- replace the mounting box with a new one, update the wires;
- fix the contacts and insert the mounting box back;
- attach the decorative panel to the place and check the serviceability of the outlet.
If you need to make several sockets, you will have to lengthen the phase wire to create an electric circuit. If there is a need to transfer the outlet, then you need to use the method of extension of the wiring. To do this, remove the insulation and twist the bare wires, and then solder them a little. Then you should fix the insulation back and install the overhead outlet.
In practice, the installation of sockets is quite a simple and uncomplicated process that everyone can do. But, it is important to remember that all installation work is carried out only with a de -energized network. Be sure to check the presence of voltage with an indicator before contact with de -energized live parts, since voltage may suddenly occur in them. Do not touch the bare wires with your bare hands, but use special tools for this purpose. If you are not sure of your own strength, then in order to avoid defeats or fire the installed outlet, seek help from a specialist. How to make installations correctly and what should the installation of sockets in the apartment with your own hands video instruction:
![]()
StrPort construction portal 2011-2018. Articles about repair, construction, building materials.
Copying information from the site is possible only with permission of the editorial office Or indicating a direct link to the source. Legal justification
Interesting, only
Interesting, here's the only problem when you need to punch a strob ...
so so.
so so. https://media-bridge.ru
When I did the repair and not
When he made repairs and did not suspect that there were so many outlets in the house))) And how many new ones were planned!? Kolu himself put all the outlets himself 25-30, before that my experience consisted of 3 outlets, and then a very long time ago, I forgot what the nuances are and what chips during installation. The guys from the Voltgetic.ru store prompted a couple of cunning ways how to quickly and reliably fix the sockets, I bought from them with everything necessary.