Due to the inevitable deterioration of the environmental situation on the planet, as beginners, ...
|
|
When choosing finishing materials for the roof, experienced specialists pay attention to ... |
It is unlikely that today someone can be surprised by the concept of a smart home. Although little ... |
DIY
One of the most ancient building structures arch does not lose its relevance today. It is used in the design of window and doorways, porticoes, arbors or as a decorative element of the landscape design of the garden. Various materials are used for the construction, among which wood is especially popular. Consider the advantages of wooden structures, features of choice and technology for creating an arch with your own hands.
Content
- Advantages of the use of arches in the interior of the room
- Types of arches: selection of size and shape
- The choice of material
- DIY interior arch from wood
- Recommendations for the installation of the finished design
- Photo of wood arches in the interior
Advantages of the use of arches in the interior of the room
The arches in the construction of a curved overlap of spans between two supports or openings in the wall. Thanks to the curved vault, arched structures can withstand significant loads.
The arches have found their application in each of the historical periods, and largely determined the architecture of the buildings of ancient Rome, European buildings of the 12th century and ancient Russian architecture during the construction of Christian temples.

Nowadays, arched structures have not lost their elegance and are often used in the design of residential premises. The main advantages of using arches in the apartment include:
- the ability to avoid typical decisions in the layout of the room;
- visual expansion/extension and zoning of space;
- the ability to hide the flaws and angularity of the room;
- getting rid of doors;
- a decorative element brings a highlight to the interior, gives the room an elegant and stylish look.
Types of arches: selection of size and shape
When choosing the shape and color of the arch, it is important to consider the design of the room. Often the arch is made in the color of furniture or as a contrast with the main design of the room.
Consider the most common forms of arched opening today.

Classical archit has the form of the opening of the right circle. This type of arch is considered universal and fits into almost any interior of the room. The classic arch is optimally suitable for doorways with a height of 2.5 meters. Root radius \u003d *width of the opening.

Arc Elips It is usually used for a slight height of the opening. This solution allows you to emphasize the individuality of the interior and avoid traditional circles.
Archinage opening of romanceit has a direct central frame with rounded corners. The radius of the corners is selected by a designer based on the size of the room and interior style.
A significant plus of the structure of the romance - the arch does not occupy a lot of free space in the place of rounding, so it can be used to arrange low openings
Arch Portal - The simplest design that does not require changes in the shape and size of a window or doorway. The arch can be mounted in a rectangular opening. Visually soften the perception of perception if the corners of the structure are slightly bent.

Portals trimmed with wood use in office rooms such an element emphasizes status and brings a touch of luxury to the interior. In addition, P-shaped arches are often used to design interiors in the style of minimalism and high-tech.
The arch of the rocker It looks equally good both in narrow and wide openings. This shape of the arch is combined with the phylenes of the door and furniture canvas, makes the room more refined. The rocker can be found in the interiors of the country-style, Provence and the design of the Scandinavian direction.
Transom Continuation of the door leaf. Such an arch performs not only a decorative function, but a practical phrama passes daylight. The arch repeats any shape of the doorway, and can be used as an independent element without the presence of the door itself.

Art Nouveau - It is performed with a large radius of the arched opening, the shape of the design is an oval set of correct shape.
Arch of trapezoid- Construction with corners sewing. It is used in interior openings of various widths and heights. Easy to manufacture, since it does not require complex wood processing use straight bars and strips with a threaded one.

Wood arches can be complemented by side elements with practical shelves, curly patterns or decorative objects (candlesticks, suspensions, lamps, etc.).
The choice of material
For making the arch, trees of different species are suitable: larch, oak, pine, linden, ash and others. Here are some recommendations for choosing the source material that will help build a strong and durable interior arch.

- Oak lamps are resistant to decay and are optimal for arranging wet rooms. Lack of material is high cost.
- Pine refers to the wood of soft species and is subject to moisture, but due to the high content of the resin, he does not give in to decay. Plus material accessibility. Pine arches are suitable for interior apartment openings.
- Natural wood can be replaced with thin MDF plates, they are convenient in work, unpretentious, and the finished product has a decent appearance. MDF can be treated, shaken or repainted in the desired color.
- For economy breeds, chipboard is suitable. An arch from chipboard can be covered with a decorative film, receiving an exclusive product.
- The design of the arch is performed from the veneer of a thin section of wood. The material looks beautiful and presentable, resistant to negative factors (temperature, humidity, sun) and is inexpensive. The veneer can be used when arranging a doorway in the kitchen and bathroom.
DIY interior arch from wood
Let us consider for example how to make an arch with the following parameters from a tree:
- width 1500 mm;
- radius of the circumference of the arch 750 mm;
- depth (wall thickness) 160 mm;
- the height of the arch in the assembly is 2300 mm.
The principle of creating an arched jumper: the main design is assembled from many small details of the bars sawed in the arc. In this case, the length of the blanks can fluctuate in the range of 400-800 mm. The longer the curved beam, the wider it should be.
Tools and materials
For the manufacture of wood arches, the following materials and construction equipment will be required:

- level;
- pencil and roulette;
- large compass;
- hacksaw on wood or electrician;
- screwdriver;
- sharp knife;
- punch or shock drill;
- self -tapping screws;
- dVP sheet or plywood for creating a template;
- strict boards calibrated on the flight (boards of equal thickness of 40 mm);
- lacques for finish processing.
Marking and creating a template
Using a large circul or two racks and a nail to draw the arch of the arch. When choosing a circle radius, you need to remember the deeper the arch, the more difficult its manufacture. Therefore, making the design for the first time it is better to choose a more gentle bend.
When developing the drawing, it is important to adhere to the rule: the distance from the upper edge of the arch to the ceiling should be at least 30 cm

So, the sequence of creating the template:
- On a fiberboard sheet, draw an arch to the full size with a radius of 750 mm.
- Conduct the upper arc with a radius of 790 mm. The centers of the circles of two arcs must coincide. The difference between two sizes (40 mm thickness of the arched jumper).
- Get the arc on marking.
Brusyev harvesting and arches assembly
The next stage in the creation of the Arch Brusyev Hands:
- Apply the template to the board and draw the lower and upper arc.
- Get the part with an electrician.
- Run and process the prepared part.
The inside of the arc is the facade part of the arch, so it must be cut especially carefully. The upper edge is not processed.

Cut the bars are typed according to the template, one joins the other along the entire width of the arch. First, the first row of bars are typed, and the ends of the parts are driven to a friend as accurately as possible.
The second row is harvested, like the first, but the bars are located with a slight displacement for about the details. It is advisable to numbness all the bars - this will greatly simplify and speed up the assembly process.
- Apply the glue to the bottom of the second row bar and attach the part to the marked place.
- Scrill through the beam with self -tapping screws so that they capture two layers of the arch (for each part of 4 self -tapping screws). Drown the hats of the screws.
- In the next bar, we spread the end of the end and lower laying with glue, tightly press it to the first row of the arch and end with the previous bar. Pull the details with self -tapping screws.
- Dial the entire second row. All details on the lower edges must be very accurately combined.
- Similarly, dial a couple of rows. The total thickness of the arch is 160 mm (4 rows of 40 mm).

The collected arc is quite strong and does not need additional mounting.
Finish processing
The inner edge of the arch should be polished well, minor inconsistencies between the rows are torn. For this work, a drill with a grinding nozzle or a grinder is suitable. Such processing will hide the docking stripes and it will seem that the arch is made of a solid array of wood.

Installation of the arch
The sequence of installation of the arch:
- If the arch is made under the double door, then a quarter with a milling mill should be passed on the lower edge.
- Coast the arched jumper from the upper side with the vertical bars of the door frame. Shake the ends, twist the box with self -tapping screws.
- For the upper part of the structure, it is necessary to make an arched platband cut out of the boards (thickness 12 mm). If one board is not enough, then it can be made from several elements, and the joint is decorated with a figure pad.

Recommendations for the installation of the finished design
If there is no desire to waste time making the arch, then you can buy a ready -made kit and assemble the arch yourself. When installing the finished design, you must adhere to a number of rules:
- before starting work, the old wooden box must be removed, the surface is cleaned;
- the installation of a multicomponent arch start better on top so it will be easier to adjust the dimensions and accommodate the product in the doorway;
- the gaps between the arch and the walls can be closed with wood, drywall, MDF or chipboard; All draft material must be hidden under the finish;
- when assembling the structure, you should not immediately tighten the screws tightly, it is possible to adjust the arch to the desired position;
- the wooden arch should be treated with an antifungal composition.
Photo of wood arches in the interior
A large arch with a low crossbar is an interesting solution that allows you to separate two functional zones in the apartment: the living room and the hallway.

The Elips arch with a spacious bookcase is a harmonious continuation of the interior made in white-pink gamut.

The arch in the ancient Roman style will look appropriate in a country house or a spacious multi -level apartment.

The arch in the form of a horseshoe frames the entrance to the hall. The lateral side of the structure is equipped with functional shelves.

The interior arch with spotlights visually expands the space and makes the hall more light.

The doorway, designed by the arc with a phrama. Floral patterns on the glass revive the calm interior of the room and bring to the room a feeling of freshness, spring mood.

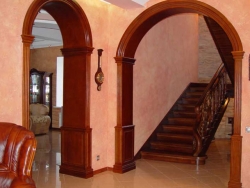
The classic arch in wooden columns - the room looks harmonious, elegant and elegant.

![]()
StrPort construction portal 2011-2018. Articles about repair, construction, building materials.
Copying information from the site is possible only with permission of the editorial office Or indicating a direct link to the source. Legal justification
Everything is quite intelligibly
Everything is quite intelligibly explained. Simple and clear. Well, for those who do not understand this matter or do not want to figure it out, you should turn to professionals in this area: http://www.interior-home.ru/foto.html?gal\u003d7#center. I recommend.