They start choosing a plinth when the flooring is ready, because these products ...
|
|
With proper use of the installation technology of soft roof, the carpet is used ... |
Wallpaper is one of the most popular types of walls. The coating is different ... |
DIY decorative plaster with your own hands. How to prepare a solution and make wall plaster with your own hands. The basic rules of wall plaster with your own hands
Decorative plaster is always an exquisite wall design. Its is a laborious and expensive process, but the resulting coating is very strong and durable. There are several most popular application techniques, but with the advent of new plastering compositions, a variety of textures and patterns is growing. In the article, we consider the features of decorative wall plaster with your own hands.
Content:
- Types of decorative plaster
- Advantages of decorative plaster
- Tools and materials for applying decorative plaster with your own hands
- Preparatory work before plaster internal walls with your own hands
- Lime decorative plaster
- Decorative plaster of the walls with cement mortar
- Stages of applying decorative plaster on the facade with your own hands
Types of decorative plaster
For the convenience of storage, most decorative plasters are sold in dry form. These mixtures already include a plaster base and decorative fillers (sand, stone crumbs, fibers, antiseptic additives, dyes). The larger the size of the filler, the higher the consumption of the finished mixture on M2 and, accordingly, is more relief, the pattern.
- Decorative plasters are divided into 2 main types: facade and for internal work. In the first case, frost -resistant and moisture -resistant additives are added to the mixture. They are also more resistant to ultraviolet rays, which retains their color for many years even on the southern facades.

Tip: choosing decorative facade plaster preference to give it to light and pastel shades. Even the highest quality composition with bright pigmentation over time begins to fade.
Decorative plasters for internal work are called interior and divided in composition into:
- mineral. It prevents the appearance and spread of mold. High moisture resistance allows you to use it in rooms with high humidity. But due to low elasticity at high temperature changes, cracks may appear;
- acrylic. The good elasticity and strength of the coating made it one of the most popular. But it has 2 disadvantages: high cost and it is difficult to wash with pollution;
- silicate Although it has a high price, it is fully justified. Silicate plaster coating is very practical, durable and durable;
- silicone. Among all of the above species, this is the strongest composition for internal work.

By the type of drawing and texture, all decorative plasters are divided into:
- structural coating. It contains different in properties and size filler from fibers to pebbles. The most popular coating of this type of bark beetle. It is made on a cement and synthetic basis. Applying the simplest of all types;
- mineral coating. It is made on the basis of marble crumbs, lime and cement, therefore it also has thermal insulation properties. And thanks to the modifiers in the composition, it has moisture resistant properties. It has a small consumption and is recommended for internal and external work;
- venetian plaster. It has been known for several centuries. The real compositions are very expensive, since the composition includes a dusty fraction of marble, which after application creates the effect of walls with overflow of natural stone. It is difficult and very long to apply it, as several layers are made. Suitable only for internal work.
Advantages of decorative plaster
- The plaster gives the appearance of the house nobility, makes the interior multifaceted. It will become an excellent basis for any design, and the heterogeneity of the coating and color will create a unique gamut of colors.
- Decorative plasters not only decorate the hay, but also thanks to moisture resistant properties, protect the base on which it is applied.
- Subject to the application technology, it will decorate the walls for many years, without the formation of cracks and rust, even in regions with harsh winters.

- Most popular textures of decorative plasters do not require special skills when applying. Therefore, the final cost, taking into account the work with your own hands, competes with other wall and ceiling coatings.
- When using a plaster with a coarse -grained filler, it is not required very thorough preparation of the walls.
- To change the appearance of the room and the facade, just repaint the plaster. Having changed the color, its relief and texture will remain.
Tools and materials for applying decorative plaster with your own hands
Of course, a specific set of materials and devices will depend on the selected decorative coating and the method of applying it.
- Primer;
- finish putty;
- decorative plaster;
- glossy or matte wax;
- spatulas of different sizes;
- brushes;
- bath for paint;
- rollers with a relief pattern;
- sponge, rags, etc.
Preparatory work before plaster internal walls with your own hands
- If the plaster composition is used with a small relief, then the walls are prepared perfectly smoothly as for painting.
- The finish putty is applied with a very thin layer, its main goal is not to level the surface, but to close all pores. After drying it, the surface is skinned with a masking grater or fine -grained grater. As a result of which dust is formed and if it is not removed, in the future, an exfoliation of decorative plaster will occur. Dilige the wall with a primer.

- By applying the finish decorative coating, it must be remembered that in one day it is recommended to make no more than two walls that do not adjoin each other so as not to spoil the drawing in the corners.
- If plaster gets on the floor or other items, it is recommended to immediately wipe it. Otherwise, it will freeze and remove only a spatula, while there is a risk of scratching the surface.
DIY decorative structural plaster
- This is the most preferred option for independent application, if there is no experience.
- It is already sold in finished form in plastic buckets of different volumes. For work indoors, the compositions are made on a water -based and therefore do not have a sharp unpleasant odor. In addition, all structural plaster are very elastic and it is easy to work with them with any tool.

- For external work, such compounds based on cement and lime are selected.
Stages of work
- Since the composition has volumetric fillers, the ideal alignment of the surface in this case is not required. The most important thing is that the surface is displeased and dried. In addition, the primer also creates an additional moisture -resistant layer between the surface and the decorative coating, and also enhances their adhesion.
- Apply the decorative composition with a spatula, starting work on top and moving down. The first layer is very important. They are aligned with internal and external angles.
- You can level it with even direct movements, but it will look more advantageous if you apply it in chaotic directions. Such stripes will create a unique pattern.
- When the layer is completely completed throughout the entire area (and it is always necessary to do this at a time, otherwise the joint will be visible) it is left until completely dry. It is better not to rush and wait a day.
- Next, make the upper layer called the coating. Sometimes it turns out rather thick, especially when the angles or niches are removed. And so that he needs to completely dry up to two days.

- If the resulting coatings seems too boring and homogeneous, it is additionally painted with a sponge, creating an imitation of glare or scuffs.
- When the paint dries, the entire area is treated with protective wax.
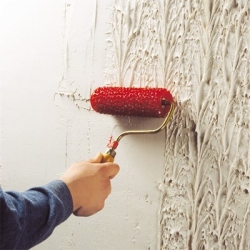
Do -it -yourself decorative textured plaster
- It is difficult to draw, its volume and texture, will depend on the application method and the tools used. The compositions for her may not have a filler, so even ordinary finish plaster is suitable, with which a relief surface will be created.
- The most popular designs of textured plaster in the form of wood bark or compressed paper.
- The quality of the plaster composition will affect the quality of the resulting coating. So, the best relief and a guarantee from its cracking will be achieved with polymer compositions. But in most cases, lime flour with various fillers is based on.
Stages of work
- If a solution for wall plaster was done with your own hands, then before starting the main work it is checked. They are applied to the wall of the wall and watch that it is not too liquid and does not drain, but it should not be too thick either, otherwise the plaster will lose its plasticity and will hardly harden.
- It is advisable to carry out work together. While one applies and lends the composition, the other gives it shape. If this is not possible, then the surface is immediately divided into several zones and made in stages. This is important, because the applied composition is quickly settled, and the relief must be formed immediately.

- The plaster is applied to the wall. If it is fine-grained, then the layer is 2-3 mm, if the filling fraction is large, then the layer is equal to its thickness.
- The formation of relief is a creative process and the final result will depend only on the flight of the fantasy of the master. Often, in the end, it is very different from the conceived at the beginning.
But still there are several common ways to create a decorative texture on plaster. For example:
- with the help of a sponge. The sponge is wetted in a soap water solution so that it does not stick to the plaster. And they press, as if pressing, and at the same time, they turn in a circular movement. So pass the entire area, without leaving unprocessed areas;
- with the help of grater. This is a special grater for decorative plaster. With its help, vertical furrows are applied, which repeat the wood bark. Their configuration will change depending on the pressure and the angle of pressure;
- application by uneven hillocks will become an exciting process. The consumption of the plaster will be large, but in the end you will get a beautiful texture called fur coat. Most often, it is done when placing outer walls with their own hands. Since the application is simple and a very tangible thermal insulation layer on the facade is created.
To emphasize the texture, as a rule, finish staining in 2 stages is performed:
- at first, the entire surface and all recesses are very carefully stained with a lighter tone;
- when the paint dries, only the protruding parts of the relief are painted with a darker shade. If the area is small, then it is made with a brush, with large volumes it is more convenient to work with a smooth roller.

The finish -based protective varnish is applied in the finish step.
DIY decorative plaster video
DIY decorative Venetian plaster
- Initially, it is sold in a transparent form by a finished solution in banks. If desired, she is tinted in any chosen shade.
- The walls for Venetian plaster are prepared perfectly, since the applied layer has no relief.
- It is suitable for use in residential premises and is made on the basis of natural materials: gash -lime, water and marble dust.
- In addition to high decorative qualities, Venetian plaster has high moisture resistance, environmentally friendly, has no unpleasant odor and fireproof.
Stages of work
- If the mixture is purchased in dry form, then just before the start of work it is diluted in such quantities that it is enough to cover the entire wall at a time. The mixture is gradually added to the water and mixed with a mixer. At the very end they add a colorer. The proportions are indicated on the packaging by the manufacturer, according to the consistency, it should be elastic and not liquid. In this case, the temperature in the room in which the solution is prepared should not be lower than +10 C.
- The first layer is made very thin and the entire area is evenly covered.

- The second layer should already create a drawing. For this, the solution is applied with arbitrary smooth movements with a rubber spatula. Each layer is applied only after the previous one (at least 6 hours) is completely dry.
- Venetian plaster involves at least 4 layers, but ideally there should be 12.
- A rich and deep color scheme of natural marble can be achieved if each layer has a different shade.
- For a beautiful glossy shine, protective wax is applied to the coating.
Lime decorative plaster
- This is an inexpensive way to decorate the walls. Since the solution is prepared independently, and all components are expensive for it. In addition, decorative plaster based on lime is environmentally friendly and has no unpleasant odor.
- Important: such a solution freezes much longer, so it is not recommended to apply a thick layer, otherwise it will float.

Preparation of lime solution for wall plastering with your own hands
- Laundice plaster is the composition of sand and gash -lime. These ratios can vary and selected individually. So, if the solution does not stick to the wall as it should, it should be added to it, and if it sticks excessively to the spatula, then on the contrary, add sand.
- First we extinguish lime. The desired amount of lime is poured into the container (any, except plastic) and poured with warm water and tightly covered with a lid. When the boiling reaction ends, lime is filtered through 2 layers of gauze. The resulting mass is set aside for a day for thickening.
- Seded sand and a little water is added to the lime and mixed until smooth. And gradually adding sand and water simultaneously in small portions, the solution is brought to the desired consistency. Ready plaster can be used for 2 days.

Tip: if you wish, make a lime plaster with a decorative relief or filling, you should not use it in its purest form. It is recommended to do a lime-cement or lime-gypsum composition.
Decorative plaster of the walls with cement mortar
Decorative plaster based on cement is used in most cases for facade cladding.
How to make a solution of cement plaster with your own hands
As a basis, cement, sand and water are used, in addition, various polymer additives and mineral fillers for relief are added to the composition.
The peculiarity of the wall plaster with a cement solution with your own hands is in a properly prepared solution:
- excessively fat It will turn out if you overdo it with the number of binder component, in this case, delaying can begin when setting it;
- skinny It is called plaster in which there is a lot of water and mineral filler, and on the contrary, there is little cement. This solution will quickly begin to exfoliate from the surface;
- normal composition In which the quality of cement and the sand filler fraction are observed in the right proportions.

On average, it is recommended to breed cement and sand with a filler 1: 3. But the higher the cement brand, the more filler you can add, so when using the M400 this ratio is 1: 7.
Stages of applying decorative plaster on the facade with your own hands
- First, the facade is plastered with a starting putty and immediately a reinforcing mesh is shed into this layer. This will allow you to align the walls (especially if the work is carried out according to foam block, foam or foam), and make a strong base for the decorative layer. Align and leave to dry.
- The surface is primed, and as soon as it dries, they begin to apply the finish layer.
- It is better to work together, since on the street the solution dries faster than in the room. At first, sprayed the layer on the wall site and evenly distributed. And instead of leveling, a special spatula or roller is used, which create a pattern or relief.
- At the end, it is painted or covered with a protective tool.

Features of wall plaster cement -sand solution with your own hands
- If several layers are made and they will not be uniform in thickness, then in the end, after drying, the effect of uneven staining stains will be created.
- Too thin layer will get wet from moisture, and emphasize the possible irregularities of the facade surface.
- When conducting work at a negative air temperature. On the wall there is the finest ice and, lying on top of it, during spring warming, the plaster will begin to move away from the walls.
- And work in the heat lead to a very rapid drying of the solution and cracking it.
- If the plaster is carried out independently, then the solution must be prepared on the entire surface. It is almost impossible to choose an accurate shade on your own and there will be spots on the facade.
![]()
StrPort construction portal 2011-2018. Articles about repair, construction, building materials.
Copying information from the site is possible only with permission of the editorial office Or indicating a direct link to the source. Legal justification