Any painting work using a brush or roller is quite time -consuming, ...
|
|
In modern interiors of the rooms, the door from the glass appeared quite recently, and ... |
What could be more comfortable, warmer and more refined than a wooden floor? Modern market ... |
Grillo ceiling installation technology
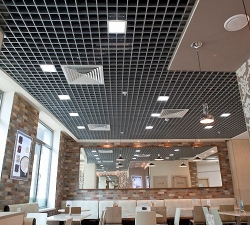
In search of diversity, when decorating the ceiling, the installation of the ceiling Grillo will be an excellent option. The ceiling of Grillo is different in that it allows you to hide all the irregularities of the main ceiling without the use of special efforts. We will talk about the varieties, technique and features of the installation of the ceiling Grillato in this article.
Table of contents:
- General concept and device of the ceiling Grillo
- The scope of the ceilings of Grillo
- The main varieties of the ceiling of Grillo
- Grillatho ceiling - the cost of buying and installation work
- Assembly of the ceiling of Grillo
- Grillo ceiling installation technology
- Installation of lighting for the ceiling Grillo
General concept and device of the ceiling Grillo
The ceiling of the grillo looks like a lattice element attached to the main ceiling. The cells are created using the intersection of an aluminum profile, which consists of a lattice and tensioning. Special suspensions allow you to fix this design on the main ceiling.
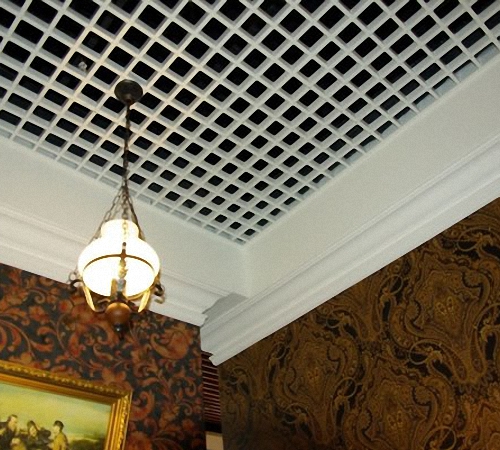
Basically, an aluminum profile is used, which has a form in the form of the letter U, the thickness of the profile is 0.5-1 cm, and the height is 3-5 cm.
When using profiles that have different heights, the effect of a falling ceiling is achieved. Thus, it turns out to achieve a beautiful visual effect and hide all the label communications.
Grillatho ceiling transparency depends on:
- the size of the cells, which is from 3x3 to 20x20 cm,
- the amount of light,
- The distances between the ceiling and the profile.
If the ceiling height is quite low, you should choose a small size of the cells, a large height of the profile and a lot of ceiling lighting.
The main advantages of installing the ceiling of Grillo:
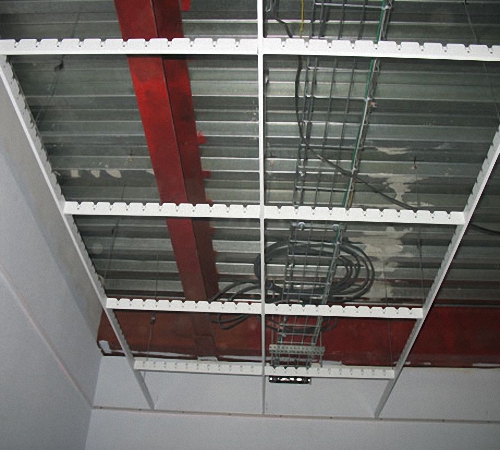
- The ceiling of Grillo perfectly hides all communications: wiring, ventilation, thus performing a decorative function;
- Grillo ceiling allows you to lower the noise level produced by the ventilation system;
- High durability of aluminum design: Grilato's modern ceilings are made of high -quality aluminum, which does not lose color, has anti -corrosion and frost -resistant qualities, resistant to ultraviolet radiation and moisture;
- If a certain grillo ceiling is damaged, the replacement or restoration of the ceiling does not require large cash and physical costs;
- The Grilato ceiling goes well with other varieties of ceilings, so the use of the Grillo ceiling will be an excellent design solution for the design of any interior;
- In the manufacture of grillo ceilings, manufacturers do not use toxic drugs, so such structures are safe for human health;
- Grillatho ceilings allow you to easily get to the inter -ground space for technical work;
- Grillo ceilings perfectly hide the fire safety system, and even if the system works, the water will not damage the aluminum profile, due to special anti-corrosion treatment.
Ceiling Grillato Photo:

The scope of the ceilings of Grillo
Grillo ceilings are installed in those rooms where, first of all, the practicality of the ceiling is required. These are such institutions as:
- Cafe,
- restaurants,
- office rooms,
- the shops,
- boutiques,
- Theaters,
- Airports,
- Stations,
- shopping centers,
- industrial premises,
- Living spaces.
The Ceiling of Grillatho provides durability and reliability in use, therefore it is most often used as an element of design of industrial or store premises.
But, in residential premises in which they use the ceiling ventilation system - the installation of the ceiling of the Grillo is the best option.
The ceiling of Grillatho is a good solution for practical people who love unobtrusive and ease of decoration of premises.
The main varieties of the ceiling of Grillo
Depending on the color in which the aluminum profile of the ceilings of the Grillo is painted:
- White,
- silver,
- gilded,
- chrome,
- blue,
- copper,
- metal and others.
Suspended ceiling Grillo Photo:
Depending on the method of placing the profile, they distinguish:
- Standard cell ceilings Grillo,
- Grillo pyramidal ceilings,
- Ceilings in the form of blinds,
- Multi -level ceilings of Grillo.
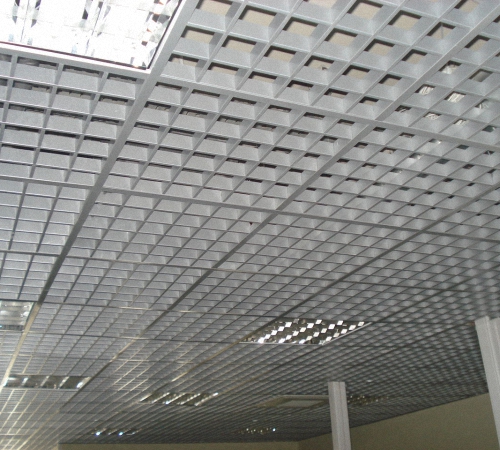
Grillo standard ceilings have ordinary square cells that differ only in size and consist of an aluminum U-shaped profile.
The pyramidal ceiling of Grillatho will give the ceiling an extraordinary shape and an original visual effect. For the device of the Grillo pyramidal ceiling, use an Y-shaped profile. Such a ceiling looks great in gold, chrome color or in wood decoration.
Grillo ceiling in the form of blinds is a great option for a room with a limited space, such as a corridor. The ceiling in the form of blinds is able to ensure the speed and ease of access to the main ceiling. Therefore, Grillo ceilings in the form of blinds are installed in places where communications are carried out in the subservient space. Grillato -shaped grilling ceilings consist of straight and transverse aluminum profiles made in the form of the letter U.
Grillo multilevel ceilings are used to embody extraordinary design solutions, and consist of ordinary aluminum U-shaped profiles, which are placed at a different distance from the main ceiling.
Grillatho ceiling - the cost of buying and installation work
Grillo ceilings installation Price: from 3 to 6 $ per 1 m. The price on the suspended ceilings of Grillato depends on the following factors:
- cell size;
- The area of \u200b\u200bthe main ceiling;
- profile color;
- the presence of anti -corrosion spraying;
- quality of material;
- The country of the ceiling manufacturer;
- complexity of combinations;
- the amount of lighting;
- Type of the ceiling Grillo.
On the ceiling of the Grillo, the cost of installation is determined, first of all, the type of ceiling: the more complex cells and profile, the higher the cost of the installation. For the standard grilling ceiling, the cost of the installation is $ 4 per 1 m. When installing the grilling ceiling Grillato, the price of a multi -level ceiling will be much more expensive than for a standard one. The installation of a multi-level ceiling is about $ 6-7 per 1 m.
Assembly of the ceiling of Grillo
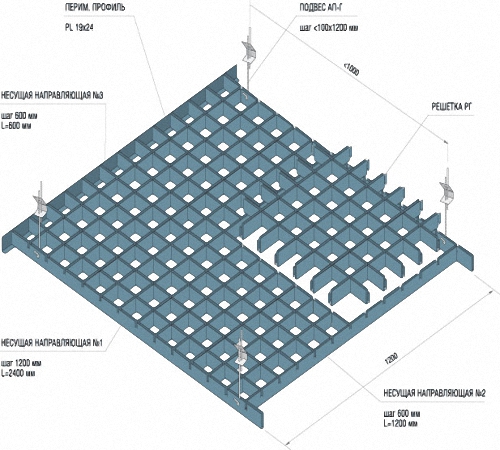
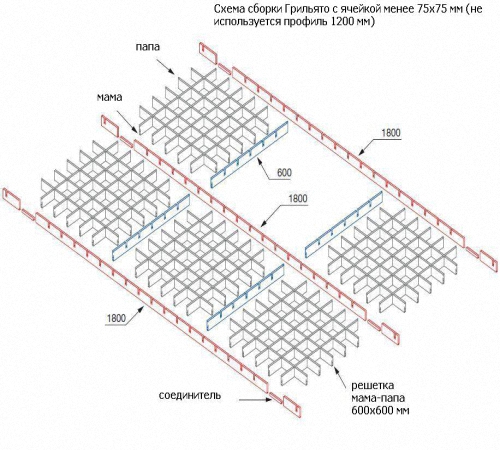
The design of the ceiling Grillo includes guides and blocks of aluminum profile. The fixation of the guides occurs on the ceiling, and then the guides should be compounded by the installation of an aluminum profile.
Grillo ceiling consists of:
- the main guides,
- short additional strains,
- suspensions,
- corner moldings,
- aluminum profile, which differs in size and height.
These are the main elements, designed to collect a variety of Grillo ceiling designs.
Before gathering the Ceiling of Grillatho, you should complete all communication works that are associated with the ceiling and determine the number of lamps that will be present on the ceiling.
Instructions for the assembly of the ceiling Grillo:
1. Using the level and pencil, make the ceiling marking. Select one wall on which it is necessary to note the starting point for further installation work.
2. When choosing a starting point, make sure that the ceiling of Grillo is attached to the main ceiling, hiding all communications and irregularities.
3. When choosing a mark, you should take three more marks on other walls, along which a line connecting the perimeter of the room will pass. During the attachment of the wall corners, the height of the future ceiling of the Grillo is fixed. Install the corners with self -tapping screws and dowels.
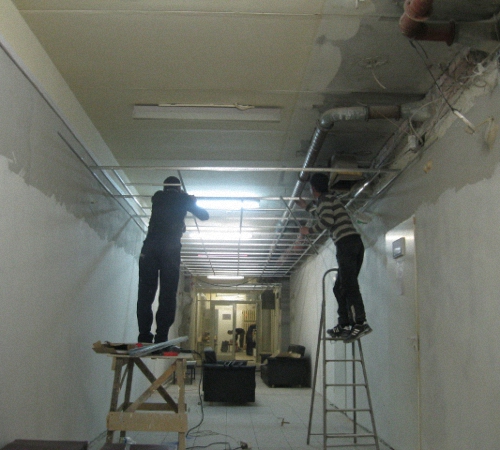
4. Along the connecting line, fix the guides. After fixing the guides, the ceiling will acquire the appearance of attached shelves. The front side of the resulting shelf should be turned down.
5. Depending on the material from which the main ceiling is made, select the screws that will well fix the design. The distance between self -tapping screws should not exceed 45 cm.
6. After fixing and fixing the main guides, go to the marking for installing the guide profile.
7. In order to fix the profile, make markings, depending on the size of the cell, and then proceed to install the profile.
8. The profile is attached to the guides and the ceiling using suspensions. The maximum distance between the fixation of the suspensions is 1.2 m.
9. The system, which will subsequently install cells, is assembled.
Grillo ceiling installation technology
The length of the supporting guides is 180 or 240 cm. Having recognized the width and the length of the ceiling, you should choose how it is better to install the guide. Divide the length and width of the room into the length of the guide in order to avoid a large consumption of the material.
After installing the location of suspensions and guides, holes should be drilled to fix them.
Determine the location of the lighting sources and drill holes.
To determine and calculate the number of suspensions when installing lighting, a number of actions should be performed:
- One lamp requires the installation of two or three suspensions;
- To fix the guides, it should be made from one to four suspensions, depending on the length of the ceiling: if the length of the guide is 240 cm, then four suspensions will be required, if - 120 cm, then three, and if the length of the guide does not exceed 60 cm, only to fix it is necessary One or two suspensions.
Installation of the main guides is made from the longest racks to short ones. The connection of the guides is carried out using special connecting elements.
After assembling the frame, the lamps should be installed. Lamps should be fixed on the suspensions.
When the aluminum frame is installed, you should check the evenness of the ceiling using the level, and then connect and check the lighting.
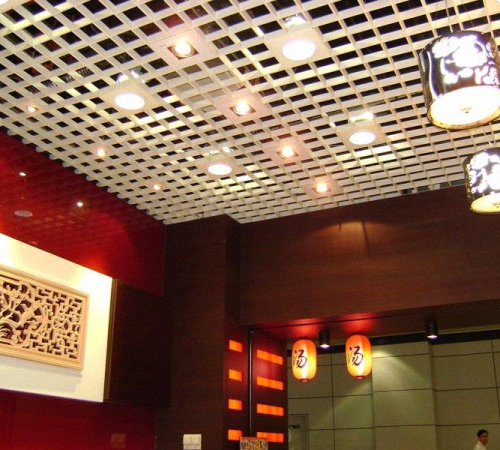
Installation of lighting for the ceiling Grillo
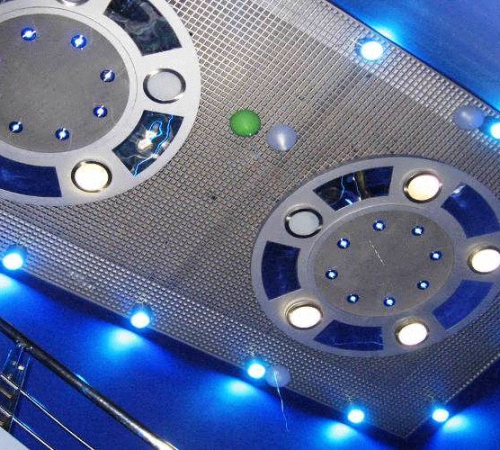
To illuminate the ceilings of the Grillo, raster type lamps are installed, which are the most convenient type of lighting for such ceilings.
The ease and harmoniousness of the use of precisely these lamps provides their size, which is fully consistent with the size of the Ceiling of the Grillo ceiling.
The presence of GB marking on the lamp indicates the fact that the lamp is designed to install precisely in the Grillo ceiling cells.
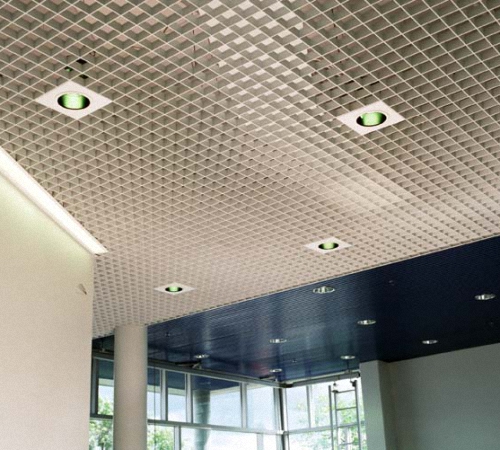
Installation of lamps on the ceiling of Grillo is carried out at any height, depending on the placement of cells. Lamps are fixed directly on the suspensions. When choosing a chrome or metallic profile color, the ceiling visually increases the space due to a good reflection of light.
Installation of lamps is carried out in any ceiling cell, so the organization of the main or zonal lighting is not difficult.
Other types of lamps, for example, point, fluorescent, halogen or LEDs, are also used for the Grillo ceiling. Lamps are built -in or suspended. The choice of lamp depends on the type of building, the functionality of the ceiling, the color of the aluminum profile and the general interior design.
Installation of ceilings Grillo Video:
