Tuplex or cork - which of them is the best substrate for the parquet board? This question...
|
|
The hall plays a particularly important role for us, since there we spend a lot of time ... |
A country house cannot be represented without a fireplace or furnace, which means that necessarily ... |
Warm water floor with your own hands: features and nuances. How to make a warm floor with your own hands, the necessary materials and tools
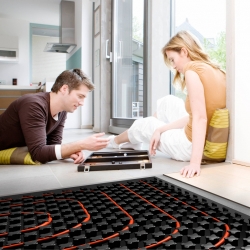
A warm hydraulic floor is a worthy alternative to traditional radiator heating in private houses. Expenses and labor costs for its installation, regarding other options for warm floors, are higher, but the initial investments fully justify themselves. In operation, a water circuit is much cheaper. To reduce the costs of arranging heating, some owners of the houses are thinking about independent installation of underfloor heating. For high -quality work, it is not enough to purchase materials and prepare the tool, the main thing is to delve into the essence of the technology, to understand the calculations, the basics of design and organization of the system, and determine a clear plan of action.
- Device and principle of operation of a water warm floor
- Water line: Arguments for and against
- Options for arranging the heating circuit
- Design: Calculation and Scheme Scheme Schemes
- Choosing elements of the heating system
- Equipment installation rules: the principles of system organization
- Step -by -step technology for the installation of a warm floor
- Tips for the installation of a warm water floor with your own hands
Device and principle of operation of a water warm floor
Water warm floor is a complex multicomponent system, where each element performs a clearly marked function. In general, this is a complex of pipes with a coolant laid for the finish flooring. A heated water is supplied to the pipeline, which transfers heat to the floor and air in the room.
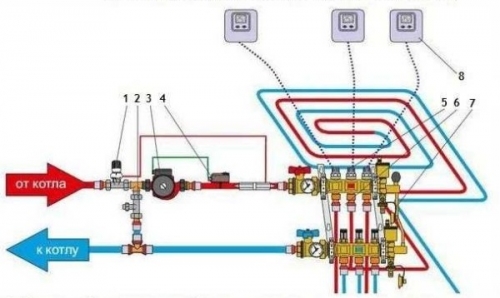
The general principle of organizing water floors is displayed in the diagram.
Explanations to the designations:
- The thermostat valve with a temperature sensor
- Balancing valve.
- Circulation pump.
- Flap is a safety thermostat.
- Electric drive valves of the collector group.
- Collector node.
- Bypass is a mock valve.
- A room thermostat.
The essence of the functioning of the heating system is as follows. The coolant is supplied from the boiler to the thermostatic valve. The element responds to temperature changes with an increase in the value, the subflice of chilled water from the reverse pipeline opens.
The circulation pump transfers the flow to the thermostat, which is responsible for adjusting the heating of water. Further, the liquid comes to the distribution comb and the loops of the circuit. To redirect the coolant, a collector node (comb) is used on different chains of the heating system.
Water line: Arguments for and against
Like any engineering system, installation and operation of the heating underground circuit, has pros and cons. At the planning stage, it is necessary to weigh all the disadvantages and advantages of a warm water floor.
Main advantages:
- Economy. In terms of operational consumption, the water system is less expensive in comparison with electric heating. Water floor is the best solution for a private house. Compared to traditional radiator heating, the savings are up to 20%.
- Safety. A person does not directly contact with a heating contour heat transmitted through a layer of the floor pie.
- Aesthetics. All components and equipment are out of sight. The rejection of wall radiators makes the room more attractive.
- The uniformity of heating. Floor heating contributes to uniform heating of the room. Cold zones are excluded.
- Durability. A competently designed system, the use of quality pipes and proper installation, the key to the uninterrupted operation of the heating complex. The service life of a warm floor is about 40 years.
It should be mentioned about the minuses of the water system:
- complexity of installation;
- significant initial investments;
- the complexity of the implementation of technology in narrow corridors and on the stairs;
- drying of air in the room;
- the difficulty of repair in the occurrence of pipes leaks occur.
Important! Water floor cannot be done in a multi -storey building with a centralized heating system. Technically, the system can be implemented, but this will violate the thermal balance between the apartments. In neighbors, the pressure in the pipeline will decrease, and the temperature of the heating of the batteries will decrease
Methods of arranging the heating circuit
There are three main options for installing a warm water floor with your own hands:
- wet technology;
- flooring;
- wooden method.
The chosen technology determines the composition and alternity of the layers of floor laying.
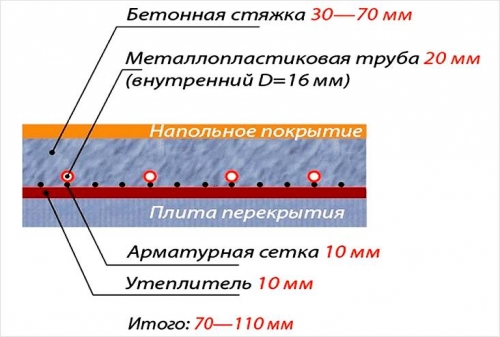
Wet method. It implies pouring the heating circuit with a concrete screed. The technology is most common due to relative accessibility and good heat capacity. Minus of the method of large weight system, increasing the load on the foundation and floors.
The concrete system cake includes:
- Black base of the floor slab.
- Waterproofing layer.
- Insulation to exclude the appearance of cold bridges and maximum heat accumulation.
- Polyethylene total layer thickness of about 150 microns.
- A reinforcing mesh to increase the strength of the screed.
- The coil of the pipeline.
- Concrete screed.
- Submit for the floor covering.
- Facing.
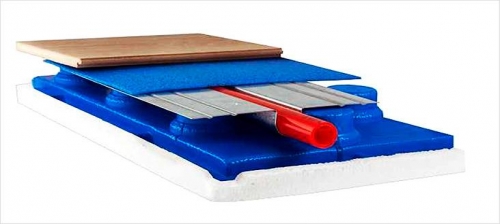
The flooring and wooden system is mainly used in the construction of wooden houses. Their advantage is the possibility of operation immediately after installation, the lack of increased heat loss.
Scheme of the organization of a flooring water floor:
- Black floor.
- The heat-insulating substrate with bosses 30-70 mm thick.
- Heating circuit. The pipe is mounted in an aluminum plate.
- Substrate. Moisture -resistant drywall, chipboard or plywood the choice depends on the finish coating.
- Layer of cladding.
Installation of a water circuit in a wooden system is performed in different ways:
- A heater is placed between the lags, and heating pipes are placed on top, the pie is covered with plywood and finish.
- On the lags, thermal insulation from polystyrene foam is fixed, plywood or OSP is laid on top, in which grooves are formed under the pipeline. The surface is covered with foil and placed a water circuit, on top of the laminate.
- The use of aluminum plates on top of the lag. After placing pipes, the floor is covered with chipboard and the finish coating is lined.
Design: Calculation and Scheme Scheme Schemes
Before proceeding with the choice of heating equipment and related elements, it is necessary to calculate the system. It is better to entrust the responsible work to the specialist. Ultimately, the results of the calculations should answer the following questions:
- what is the length and diameter of the heating circuit;
- how many loops of the coils are connected to one collector;
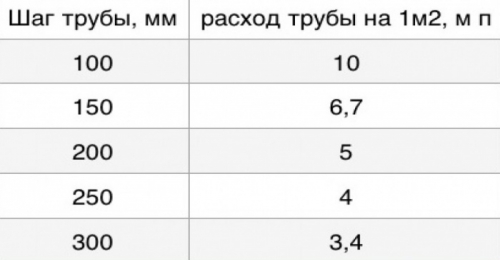
- step layout of the circuit, pipe consumption.
The engineer-engineer during calculations takes into account a number of factors:
- climatic features of the region;
- thermal costs of the room that depend on the materials of structural elements: walls, roofs, etc.;
- the presence of an additional heating system;
- the area of \u200b\u200bglazing of the house;
- type of finish coating;
- the purpose of the room.
When calculating, they adhere to the following rules and norms:
- Optimum flooring: kitchen 21-25s, living rooms 28C, lobby 30C, pools, bathrooms 31-33C.
- The maximum length of the circuit depends on its diameter: the length of the coil with a cross section of 16 mm 80 m, 17 mm 100 m, 20 mm 120 m.
- All the loops of the system should have the same diameter, the length is permissible different. It is better to divide the area into several areas than to increase the power of the pump.
- The layout step depends on the estimated temperature of the coolant and the density of the heat flow. The range of values \u200b\u200bis 100-600 mm.
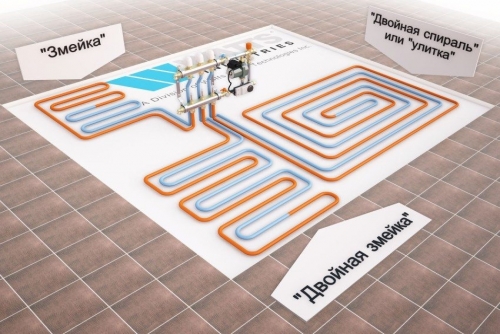
An important point of design, the choice of the placement scheme of the thermal line. There are three options: a snake, a snail, combined.
Snake.The easiest way to implement. The pipeline is laid in sequential loops going from one wall to another, and return to the collector. The deficiency is uneven heating.
Snail.The line and reverse line of the highway go near each other, a loop forms in the center of the room. Most of the warm floors are equipped according to this scheme, since it provides the same intensity of the heating of the floor.
Combined. The method is relevant for premises of complex configuration and rooms with outer walls. The regional zones are formed by a snake, and the remaining area with a snail.
Features of the distribution in contours:
- Each loop should be placed within the boundaries of one room. Exclusion neighboring bathrooms, for example, toilet and bathroom.
- When laying several circuits within the same room, it is desirable that their length is approximately the same. The maximum allowable run of length is 15 m.
- The coverage area of \u200b\u200bnot more than 40 sq.m. The maximum length of one side of the loop is 8 m.
Choosing elements of the heating system
Having calculated the system, you can start choosing components. The main attention should be paid to these elements:
- collector;
- type of pipes;
- option of thermal insulation and substrate.
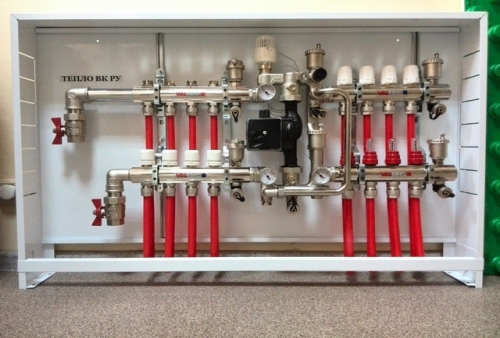
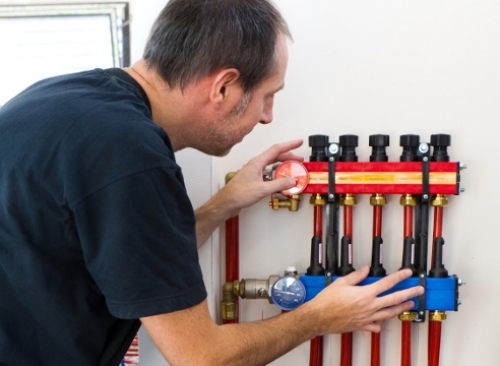
Collector node. The distribution element is one of the most important components of the heating system. In addition to redirecting the coolant, the equipment regulates the temperature, balances the loops, and removes air.
In a primitive version, the collector is equipped with shut -off valves. Such an assembly reduces the reducing the system, but limits the possibilities of adjustment. Optimal if the distribution unit is equipped:
- balancing valves and overlapping valves;
- automatic air vent;
- drainage channels for draining the coolant;
- fitings for fixing pipes.
In the absence of a separate riser under a warm floor, a mixing unit is required to the complex of equipment is responsible for the preparation of the coolant. The construction of the node includes: pump, bypass, thermostatic valve.
Type of pipeline.The main choice lies between the following types of pipe rental:
- Sewed polyethylene. The best option for pert or PEXA pipe with a stitching density of about 85%. Docking of the circuit using fittings, the maximum temperature of the coolant supply 120C. You should give preference to modifications with an EVOH barrier layer that reduces oxygen diffusion.
- Metalloplastics. The material has good thermal conductivity and is resistant to deformations, but is afraid of multiple flexion/extensions. When scrolling about the axis, there is a risk of damage to the aluminum layer.
- Copper rental. The undoubted leader, according to the criteria of thermal conductivity, durability, inappropriateness of corrosion, strength and ability to bend along a small radius. Minus high cost, the need for expensive components.
- Hofra made of stainless steel. A Hoshlang pipe has a lot of advantages comparable to copper piping. Disadvantages: vulnerability of steel to a number of chemicals contained in water, roughness of the inner walls.
Substrate.The bedding material should have low thermal conductivity, be elastic, durable, resistant to temperature fluctuations and waterproof. These criteria are more consistent with:
- polystyrene foam;
- a substrate of foamed polyethylene;
- metallized heat -reflecting film;
- substers with pimples.
Equipment installation rules: the principles of system organization
We denote the basic requirements for the placement of structural elements of a warm floor:
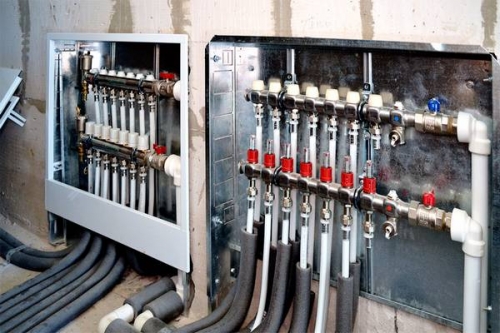
- The collector is mounted in a special box. The width of the block 12 cm. The exact dimensions are determined taking into account the complete equipment of the distribution unit.
- Under the collector group, you need to leave the distance to the floor for the bend of the summarized circuits.
- One of the main rules for laying a warm water floor with your own hands is the installation of the collector equally at all of the contours. That is, with the preservation of approximately the same length of the loops. As an option, it is possible to approach the cabinet to the largest contour.
- Installation of a collector unit above the level of a warm floor. The removal of the contours up from the cabinet is not allowed. Otherwise, the air removal system will fail.
Step -by -step technology for the installation of a warm floor
The main preparatory work before starting work on installing a warm water floor with their own hands includes:
- system calculation;
- selection of structural elements;
- determination of the method of laying a snake;
- selection of additional materials, tools;
- preparation of the premises.
The first three points are discussed above. The next step is the selection of the necessary materials for a warm water floor. To arrange a system by the method of wet screed, you will need:
- dampfer tape;
- cement, sand;
- reinforcing mesh;
- rolled insulation;
- polyethylene film;
- construction tape;
- reinforcing tape;
- level, clamps.
The preparation of the premises is reduced to the following actions:
- Take all the furniture from the room.
- Clean the premises of garbage.
- Find the installation sites of the collector-mixing unit.
- If necessary, hire a niche in the wall.
At the end of dusty work, you can proceed to the installation of a warm floor cake. Further alternating actions include the following stages.
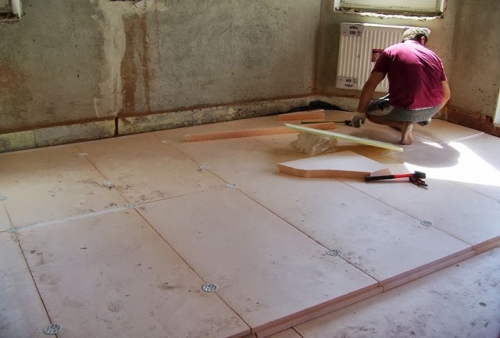
Laying the heat -insulating layer. The insulation is placed on an even base. Thermal insulation plates are tightly joined, the joints are glued with tape, and plastic dowels are fixed at the corners.
Installation of pipes and connection to the collector. Mark the circuits of the contours on the basis of the perimeter of the room to glue with a dumpfer ribbon. Put the pipes along the lines, fixing them with brackets. Remove the loops to the collector and write down the length of each circuit.
Placement of a reinforcing grid. It is enough to place a grid of 3 mm with a cross -section of 3 mm on top of the line, the dimensions of cells 10*10 cm. Metal reinforcement can be replaced with plastic. The main task of the grid is prevented by cracking screed.
Resenting and checking the system. The stage is necessary to exclude possible malfunctions and leaks before filling the screed. Procedure:
- Open the ducts on the collector, all the contours except one block.
- Connect the tap water, connect the hose to the drain pipe and bring it to the sewer.
- After checking, block the circuit, and do similar actions with other loops.
Fill the screed. Install the beacons, prepare a solution, the ratio of components: 1: 3 (cement: sand), water a third of the mass of cement. Mix the mixture thoroughly with a mixer and pour the floor, starting from the far corner.
Finished adjustment. After 3 weeks, the balancing of the loops of the water line is performed. When the circulation in the contours is established, they begin to start the heated coolant.
Commissioning. At the finish stage, the system is filled with warm water, starting with 23-24C and daily increasing the temperature by 3-5C.
Do -it -yourself control temperature adjustment:
- On the heat -regulating tap, set 23C, start the pump to the minimum power and leave such parameters for the day.
- After 24 hours, increase the temperature to 28 pp.
- Check the difference in temperature indicators of the feed collector and return it should not be more than 10C. Otherwise, it is necessary to increase the speed of the pump.
To feel heating the floor, you need to wait a couple of hours. The final adjustment of the temperature and the pump takes time.
Tips for the installation of a warm water floor with your own hands
Expert recommendations will help plan and correctly equip the heating system:
- The zones of the room along the outer walls, near the balconies are designed by pipes, laid a more densely small step stabilizes the heating of the room.
- When choosing a snake, the consumption of pipes is larger, since the scheme involves a reduced step. With a spiral, the distance between the pipes up to 20 cm.
- It is advisable to add polypropylene fiber -fiber to the concrete solution, this will increase the strength of the screed.
- Drinking pipes with couplings during installation in the screed is prohibited.
- The thickness of the insulation layer depends on the base: the floors on the ground from 10 cm, the first floor with a basement of 5 cm, the second floor 3 cm.
- The height of the screed is determined by the type of flooring and pipe laying steps. A screed 3-5 cm thick is equipped under the tile.
The choice of qualitative components and compliance with installation technology is the key to durability and uninterrupted operation of the warm water floor. The debugged heating system will create a comfortable microclimate into the room.
Warm water floor with your own hands: video

