From such an event as sealing seams in panel houses, in...
|
|
The size of the cellar depends on the size of the foundation and the height of the base. Often the height of the ceilings ... |
The construction of wooden houses is gaining popularity again, because many ... |
How to pour concrete floor

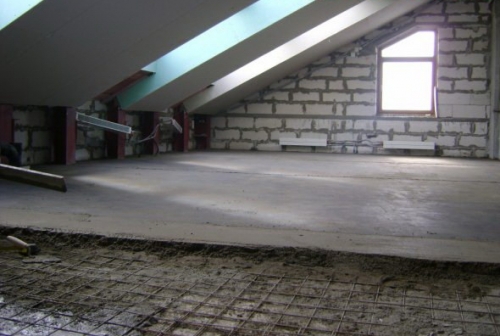
Due to its strength, durability, unpretentiousness and multifunctionality, concrete floors are popular not only in rooms where large loads on the surface of the floor are expected, but also in private housing construction. So, for example, a concrete floor in the kitchen, bathroom and bathroom is simply required. And in the bedrooms, hallways, living rooms and other rooms, concrete filling began to use a warm floor with the appearance of the system, which solved an important problem, which is that such a floor is very cold. Even in private houses, where exclusively wooden floors on the lags used to be equipped before, they began to pour concrete everywhere. And here, questions began to arise how to fill the concrete floor on the ground and what are the features of the filling on the overlap. Within the framework of this article, we will reveal the general technology of filling and denote some nuances and differences.
- Technology for laying concrete floors
-
How to make a concrete floor on the ground correctly
- Conditions under which the concrete floor is possible on the ground
- Marking the level of finishing concrete floor: zero mark
- Work on the preparation of the base
- Formation of pushing from gravel, sand and crushed stone
- Laying waterproofing and thermal insulation
- Reinforcement of the concrete floor
- Lighthouse installation and map formation
- Preparation of a solution for pouring concrete floor
- Pouring concrete floor, leveling the solution
- Aligning screed of a concrete floor
- How to fill the concrete floor on the ceilings correctly
- Pouring concrete floor: video example
Technology for laying concrete floors
Concrete floors can be equipped on various surfaces: directly on the ground, on the floor plate, on the old concrete coating, even on the old wooden floor. Concrete is simple, not demanding material available to everyone, and, importantly, relatively cheap.
In order for the floor in the end to turn out to be strong and durable, all technological conditions and stages of work should be fulfilled. When pouring concrete on different surfaces, there are distinctive features, but there are general rules for all cases.
Concrete floors Pouring technology And the stages of work:
- Waterproofing of the base.
- Thermal insulation.
- Reinforcement.
- Installation of guides (lighthouses).
- Fill the black concrete floor.
- Grinding the surface of the concrete floor.
- Fill the aligning screed.
Depending on the design features of the premises, some stages of work can be added. For example, when arranging a concrete floor on the ground, on the basis of a spift, it is necessary to perform.
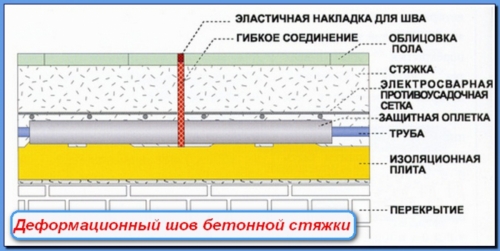
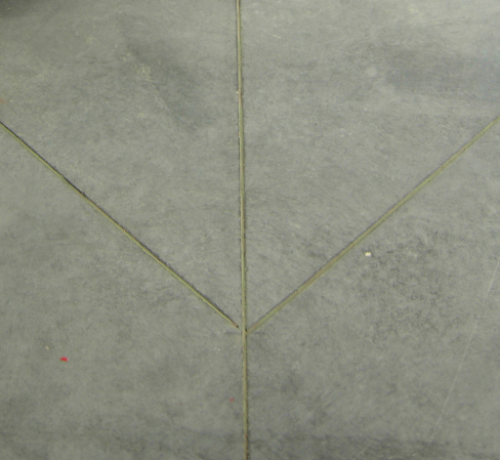
To protect the concrete screed from cracking, deformation seams are cut into it, which have three types of only:
- Insulating deformation seams They are performed in places of contact of the concrete floor with other structural elements of the structure: walls, columns, ledges, etc. This is necessary so that vibrations are not transmitted from the floor to other structures. Otherwise, there may be a skew or partial destruction of the foundation.
- Structural seams They are executed in places where concrete freezes unevenly, i.e. In the event that the pouring took place not in one reception, but with interruptions that were more than 4 hours.
- Shrinkage seams Performed to relieve voltage due to uneven shrinkage and drying.
Deformation seams must be cut before arbitrary cracks appear, but at the same time, concrete should already gain the necessary strength. The depth of the seams should be 1/3 of the thickness of the concrete layer. In the future, the seams are filled with special sealants.
Given the complexity and dusting of work on the arrangement of the concrete floor, many hire construction teams for their implementation. The price depends on concrete floors, first of all, on the complexity of the ordered works and the thickness of the layer. The cheapest option would be an ordinary cement-sand screed. Coating with reinforcement will cost a little more expensive. The cost of the concrete floor is influenced by the type of reinforcing grid: if it is an ordinary road grid, it will turn out cheaper, and if the frame welded from the reinforcement, then more expensive. The most biting option is a concrete floor with a hardened upper layer, it will cost 30 40 % more than a regular floor of the same thickness.
Possessing minimal skills in construction, knowing how to handle the tool and inviting one or two partners, you can easily fill the concrete floor with your own hands. It is enough to make calculations, stock up on the necessary tool, material and study the technology so that everyone will perform their functions and argue. Then the price will depend on the filling of the concrete floor only on the material that will be used and its quantity.
How to make a concrete floor on the ground correctly
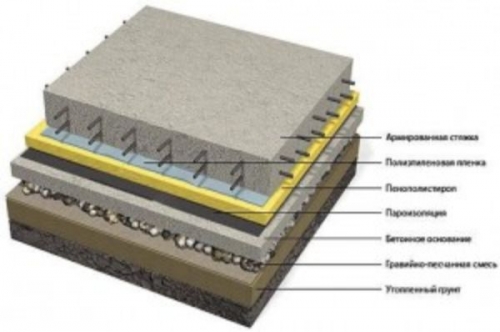
The arrangement of the floor directly on the ground is always fraught with a number of questions: what to make a spatch from, and what layer, and how to waterproof, and at what stage to insulate and so on. The concrete floor on the ground is a layered pie, which we will talk about below.
Pouring concrete floor: pie pattern
Conditions under which the concrete floor is possible on the ground
Before moving directly to the technological process of the arrangement of the concrete floor, I would like to note that not on all soils you can pour a concrete floor. Firstly, the level of groundwater should not be higher than 4 5 m to exclude flooring and sucking moisture through the capillaries. Secondly, the soil should not be mobile, otherwise the concrete floor can quickly collapse, while damaging the foundation. Thirdly, the house in which such a floor is planned should be resident and heated in winter, since the soil freezes in winter, and with it the floor, which will exert additional pressure on the foundation, deforming it. Well, the last restriction of the soil should be dry.
Marking the level of finishing concrete floor: zero mark
We begin all work on arranging the floor only after all the walls are completely erected and the structure is covered with a roof. So we will be protected from the surprises of nature.
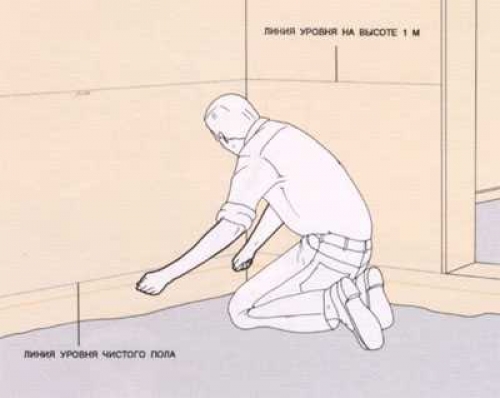
First of all, you need to outline the level of the final sex, i.e. The mark to which we will fill the floor. Since we do not plan to carry out the threshold, we will focus on the bottom of the doorway, so that the floor turns out to be even and the same in all rooms.
We apply the zero level as follows: we put up exactly 1 m from the lowest point of the doorway. We apply a mark on the wall, then transfer the mark to all walls in the room, draw a line whose horizontal is constantly controlled using the level.
After the line is applied, we lay 1 m down along the entire perimeter of the room from this line. We draw a line. This will be the level of the final sex. For convenience in the corners of the room, clog the nails on the line and pull the cord. So it will be easier to navigate.
Work on the preparation of the base
We remove all construction garbage from the room. Then we remove the upper layer of soil and take it out for garden or landscape needs. What depth to remove the soil? The concrete floor on the ground is a multi -layer pie, about 30 35 cm thick. Focusing on a zero mark, we are just trying to remove the soil to a depth of 35 cm.
Be sure to compact the surface of the soil. It is better to do this with a special vibration plate or vibration aid, but if there is no such equipment in the arsenal, you can do with improvised means. We will need a log to which we will attach the pens, and we will score an even board from below. Watching this log together, we compact the soil to such an extent that there are no traces of steps on its surface.
Important! In the case of high strip foundations, there are situations when the distance from the zero mark to the soil is more than 35 cm. In this case, remove the upper fertile layer, and pour sand instead and thoroughly trim.
Measures for additional waterproofing of the floor may also include the arrangement of clay pouring. Then clay is poured on top of the soil and is thoroughly compacted. In the future, it will prevent the penetration of moisture into the floor.
Formation of pushing from gravel, sand and crushed stone
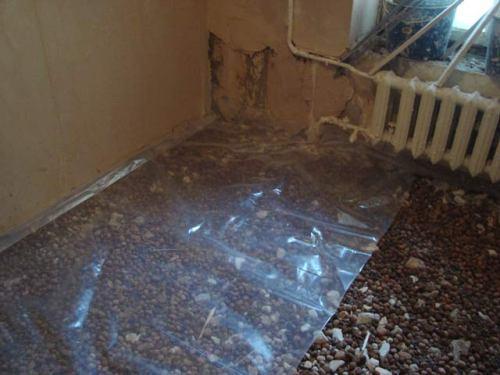
Before you make a concrete floor on the ground, it is necessary to perform a spiver.
The first layer gravel (5 10 cm). Water with water and seal. To make it easier to control the thickness of the layer, drive the pegs into the ground, set them in level, and after filling and tamping we take them out.
The second layer sand (10 cm). We control the thickness and level that are the same pegs. We shed the layer with water and seal with a vibration plate or a log with a board. For this add -on, you can use ravine sand with impurities.
The third layer crushed stone (10 cm). We thoroughly level and compact. Our task is to make sure that there are no sharp edges of crushed stone on the surface. If they are, it is necessary to smooth them out by turning the pebbles or removing. Crushed stone with a fraction of 40 50 mm should be used. After tamping, crushed stone can be slightly sprinkled with sand or crumb crumbs and tightened again.
Important! Do not forget to control the horizontal using the level.
It should be noted that the spray can be performed only from two layers: sand and crushed stone. Also, to simplify control over the thickness of the layers, their level can be applied to the walls of the foundation.
Laying waterproofing and thermal insulation
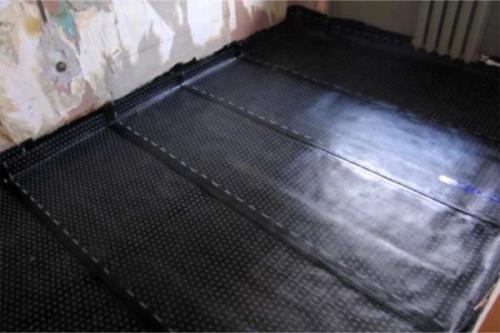
If the crushed stone layer is compressed tightly and the sharp corners are not observed, then the waterproofing material can be covered directly on it. To do this, you can use modern rolled materials and membranes, roofing material in several layers or simply polyethylene film with a density of at least 200 microns. We spread the material over the entire area of \u200b\u200bthe room, display the edges to the zero mark on the walls and fix it there, for example, using tape. If the canvases are not enough to cover the entire area, then the joints must be performed with an overlap of 20 cm and glued with adhesive tape.
On top of waterproofing, thermal insulation can be performed using such materials: keramzit, perlit, extruded polystyrene foam, foam polystyrene (Styrofoam), stone basalt wool (corresponding density), poliuretan foam.
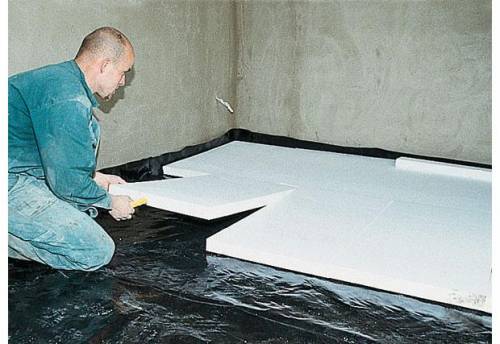
Consider the option of laying the plates of extruded polystyrene foam. They are laid out in a checkerboard pattern, tightly to each other, the joints are glued with a special adhesive tape.
Important! There are times when there is no way to perform hydro- and thermal insulation directly by adding. Then a layer of the so -called skinny concrete (liquid consistency) up to 40 mm thick is poured on top of the pouring. When he hardens, the above procedures can be performed on top. Skinny concrete firmly binds a layer of crushed stone and is a stronger base that cannot break through or damage waterproofing materials.
Reinforcement of the concrete floor
The technology of filling the concrete floor necessarily includes reinforcement in order to harden the floor as much as possible. The reinforced floor is able to withstand large loads, which are evenly distributed over the surface.
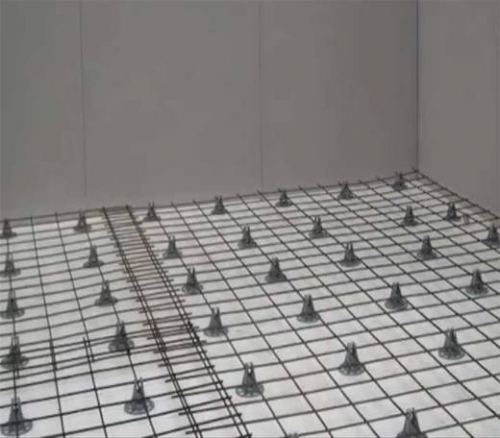
As a reinforcing material, you can use metal and plastic nets with various cells, as well as the frame of reinforcement. Most often, welded reinforcing nets are used with 5x100x100 mm dimensions. Less commonly for the sexes for which large loads will be made, use a frame welded in place from a reinforcing bar with a thickness of 8 18 mm thick. In this case, a more thorough vibration seal of the concrete mixture will be required.
The reinforcing grid or frame cannot be laid directly on the base, so it will not perform its functions and will even be superfluous. It must be raised by 1/3 of the thickness of the future concrete fill. Therefore, we install a grid or frame on stands 2 3 cm high, which are called chairs.
Lighthouse installation and map formation
The installation of guides or as they are also called lighthouses allows you to fill the concrete mixture as smooth as possible, at the same level.
As guides, you can use round cross section pipes or a metal square profile, as well as wooden bars, if their surface is smooth enough, you can lay special lighthouses made of aluminum.
We break the room into segments of 1.5 2 m wide.
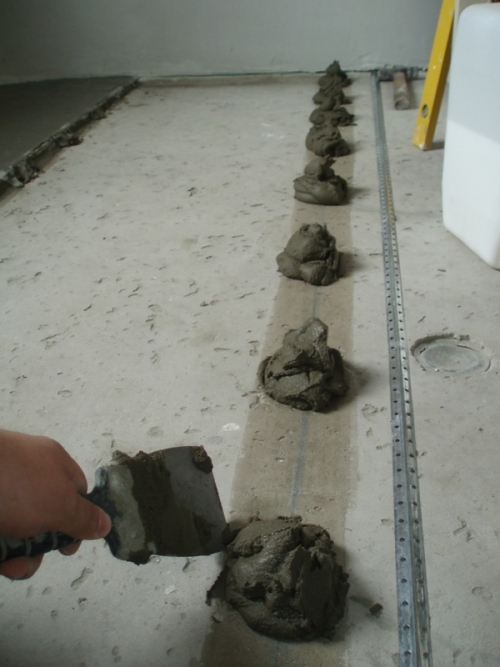
We install guides on buns made of concrete solution. Pressing them or adding the mixtures, we control the location of the lighthouses so that their upper edge is strictly along the zero line. We lubricate the guides with special oil, in extreme cases, you can work out to make them easier to extract in the future.
Important! We control the strictly horizontal location of the guides using the level and leveling. It will be possible to fill the floor with concrete after the buns hardened enough, so that when pressed on the lighthouse, they are not sold.
The breakdown of the room into maps is performed if its area is large enough and it is not possible to fill with concrete into one -reception. Then the room is divided into square or rectangular maps, the size of which is dictated by the performance of the construction team.
We mark the area to the sites. We knock down the formwork-frame made of freshly sawed wood or from laminated plywood. Naturally, the height of the formwork should be strictly bred to zero.
Preparation of a solution for pouring concrete floor
In order for the concrete floor to possess as better as possible thermal insulation properties, fired sand or perlite should be added to the solution. And in order to have time to pour and knead the solution, it is necessary to purchase or rent a concrete mixer.
The secret of preparing the solution is as follows:
- We fall asleep 2 buckets of perlite in a concrete mixer.
- Add 10 liters of water and knead. After adding water, the volume of the perlite should decrease markedly.
- When the sand mixes well with water, add 5 liters of cement and continue to knead.
- We add 5 liters of water and continue to knead.
- When the mixture becomes homogeneous, add 10 liters of sand and 2 liters of water. Mold until the mixture becomes loose.
- We pause in a batch for 10 minutes, in no case add water.
- After 10 minutes, we continue the batch until the solution becomes plastic.
For filling the floor, it is best to use the cement of the M400 and M500.
Pouring concrete floor, leveling the solution
We begin to fill the floor with the opposite of the door of the corner, trying to fill out several cards in one or two reception.
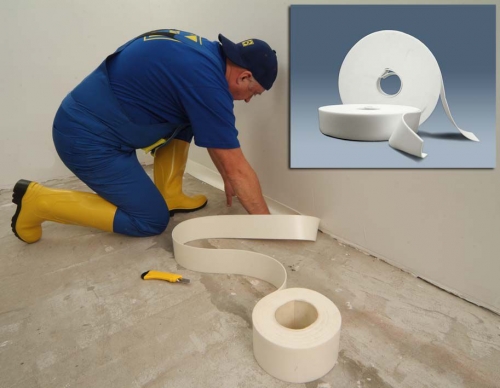
Since the concrete should not fit tightly against the walls and protruding structures of the building, we are isolated, laying the damping tape along them.
Pour the resulting solution into a card with a layer of 10 cm and level it with a shovel. We perform piercing movements to remove excess air and compact the solution. If possible, you can use the deep vibrator, which is immersed in concrete, and when concrete milk appears on the surface, it is transferred to another place.
Drive the solution with the rule. We install it on the guides and pull it with light movements to the left-right. So excess concrete are removed and distributed into voids of other cards.
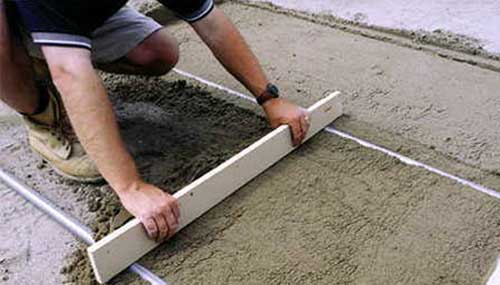
After completing the level of the solution, we take them out along the guides and fill in the released space with a fresh solution.
In the following days, we constantly moisten the surface with water, you can additionally cover the concrete with a film. We give concrete to gain the maximum of its strength characteristics within 4 5 weeks.
Aligning screed of a concrete floor
When pouring a concrete floor, it is rarely possible to make the surface perfectly even, most often there are small flaws, influxes. If you plan to lay ceramic tiles, then perfect evenness is not needed, so you can immediately start work. But if you want to make a floor from a laminate or linoleum, then the surface should be perfectly flat.
Self -leveling mixtures make it possible to make the floor surface mirrored.
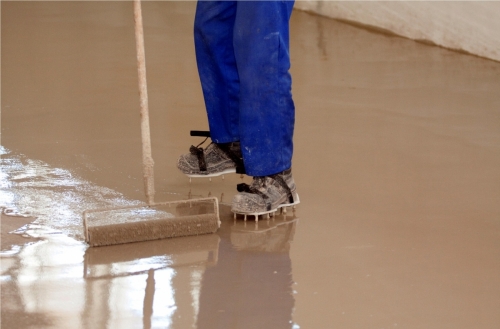
According to the instructions on the package, we prepare a solution of a self -leveling mixture, pour it on the floor and level it with a special brush. Then roll with a needle roller to remove air bubbles from the solution. We leave to dry for at least 1 week. Then the concrete floor is ready for use.
How to fill the concrete floor on the ceilings correctly
A feature of the pouring of the concrete floor by ceilings is that there is no need to perform a spift.
We check the concrete slab of the ceiling, whether there are cracks, cracks and chips on it. If we find, then we seize with a repair solution. A wooden floor should also be strong, without large cracks.
We can waterproof the ceiling by placing a plastic film with a density of 200 300 microns without fail.
We put thermal insulation on top. It can be polystyrene foam, extruded polystyrene plate, basalt wool slabs or spraying polyurethane foam.
Install the beacons and fill the solution with a thickness of 100 mm. We perform all other operations in the same way as in the arrangement of the floor on the ground. If something is not clear to you in the pouring instructions, perhaps you will help you watch the showing concrete floor of the video.
The filling of the concrete floor is quite capable of performing yourself, the main thing is not to save on materials and follow the technological process. Then the floor will be able to last decades without requiring major repairs.

Fucking, clearly
Fucking, clearly