The use of glass -fruits is associated primarily with internal and external ...
|
|
When installing or updating the heating system, it is important to correctly decide on ... |
Beauty and reliability are the basic requirements that consumers make ... |
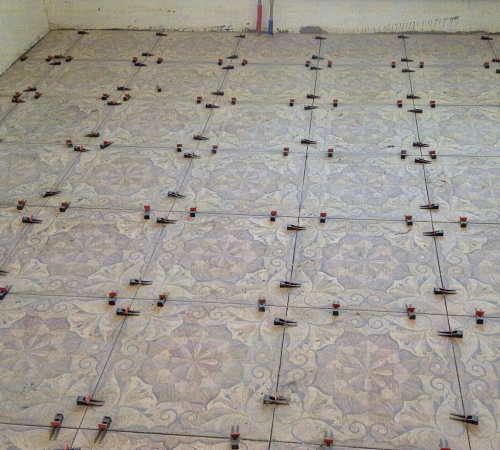
Tile alignment with your own hands
If it is planned to lay tiles on the surface with drops in height, then you must align the tiles. For this, both specialized devices are used and the process is carried out on their own. We will consider further about the methods of leveling tiles and technologies for their conduct.
Table of contents:
- Tile alignment system: device, advantages and disadvantages
- DIY Tile alignment of tiles
- Technology for using a tile laying and alignment system
- Preparation and alignment for floor tiles
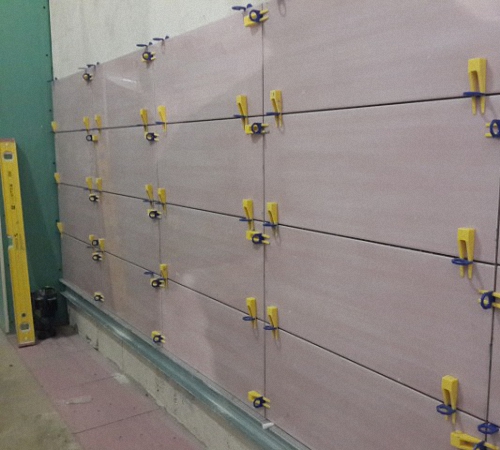
Tile alignment system: device, advantages and disadvantages
Using the use of the tile alignment system, it is possible to make styling much faster, and the surface at the same time is evened and absent drops. This system, according to the principle of action, replaces the crosses that are previously installed in the seams and has the form of wedges in which there are clamps. The main part of the system is the wedge in the form of spacers, with which it is possible to adjust the location of the tile on the surface. To fix the position of these elements, the second version of the wedges is used - clamping. Thus, it is possible to install and fix the tile in a certain position. Thus, the surface, after laying the tile, becomes perfectly flat.
When laying large parts of the tile, they should be covered with two layers of glue. This system has a large number of advantages and becomes quite popular among the use of both beginners and professionals. In order to study the feasibility of using the tile alignment system, we propose to study its advantages:
1. Obtaining a perfectly flat floor. With the help of this advantage, it is possible to achieve a perfectly flat flooring with tiles. The appearance of the masonry improves, and the quality of operation of the flooring is also improved. The process of installing tiles is accelerated, and work on its implementation becomes easier.
2. On the surface of the floor are the same seams in size, the tiles look perfect. At the same time, the use of crosses for seams becomes impractical. The distance between the tiles is the same on any section of the floor.
3. The glue is evenly distributed over the entire surface of the floor, for the uneven surface of the floor, an adhesive composition is used, distributed over the surface. Using the solution, it is possible to fill in all the voids formed on the floor. Without this system, the ideal distribution of glue on the surface cannot be achieved.
4. Laying tiles in this way prevents the shedding of tiles during its operation. Even large loads to the floor surface do not lead to its subsidence.
5. Fixation of the tiles in the necessary position is another advantage of this system, which is difficult to achieve, laying the tile manually. After drying the tiles laid down in the usual way, displaced or sagging areas appear on the floor. By applying the clamping of tile leveling, it is possible to get rid of this drawback. The tile is installed in the position necessary for us and is in it until it dries completely.
Despite this, this system has certain shortcomings, namely:
- time costs for installing and removing clamps;
- seams, in this case, are filled with glue and need additional cleaning;
- To buy the system, you will need to spend additional funds, which is not always profitable, especially if it is necessary to install tiles in a room with a small area.
DIY Tile alignment of tiles
There are two options for aligning tiles. The first is cheaper and most often used. It is used if the surface is characterized by the presence of small drops in height. In this case, a wedge is used to clamp the basic element, and the tile itself is installed on an even base.
The cost of the second version of the system for aligning tiles is much larger. This system is distinguished by a peculiar structure, the shape of the inserts is curved. Thus, it is possible to achieve self -leveling, without additional manual intervention. The alignment of the plate occurs automatically, while laying tiles on the floor with a large number of defects is allowed.
Tile alignment system video:
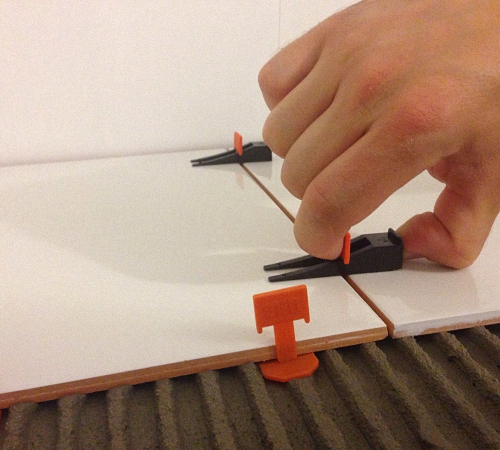
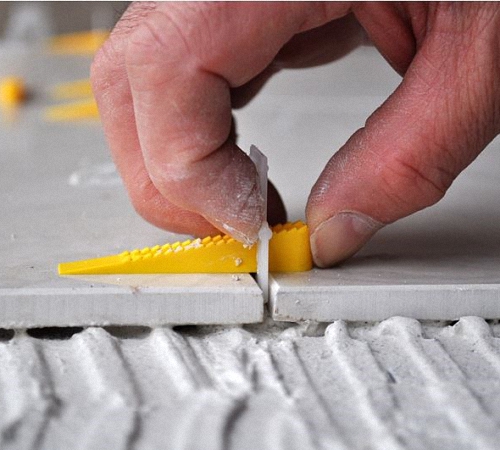
The use of this system is simplicity, although it requires additional time to install it. However, the result is worth it. To install this system, the following actions should be performed:
- Apply glue to the tile with a gear spatula;
- Install the tile and attach the alignment system to it;
- Laying the second tiles;
- To fix the inserts, use wedges;
- Install the inserts on both sides of the tiles;
- Complete the clip to a tight fixation of the inserts;
- Calculate the seams in the ratio with the adapted adhesive composition.
Keep in mind that the glue should be cleaned from the seams in the process of laying the tiles. Otherwise, it will take a lot of time and effort to remove it.
Technology for using a tile laying and alignment system
We offer to familiarize yourself with the step -by -step instructions for laying tiles with your own hands using the alignment system:
1. Initially, the surface should be prepared, it should be cleared of dust and dirt, as well as degreas.
2. In order to increase the level of adhesion of glue with the surface, the floor should be treated with a primer.
3. Glue, it is necessary to prepare using the instructions. Since otherwise, problems with its drying and strength may occur.
4. Apply glue to the floor, according to the thickness specified in the instructions. Before installing the tiles, install two clamps on the floor, retreating from the edge of the tile one centimeter.
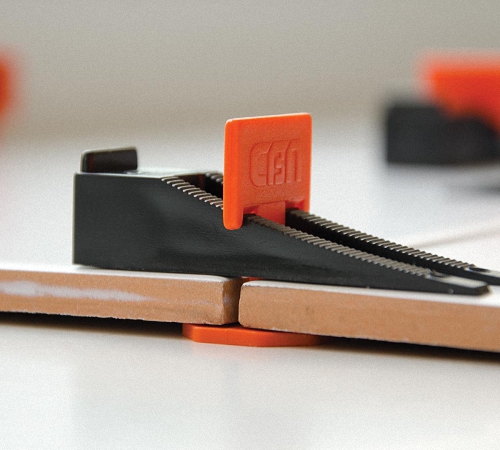
5. In the same way, install the second tile, between them an element is installed in the form of a wedge installed between the upper and lower parts of the clamps. Fix the wedge in the right position.
6. Keep in mind that the lower part of the wedge should be tightly fixed on the surface. It is with its help that alignment is carried out.
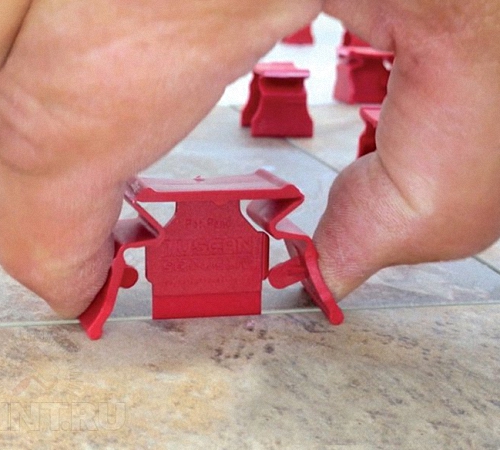
7. In the same way, other wedges are installed under each tile. Removal of wedges is carried out only after the glue is completely dried.

8. In order to get rid of wedges, a tool in the form of a hammer, chisel is used. Remove the clamps in the longitudinal direction with respect to the seams. After removing the wedge, the lower elements remain under the tile.
9. Wheelled clamps are used only once, after removal they are thrown away. Clinic can be used many times. Keep in mind that for successful alignment, the room should create optimal conditions of temperature and moist regime. The presence of a temperature of less than 15 degrees and the presence of high humidity are not allowed.
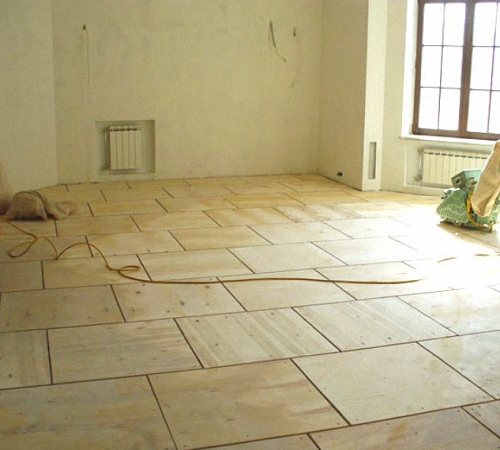
Preparation and alignment for floor tiles
Before starting tile laying, you should prepare the base for this process. First of all, the floor or walls on which the tile is laid should be perfectly even. Only in this case, it will be possible to avoid bloating or deformation of this finishing material.
If the state of the floor is critical, then it is necessary to remove the old flooring and install a new screed. Preparation of the floor for laying tiles is accompanied by the need to use tools in the form:
- spatula;
- flooring tools;
- putty;
- hammer;
- spatula;
- chisel;
- gloves.
Before the leveling, the room must be ventilated. Next, you should take out all the furniture and other items that are on the floor. In order to remove dirt, dust or fat spots from the floor, use a soldering lamp. To remove cracks or other defects, use putty. Next, you should wait until the putty dries completely.
Next, you should close all windows and doors in the room. The optimum temperature for further work is 20 degrees. Most often, tiles are laid on a concrete base. However, it should be perfectly even. In the presence of drops in height more than 3-4 cm, the floor should be previously leveled.
A wooden base - very rarely used as a carrier under the tile. Wood - prone to high moisture and temperature difference. In addition, the tree is not how hard to be the basis for the tile. Therefore, during the operation of tiles on the floor, its deformation is possible.
Laying tiles on an old wooden coating is unacceptable. Before laying the tiles, the dismantling of the old wooden coating should be carried out. Next, you should install a new concrete screed.
To check the floor before leveling sex tiles, you should use a special device - level. There are two of its options:
- water device;
- Laser -type level.
Using the level allows you to determine the highest part of the floor or wall. This point is the main one for leveling the surface. The entire floor is aligned in a ratio with this point.
The laser level allows you to quickly determine the level of curvature of the floor. The use of a water level requires the use of a pencil and a ruler to make a marking for alignment.
The preparation of the floor and its alignment is carried out in this way:
- The highest point in the room is originally determined;
- Next, you should draw lines on the walls from it, based on them will be aligned.
Next, you should start work to equalize the floor. There are several methods for performing this process:
1. Self -leveling compounds are the first and most popular method. These compounds have the shape of dry powder, their basis is cement. These compositions allow you to prepare the basis for laying a decorative flooring.
There are two options for these compositions:
- The first - less fluid, allow you to get rid of differences in height up to 4 cm;
- The second - should be applied using a thin layer, with their help finishing is performed.
Each of the compositions needs thoroughly cleaning the floor of pollution and applying a primer to their surface. To prepare the composition, you should study the instructions and combine the dry composition with water in the right proportion.
For the sake of improving the smoothness of the composition, the proportion should not be improved. Since these operations will negatively affect the quality of the resulting coating. The composition thickens very quickly, so it is recommended to prepare it portions.
The work is carried out in a completely closed room. To level the mixture, a spatula is used. These compositions are light in work, quickly level the floor. However, their only drawback is the high cost. Therefore, with the aim of saving, another method of leveling the floor is used, which we will talk about later.
2. The second method of alignment is the use of screed on a cement basis. This method is appropriate if the changes in height are more than five centimeters.
The use of this method is relevant if the floor is quite uneven. In order to fix the curvature, you will need to work hard. In addition, using a cement mortar, it will be possible to save well.
After preparing the floor and marking, the beacons should be installed. Most often, they have the shape of an ordinary even wooden beam. The first beach is installed at a distance of 2-3 cm from the wall. The second lighthouse is installed at a distance of 60-70 cm.
To check the evenness of the installation of each of the lighthouses, the level should be used. In the presence of differences between the beacons, a beam is supplied under them. After installing the beacons, a cement mortar should be prepared. For this, it will require the presence of Portland cement and clean dry sand. The proportions for their connection are one to three. You should start alignment from the far corner in the room.
Keep in mind that the presence of moisture in the sand will negatively affect its qualitative characteristics. Therefore, sand for the manufacture of screed should be absolutely dry. Next, the floor should be covered with a plastic film.
If you plan to align the floor made of wood, then for the manufacture of screed it will be necessary to mix glue with sawdust. If the floor is deformed eventually, then this composition is an ideal solution. After that, you should wait for the drying of self -leveling trains, this will take from 1 to 5 days. After drying the floor, proceed to laying tiles. For additional alignment of the floor, you should use crossings for tiles with alignment.
Using the above methods, you can also align the walls in the bathroom under the tile. However, a simpler and more reliable way is to use special floor aligning systems for tiles.
Alignment of tiles video:
![]()
StrPort construction portal 2011-2018. Articles about repair, construction, building materials.
Copying information from the site is possible only with permission of the editorial office Or indicating a direct link to the source. Legal justification