The range of flooring suitable for the bathroom includes the most ...
|
|
After a certain life of a brick foundation, it needs ... |
Aerated concrete blocks are quite popular, so it allows you to build buildings ... |
How to seal your own bathroom
In the process of repairing the bathroom sealing the joint between the plumbing and the wall, special attention should be paid. It is in the gap along the perimeter of the font that spray falls. The area under the bathroom is practically not ventilated, so puddles dry poorly, high humidity and mold appear. High -quality sealing the cracks allows you to avoid these problems and extends the life of the facing material.
- What tasks does the sealing of the bathroom solve
- Ways to seal the joint between the wall and the bathroom
- Cementing slit outdated joint processing method
- Application of mounting foam: for and against
- Installation of plastic or ceramic skirting boards
- Hermeting technology by curb tape
- Foundation of the junction of tiles
- Filling the slit of decorative grouting
- Using sealants: silicone and acrylic compositions
- General recommendations for sealing the bathroom
- Protection against moisture of a wooden floor
What tasks does the sealing of the bathroom solve
Installation of the bathroom close to the wall is impossible for a number of reasons: the curvature of the floor or the walls themselves, the inconsistency of plumbing to the dimensions of the bathroom. As a result, gaps occur through which water will seep during bathing. The lack of tight joints can lead to negative consequences:

- With active bathing or taking a shower, spray through the cracks fall on the floor. If the resulting puddles cannot be wiped in a timely manner, then the water will begin to seep on the lower floors and flood the neighbors.
- Regular flooding of the bathroom significantly increases air humidity, which provokes the appearance of mold on the walls, ceiling and field, as well as the development of pathogens.
- Increased humidity negatively affects the decoration of the premises between the stitches between the tiles lose their aesthetics and darken. Even high-quality repairs will not withstand the fatal impact of moisture and will become unusable for two to three years.
High -quality sealing the seams between the bathroom, shower, sink and wall an important stage of repair, which cannot be neglected. Even the amor of construction craft will be able to cope with work.
Ways to seal the joint between the wall and the bathroom
Before sealing the bathroom, it is necessary to evaluate the condition, size of the gap, as well as the material of the adjacent surfaces. An important factor when choosing the method of the issue price. The main thing is that the selected material meets the requirements of water and heat resistance.
We will analyze in detail how to seal the joint between the bathroom and the wall with the most common and effective methods.
Cementing slit outdated joint processing method
Grandfather method of sealing the use of cement mixture. With the advent of modern building materials, its popularity has decreased, but this method did not become less effective.
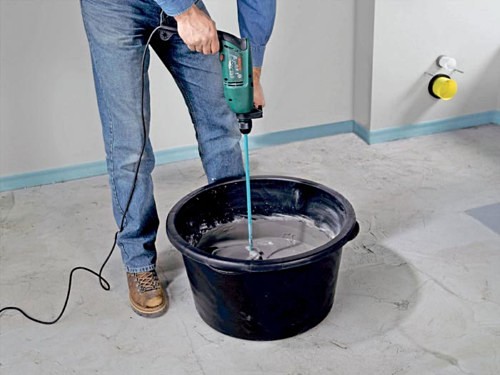
For work, you need to prepare:
- container for kneading the solution;
- sand;
- cement of the brand 400 or 500;
- plasticizer (clay or lime);
- water;
- plaster shoulder blade;
- foam sponge or pieces of rags.
The order of the solution:
- Combine sand with a plasticizer in a ratio of 4: 0.8 if lime is used, 4: 0.5 if clay.
- Add cement to the dry mixture of sand and plasticizer. The proportions of the components of the components: 4: 0.5 (sand/cement M400), 5: 1 (sand/cement M500).
- Stir the composition until smooth.
- Gradually, adding water in small doses, knead a solution of the desired consistency.

Sealing technology:
- Clean the sides of the bathroom by removing all the construction garbage, dirt or the remains of the previous grout.
- Put a container under the gap so that the cement mortar does not fill the floor.
- Cut the fabric into long segments, moisten them in the mixture and fill them with cracks.
- The spatula apply the solution along the perimeter of the plumbing of plumbing to the wall.
- Remove the excess cement mixture with a damp sponge.
After grasping the solution, the coating can be slightly polished and painted with oil paint.
Application of mounting foam: for and against
Experienced builders are used by mounting foam when performing various repair tasks. Universal building material is also used as a sealant for the bathroom. Arguments in favor of such a solution:
- accessibility of the material;
- simplicity of application;
- sufficient efficiency.
The disadvantages of using mounting foam:
- a special gun is required for work;
- the method is suitable for sealing cracks with a width of 3 cm;
- the difficulty of removing the mounting foam from the final surfaces of the tile and the bathroom.
Important! To work in a wet room, you need to choose moisture -resistant material. The best option is one -component polyurethane foam.

Sealing the bath of the bath is performed in the following sequence:
- Clean the adjacent joints and degrease the surface with alcohol or solvent.
- Wipe the dry and seal with the painting tape of the board of the bath and the wall will prevent foam on them.
- The balloon will pre -hold in a warm room will increase the elasticity of the sealant.
- Shake the bottle of foam.
- Insert the balloon into the gun and turn upside down.
- Put on gloves and carefully, moving along the joint to squeeze the foam.
- After drying, cut off the excess of foamed sealant.
Installation of plastic or ceramic skirting boards
Sealing the bath with a corner of a simple and clean method. The trimmed joint looks neat, and the curb does quite well with the task. There are two types of corners:
- Plastic. Products are affordable, easy to install and are produced in a wide range of shapes and colors. Due to the fact that polymer borders have light weight, they are often attached to the bathroom and wall through a self -adhesive tape or with the help of silicone nails.

- Ceramic. The corners of mineral raw materials are perfectly adapted for a wet microclimate of the bathroom and durable. The only drawback of ceramic borders is high cost. The skirting board is planted on a moisture -resistant adhesive solution.
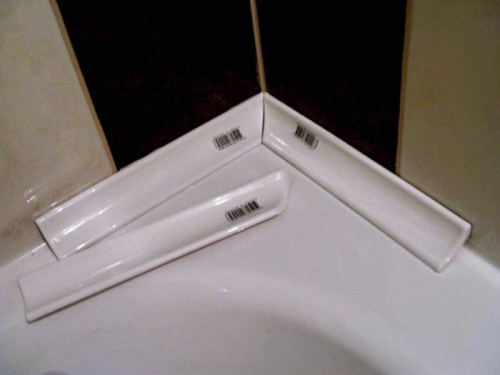


The installation procedure for plastic self -adhesive plinth:
- Cut off the curb of the desired size.
- Clean the docking surfaces.
- Take a little heated the back of the border to activate the adhesive composition, attach and tightly press the corner.
- Fill all visible seams with a transparent silicone sealant.
- From the ends of the baseboard, install plastic plugs.
The installation technology of a ceramic border resembles the process of laying tiles. The skirting board is attached to tile glue, and the seams are sealed with a moisture resistant grout.
Hermeting technology by curb tape
The sealing tape of the bathroom is produced in different widths in a variety of color solutions. When choosing a strip curb, it must be taken into account that its width should be at least 10 mm exceeding the width of the gap. It is better not to save, and install a larger strip.
The seal is glued according to the following technology:
- Surface preparation: cleaning, degreasing and drying.
- Cutting the tape into three stripes with an overlap on the side elements of 1.5 cm.
- Bending the curb along the length of the notch.
- Press the tape-mickel to the junction.

Tips for working with a tape border:
- synthetic material needs to be replaced every 2-3 years;
- after applying the tape, it is undesirable to use the bathroom within one day;
- it is better to give preference to antifungal impregnation products.
Foundation of the junction of tiles
A popular and aesthetically attractive option for closing the docking gap with tiles, selected in the same style with the entire decoration of the bathroom. The remains of the styling tile, a decorative border from a single series with tiles or ceramics in contrast can be used.
The method is universal, as it is suitable for sealing cracks of different widths.
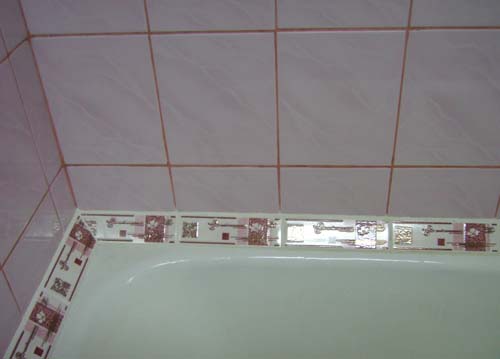
Sealing technique with bathroom tiles:
- If the width of the gap is 1-3 cm, then it must first be filled with mounting foam.
- While the foam freezes, you can cut the tile into the segments of the desired thickness.
- Apply tile glue on foam and border tiles, attach tiles to the base.
- As you lay between the elements, it is necessary to expose crosses that ensure the evenness of the inter -seams.
- After hardening the glue, fill the holes between the tiles of the grout.
If there is a large distance between the wall and the bathroom (more than 5 cm), then it is necessary to equip the structure made of moisture-resistant drywall or a kind of formwork. The frame of GKL should be thrown and lined with a liter, and the formwork is poured with a cement-sand mortar and lay the tiles on top. As a result, a practical shelf should be obtained, firmly adjacent to the bathroom.

Filling the slit of decorative grouting
The method is less in demand than the above methods, as it allows you to qualitatively sequentize joints up to 5 mm wide. At the same time, the distance from the bathtub to the wall around the entire perimeter of the adjoining should remain almost the same acceptance of 1 mm drop per linear meter. If this condition is neglected, then the seam obtained will look uneven. In situations where the gap is over 5 mm, the technology is ineffective.
Additional restriction of the use of fugues for sealing the gap material manufacturing a bath. The method is permissible only for cast -iron plumbing, since the models of acrylic and steel during operation are inclined to change their dimensions under the influence of high temperatures. Materials increase in volume or settle at high loads. As a result, the grout begins to crack and the joint is depressurized.

The advantages of using grout are:
- the decorativeness of the method decorated joint completely repeats the inter -seams, creating a single perception of the interior of the bathroom;
- accessibility for implementation applies the remains of the grout fugue after processing the seam between the tiles;
- simplicity and speed of application.
The process of processing the joint is the preparation of the seam (cleaning/degreasing), the preparation of the tinting composition and the wiping of the mixture into the gap. After a day, the fugue is cleaned with sandpaper.
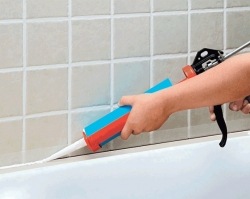
Using sealants: silicone and acrylic compositions
To seal slots up to 15 mm wide, moisture -resistant sealants are applicable. Silicone, acrylic or combined compounds are optimally suitable for work. Most often, silicone sealants are used in bathrooms, but two other options are also acceptable.
Choice nuances:
- Silicone sealant is of two types: neutral and acidic. The most suitable sanitary neutral subspecies. It contains antifungal additives. Lack of neutral sealant is high cost. Acids have a pungent odor and are able to corrode metal surfaces.
- When choosing an acrylic composition, you need to pay attention to its water resistance. A waterproof sealant for plastic is suitable for work.
- The packaging should indicate the recommended scope, working temperature and shelf life.
- It is better to buy a sealant in a store, it is advisable to choose products of popular brands: moment, titanium, Wepost, Delta.

To apply the sealant, you need to prepare: a special gun, rubber spatula, degreaser and sponge.
The procedure for sealing the seams with a sealant:
- Clean and degrease the processed surfaces.
- Leave the bath for half an hour to dry.
- Prepare a sealant: cut the tip of the bottle at an angle of 45, put a protective cap on it and place the cylinder in the mounting gun.
- Distribute the sealant evenly.
- Remove the excess material with a moisturized spatula.
General recommendations for sealing the bathroom
Experts recommend adhering to the following rules, performing sealing the junction of a bath with a wall:
- Before work, the font must be filled with water and left for 1-2 hours. Plumbing will shrink that to reduce the cracking of the sealed layer in the future.
- Using a cement mortar, it is impossible to allow it to enter the drain hole. The bottom of the bathtub must first be covered with polyethylene.
- In practice, quite often use the combined method of sealing joints. For example, a cement mortar or mounting foam on top is closed by a decorative border.

To maximize the cracks during the repair, it is necessary to align the walls and the floor. The errors in the slope of the wall leads to a non -inspection of plumbing and structural elements of the room.
Protection against moisture of a wooden floor
The desire to arrange the house with natural materials Actual trend in the field of construction. Particularly bold use wood even when decorating flooring in wet rooms. Having decided on such a step, it is necessary to provide sufficient waterproofing of the coating.
Sealing the wooden floor of the bathroom is carried out by various protective materials:
- Oil. Modern coating materials are advanced based on natural oils and contain synthetic additives: polyurethane or solid wax. The oil penetrates deeply into the structure of wood, filling the microcracks of the material. The composition prevents the swelling or drying out of the tree.
- Wax. It is recommended to use on top of the oil. The waxed floors are moisture-resistant, but to maintain the effect the procedure, the procedure must be repeated every 1.5-2 years.
The seal of joints between wooden lags is performed by a special sealant for wood. The material allows the tree to breathe, and thanks to the elasticity of the composition, the expansion and compression of the coating is compensated.

![]()
StrPort construction portal 2011-2018. Articles about repair, construction, building materials.
Copying information from the site is possible only with permission of the editorial office Or indicating a direct link to the source. Legal justification