It’s scary to recall, but years ago, 25 years ago, not every apartment could meet wallpaper ...
|
|
Everyone who decided to build a sauna on his country site is early or ... |
During the construction, it is necessary to approach carefully to every detail and take into account ... |
How to install door platbands correctly
Door platbands are designed to mask the gap between the doorway and the door frame. They are selected according to the necessary texture and width, and the color is selected exactly the same as that of the door leaf. They are made from different materials and divided into wooden, plastic, laminated, from MDF and veneered. Work on their mounting is the last step in the installation of the door. By the beginning of these works, the rest of the repair, except for the installation of floor skirting boards, should already be completed. This article will talk about how to make and how to correctly install door platbands.
Content:
- Types of door platbands
- How to make door platbands
- How to fix door platbands
- How to install door platbands
- Nuances when installing platbands
Types of door platbands
To date, the construction market is filled with platbands of all kinds of forms: carved and curly, halted and semicircular.

They play the role of the finish decoration of the door. Some sellers, in order to visually reduce the price, indicate the cost of only the canvas and boxes. But having begun to install, it turns out to be unknowingly that there are not enough platbands, and you can only buy them for a fee. Therefore, even when buying a door, it is necessary to check their availability in the configuration. Of course, the price of door platbands is quite affordable, but when buying, another problem can arise. It will not be difficult for a painted or laminated door to choose the necessary shade of platbands, but it will be extremely difficult for wooden or venerable.
The standard width of the door platoon is 7 cm, thickness 1 cm, height 210 cm. For an interior door with one sash, 5 plates of the platband are required, and for a door with two sashes of 6 strips.

If you only need to frame the doorway, then two and a half planks are enough. In addition, manufacturers make door platbands of any size in width, height and thickness.
Tip: When choosing platbands for interior doors, their color should completely coincide with the color of the door leaf. And when choosing a frame for the front metal door, from the inside, the shade is selected according to the color of the walls of the corridor.
Door platbands are made of MDF, plastic, natural wood, aluminum or steel. As a decorative coating, a laminated film, veneer, facing plastic or paint composition is used.
What is a telescopic platband?

Outwardly, it looks like an ordinary door barn, but has a ledge for connecting with reckoning and a door box. Their use is most optimal if the door box is a couple of centimeters already than the thickness of the wall. Thanks to a special protrusion, it is tightly attached in the longitudinal grooves of the door box.

With proper installation, the fasteners become absolutely invisible, which gives the entire structure the type of monolithic, durability and strength. But with an incorrect calculation of the distance, the platband will enter the box loosely and the gap will remain. The design will immediately acquire an ugly and untidy look.
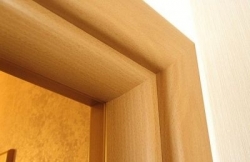
What is a capital?
The capital is a relatively recently appeared door decoration. Although their main function is exclusively door decor, they also relate to the category of door platbands.
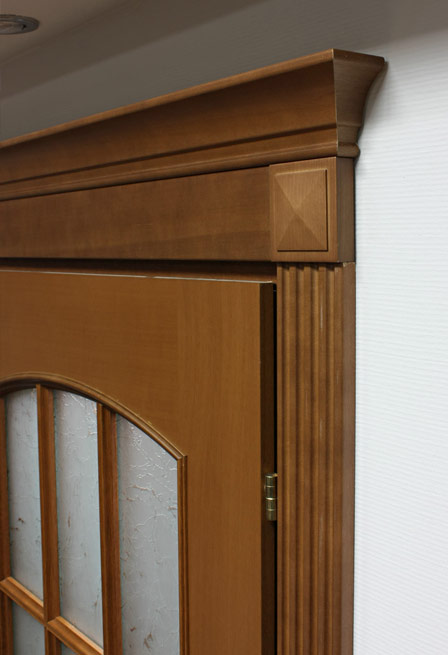
In most cases, they are made from an array of wood or MDF. They are produced by various shapes and decorated with curly glasses. The capital is made both standard and non -standard sizes. After installing them, the door acquires a rich and finished look.
How to make door platbands
Nowadays, a large number of all kinds of door platbands are represented on the construction market. They differ not only in material, but also in size and color scheme. They can also be done with your own hands at home, this will reduce repair costs. But to make high -quality platbands, special woodworking tools and at least a little experience on such equipment will be required.
Below is a list of tools that will facilitate work on the manufacture of platbands. Some of them can be replaced with a shirt, but thereby increasing labor costs.
Necessary tools:
- pylorama for the manufacture of blanks;
- a fugitive machine for creating a right angle;
- flight to achieve the necessary thickness thickness;
- a vertical milling cutter of creating a drawing (it is not necessary if the platband is simple without a pattern);
- electric grinding machine and milling mill;
- auxiliary tools: squares, ruler, pencils.
The choice of material
The board for the platbands is chosen only well -dried, otherwise it will lead it over time. The degree of drying is determined by sound. To do this, they knock on it with a finger, if the sound is deaf means that the board has not yet been dried, and if the sonorous material is ideal for work.
In addition to sound, when choosing a board, you should pay attention to its color.

It should be uniform, and blue spots mean that drying technology was broken. In the future, they can be hidden only by painting with opaque paint.
The surface of the board should not have knots. This not only worsens its appearance, but also increases the risk of a turning point in this place.
Production
Having picked up the material and preparing the necessary tool, you can begin to manufacture door platbands. First, blanks are cut for the necessary sizes, which are calculated individually for each door. It is worth noting here that the qualitative result directly depends on how sharply the cutting knives are on cars and machines.

When the platband is ready, it is polished. This is done in two stages: the first is rough grinding with an electric machine, the second is manual processing using a fine -grained skin. At the second stage, all circular scratches left by an electric machine should be removed. The finished platband is covered with a protective composition.

How to fix door platbands
In total, there are four main ways to attach door platbands: with the help of finish and liquid nails, on screws or on special mounts called beaks.
Fastening for finish nails
This is one of the most popular ways. It has a number of advantages: if necessary, the platbands are easily dismantled and reinstalled, and the fastening process itself is simple and reliable.

For attaching the platbands, nails with a flat narrow hat are selected. It is not difficult to calculate their length, they should enter the door frame to a depth of 1.5-2 cm. The average length of the finished nails for platbands is about 4 cm.
Tip: If you could not buy nails with flat hats, they can be cut with side cutters.
To facilitate the work, points for fastening are in advance on the platbands. They are placed on equal removal from each other along the entire length of the bar. The main thing here is to comply with the desired balance, it is often not recommended to arrange them, but too rarely also bad. Experts advise you to observe a distance of 50 cm.
Liquid Nails
They are a special glue in tubes. The fastening on it is very simple, the glue is simply applied to the platband from the reverse side immediately before the mount. Then the bar is tightly pressed against the wall, it is held so for a few seconds, after which it can be released. Everything, the platband is installed.

The advantage of this method of attachment is not only in the simplicity and speed of work, but also in the fact that there are no traces of fastening on the front side of the platbands. The disadvantage is the complexity of its dismantling and not too much reliability of the mount.
Mounting on screws
Due to its simplicity and reliability, this method is gaining more and more popularity. For wooden platbands, screws for wood with a diameter of 6 mm and a length of 2-2.5 cm are used.

On the platbands, places for screws are marked in advance. Then small holes are drilled, which guarantees a great result in the future and protect the wood from the split during spinning a screw.
Tip: for less visibility, the self -tapping hat, it is receded into wood, having previously drilled a small recess.
Special beak fasteners
Their advantages are good appearance, ease of installation and operation. But there is a significant drawback. Most platbands are made from MDF, and when removing the beak, there is a possibility that it will grow up.

How to install door platbands
To install wooden platbands, you will need:
- knife -haired woman;
- fasteners (finish nails and glue)
- augoter;
- roulette.
Stages of work
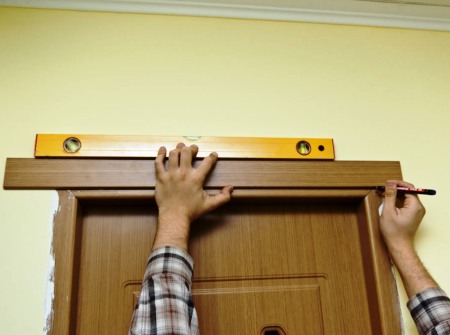
- At first, the platbands are applied in height of the door, and the required length is measured. Then the bar is placed on a flat surface and a right angle is noted using a square. Excess is cut off;

- the platband with the finished angle is applied to the door box, aligned at the edges and down. The height is noted corresponding to the inner hum of the door frame;
- then, starting from the mark made, with the help of an angler, an angle of exactly 45 degrees is measured and marked with a pencil. The excess is cut off and the platband is temporarily deposited to the side;

- repeating the entire sequence, the parallel side is marked;
Tip: the upper platband is prepared in the last turn, only after both side strips are already cut and installed. This will prevent errors during markings and exclude the possibility of the formation of cracks at the junction.
- after both lateral platbands are cut, their installation begins. Cloves are driven into the door frame, after which they, with the help of nippers, are removed, leaving a sharp angle. The length of the clove on the surface for installing the platband is left approximately 5 mm;
- nails are clogged with a distance of about 50 cm. Usually they are located at the top, below and two in the middle;

- for better adhesion of the platband with the box, glue is applied to it. At this stage, the main thing is not to overdo it, and when pressed, the glue should not be squeezed out;

- nitting the bar to the door frame, it is not recommended to beat right on it. For this purpose, a wooden block wrapped in a cloth is prepared;
- by applying the finished platband and leaving it, we plant it on nails with strong blows through the bar;
- when both side platbands are installed, the upper marking begins. Both of his angles of 45 degrees are measured not by an angle, but directly applying it over the side planks and drawing a cut place with a pencil.

Installation of door platbands is completed.
Nuances when installing platbands
The presence of a nail or screw can be made inconspicuous with a wax corrector or acrylic sealant of a suitable color.
To avoid cracks in the joints of the platbands, the corners of the upper bar are measured along the saws of vertical strips, taking into account their errors.
It happens that the platbands in the joints have a discrepancy. This is due to the uneven walls or the curvature of the planks themselves due to improper storage. Fixing this is quite simple, it is enough to connect the bar among themselves with a finish nail.

If minor cracks are detected, they are masked with acrylic sealant or wax corrector of a suitable color.
When there are significant defects around the box, a wide doorbell is suitable for their masking. Its width is 10-12 cm, and with an individual order it can be even larger.
If you wondered how to glue the platband, then you can choose from several options. With perfectly even walls, liquid nails are used. Also, for additional fixation, when installing on nails, acrylic glue or PVA is used, which lubricate the reverse side of the platband. But it should be noted that the really reliable mount is only one on carnations.
As mentioned above, the installation of door platbands is a finish stage of all repair work. The platbands are flush on the end, and it seems visually that on the wall. The most popular way to attach thin carnations with a small hat. In the event that the platbands must be fixed directly on the wall, liquid nails are used, but this method of fastening does not give a long guarantee.
For the interior door, the platband should be 10 cm above the doorway. The standard installation of the platbands is carried out with a back of 45 degrees, but it can also be performed at an angle of 90 degrees - it looks a little unusual.
If the opening in the wall is located on the side or in contact with the next wall, then the platband does not fit completely. It turns out beautifully to cut the width only by the end electric saw. The accuracy for the platband is especially important, because its main role is the decorative decoration and camouflage of all the irregularities of the wall and the end of the door frame.
But there are times when platbands are not needed, for example, a bathroom whose walls are tiled. They will not only look inappropriate there, but it will also be impossible to attach them. The only possible way to fasten is liquid nails, but given the high humidity of the room, they will not last long.
For very wide (thick) walls, door platbands are also not the best option. In this case, the slopes can simply be painted, glued with wallpaper or plastered. Also, in most cases, door platbands are not required when installing doors-wrappers.
![]()
StrPort construction portal 2011-2018. Articles about repair, construction, building materials.
Copying information from the site is possible only with permission of the editorial office Or indicating a direct link to the source. Legal justification
In the company I ordered 2
In the company I ordered 2 interior doors. They do not draw up a contract, they do not give a guarantee. The measurer did not compile, the height and width of the door. The dispatcher quickly wrote invoices on the door and accessories. In the morning they urgently brought. Why were they in a hurry? Although they were waiting for 3 hours the master. He began to set the doors. He began to have only troubles. And I have even more. The master fell ill- I let him go. I come to the apartment the next day. : The loops on the doors are different, there is no latch in
Doors. On Saturday, the master comes. He quickly finishes pens and platbands. In the kitchen, the door itself opens. In the opening on half the door, the gap into the finger. At the second door, the platbands stick out in CE. In general, one answer is uneven walls. Builders are to blame. I called the manager. He said: we will fix it, but it needs money. I convincingly asked, but think about what to do next?. He said, we’ll think with the master and come. The next Friday evening, the master arrived. I brought the door to the door. And on this he finished work. He said that I was no longer obliged to do anything. What should I do ?
call them again ... supposedly
to call them again ... supposedly you want to put the doors .... and take it hostage yet)))) or take off